In diesem Video wird das ScanDoc-Programm im Detail vorgestellt – ein modernes Tool für die Fahrzeugdiagnose. Sie erfahren, wie die Benutzeroberfläche aufgebaut ist, welche Funktionen dem Nutzer zur Verfügung stehen und wie man mit deren Hilfe schneller und effizienter arbeiten kann.
Hierbei handelt es sich um ein Installationspaket für Ihr gewähltes Betriebssystem (z.B. für Windows muss die Datei Setup.exe heruntergeladen und installiert werden).
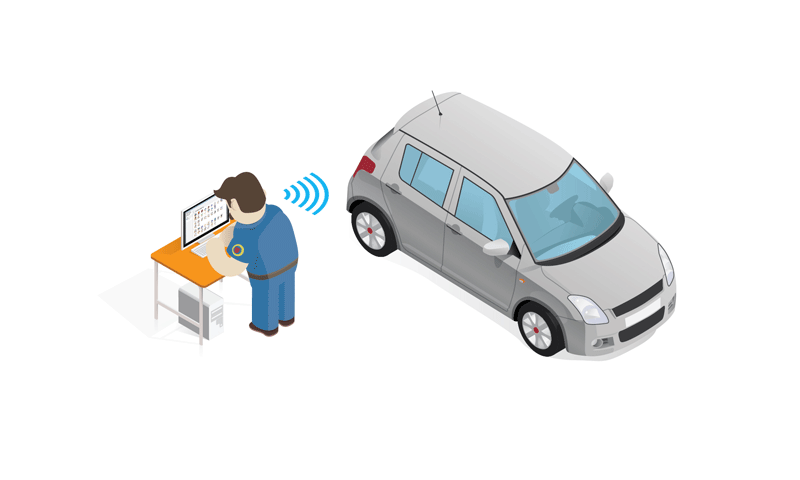
Diese Programmversion arbeitet direkt mit dem Adapter über das WLAN-Netzwerk und benötigt keine ständige Internetverbindung.

Um den ScanDoc-Scanner per WLAN mit einem Computer oder Telefon zu verbinden, muss das WLAN-Passwort des Adapters eingegeben werden.
Das WLAN-Passwort wird werkseitig im Adapter festgelegt.
Wenn Ihr Scanner die Seriennummer s/n: 01230 hat, lautet der WLAN-Name S1230 und das Passwort für die WLAN-Verbindung mit dem Adapter scandoc1230.
Passwort ändern (Netzwerkname/SSID) für die WLAN-Verbindung mit dem Scanner
Installieren Sie die Software entsprechend dem Typ und der Bittiefe Ihres Betriebssystems von der Website des Herstellers: quantexlab.com/de/download.html.
Die ScanDoc App für Android (Mindestversion 6) kann im offiziellen Google Play Store heruntergeladen werden.
Die ScanDoc App für iOS (Mindestversion 10) kann im offiziellen App Store heruntergeladen werden
Starten Sie das neue ScanDoc-Programm auf Ihrem Gerät (Computer, Laptop, Tablet, Telefon) über das Desktop-Symbol. (Das Betriebssystem könnte nach Internetzugriffsrechten fragen - erlauben Sie den Zugriff.)
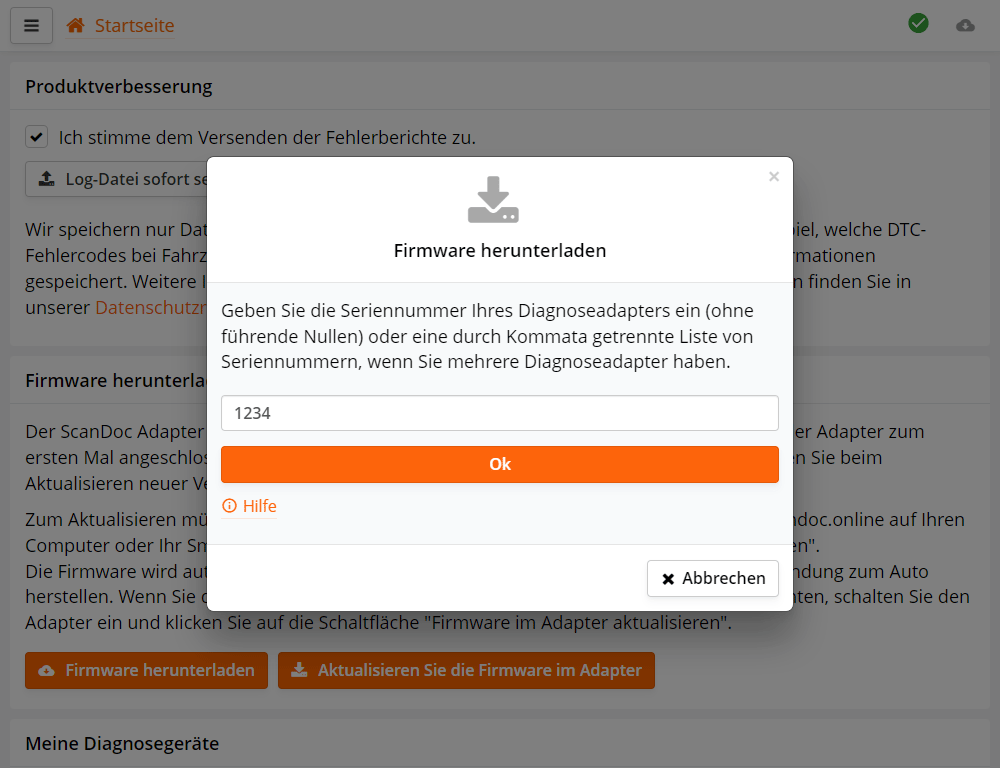
Beim ersten Start des Programms erscheint ein Formular zur Eingabe der Seriennummern. Geben Sie die Seriennummer Ihres Scanners ein.
Wenn Ihr Scanner die Seriennummer s/n: 01230 hat, geben Sie 1230 ein.
Falls Sie mehrere Scanner besitzen, geben Sie die Seriennummern durch Kommas getrennt ein, z.B.: 25478, 1234.
Anschließend lädt das Programm automatisch die erforderlichen Firmware-Dateien aus dem Internet für Ihren Scanner herunter.
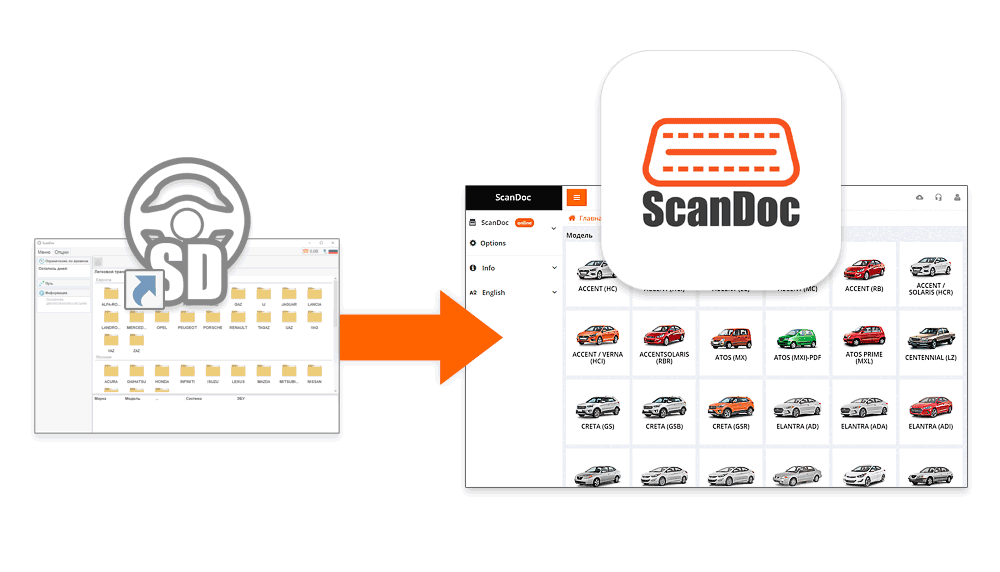
Dies ist nur erforderlich, wenn Sie einen neuen Scanner gekauft haben oder mit der alten Software gearbeitet haben und jetzt auf die neue Version wechseln.
Wenn Sie bereits mit der neuen Software gearbeitet haben, können Sie diesen Schritt
überspringen.


Sollte das Adapter-Update aus irgendeinem Grund nicht durchgeführt werden, können Sie den Bootloader-Modus verlassen, indem Sie das Gerät aus- und wieder einschalten.

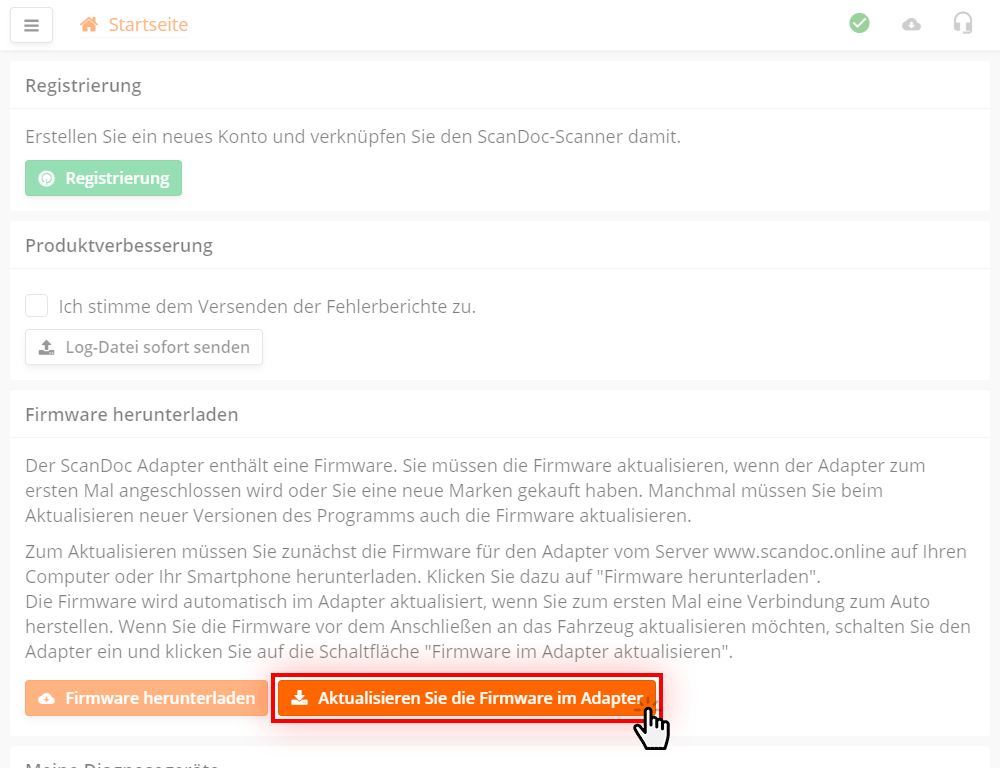
Klicken Sie im Programm auf die Schaltfläche Aktualisieren Sie die Firmware im Adapter
Die Software wird auf den Scanner übertragen. Das Gerät ist nun betriebsbereit.
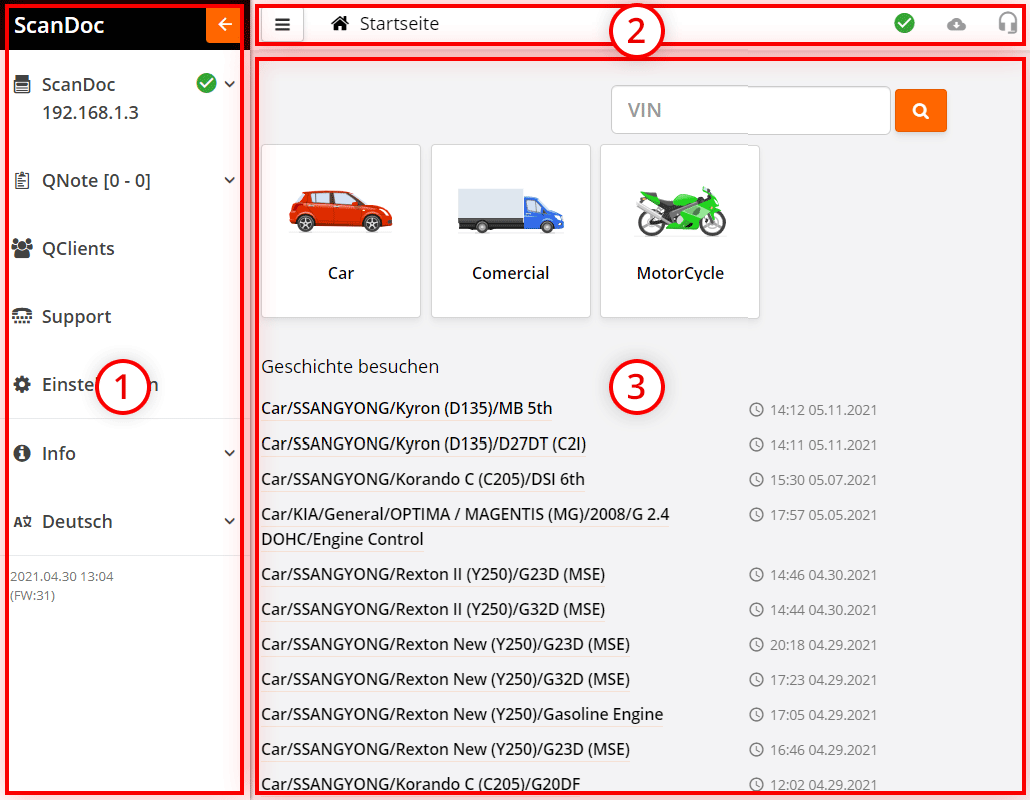
Das Programmfenster ist in 3 Arbeitsbereiche unterteilt.
| Schaltfläche zum Öffnen des Seitenmenüs. | |
| Navigationspfad
Beispiel:
Main / Car / SSANGYONG / Actyon sport II (Q150) |
|
| Verbindungsqualitätsanzeige zwischen Programm und Scanner:
- Stabile Verbindung
- Instabile Verbindung - Keine Verbindung zum Scanner |
|
| Link zur Downloadseite für neue Programmversionen. | |
| Supportanfrage erstellen. |
Während der Arbeit mit dem Programm können Sie die Zoomstufe über die Browserfunktionen anpassen.
Für Windows-Betriebssysteme verwenden Sie folgende Tastenkombinationen:
Für macOS-Betriebssysteme verwenden Sie folgende Tastenkombinationen:
Starten Sie das auf Ihrem Computer oder Mobilgerät installierte Programm.
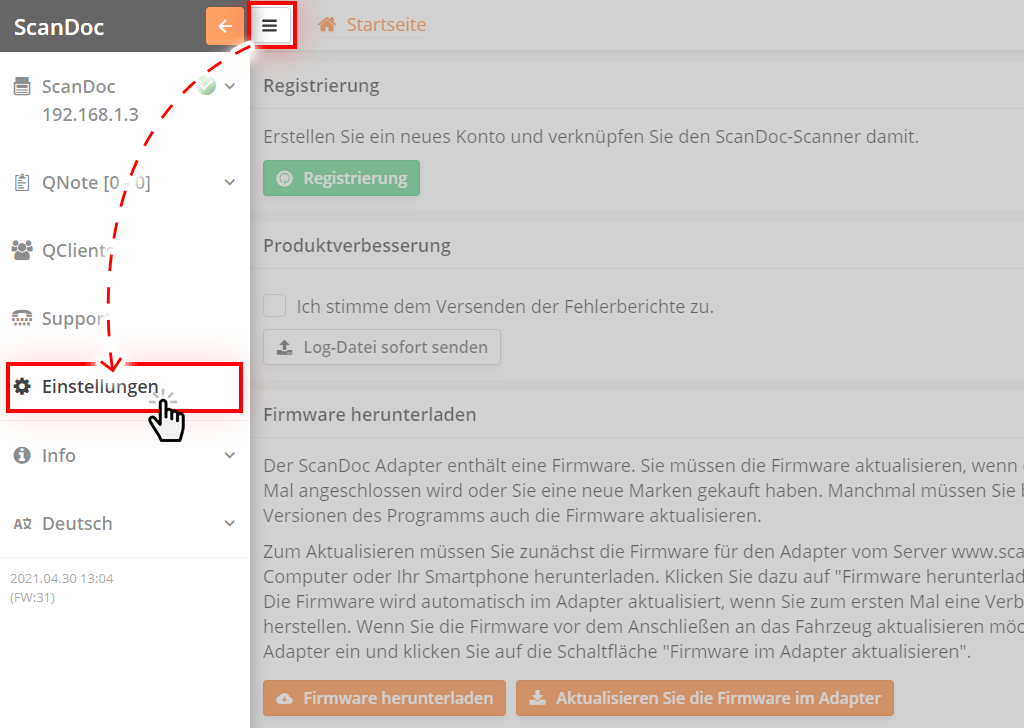
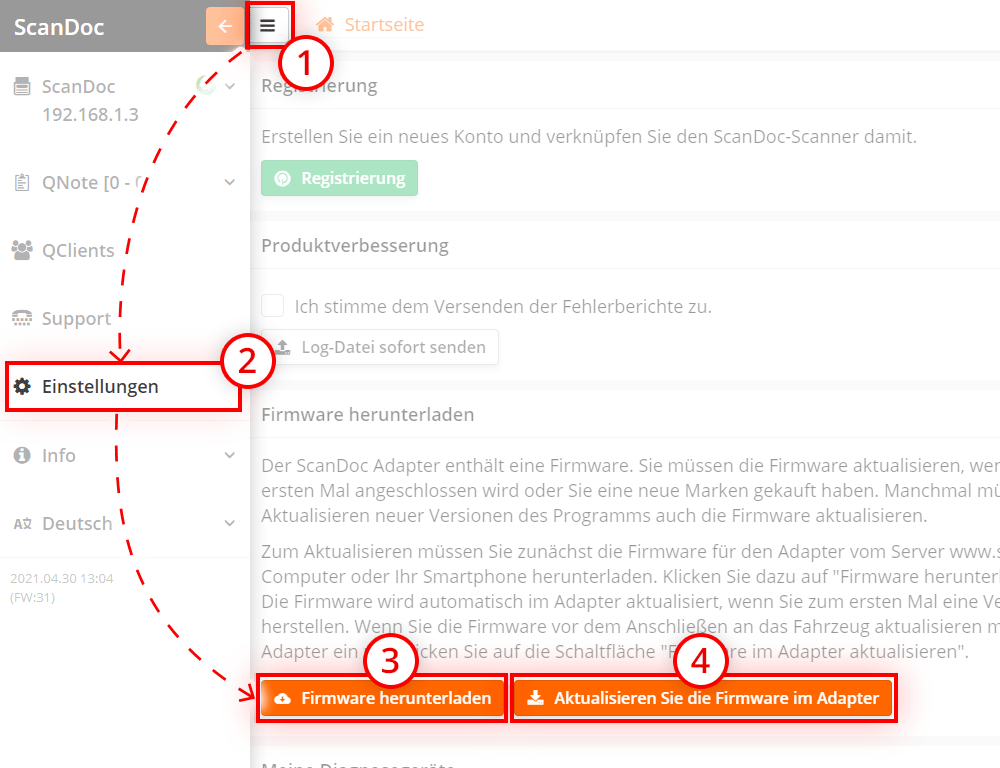
Klicken Sie auf die Schaltfläche oben im Fenster, um das seitliche Menü zu öffnen.
Klicken Sie auf "Einstellungen" im seitlichen Menü, um zum Einstellungsfenster zu gelangen.
Lassen Sie uns die Optionen in diesem Fenster betrachten.
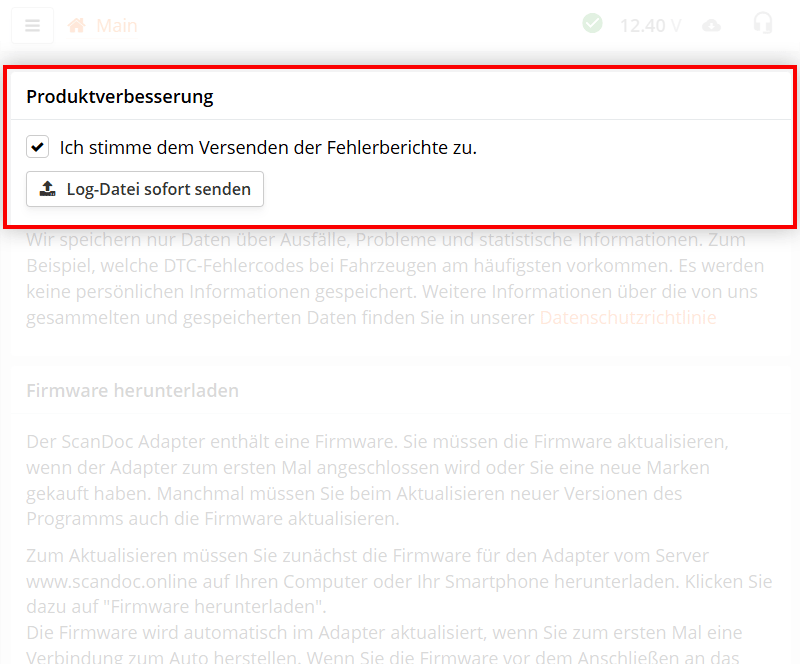
Wenn die Option "Ich stimme dem Versenden der Fehlerberichte zu." aktiviert ist, sendet das Programm automatisch Berichte über interne Fehler.
Wenn Sie die automatische Übermittlung von Fehlerberichten deaktiviert haben, können Sie die gesammelten Informationen manuell über die Schaltfläche Log-Datei sofort senden übermitteln (Internetverbindung erforderlich).
Wir speichern nur Daten über Abstürze und Probleme sowie statistische Informationen. Zum Beispiel, welche Fehlercodes bei welchen Fahrzeugen am häufigsten auftreten. Es werden keine persönlichen Daten gespeichert.
Weitere Informationen zum Support finden Sie auf der Seite Support kontaktieren
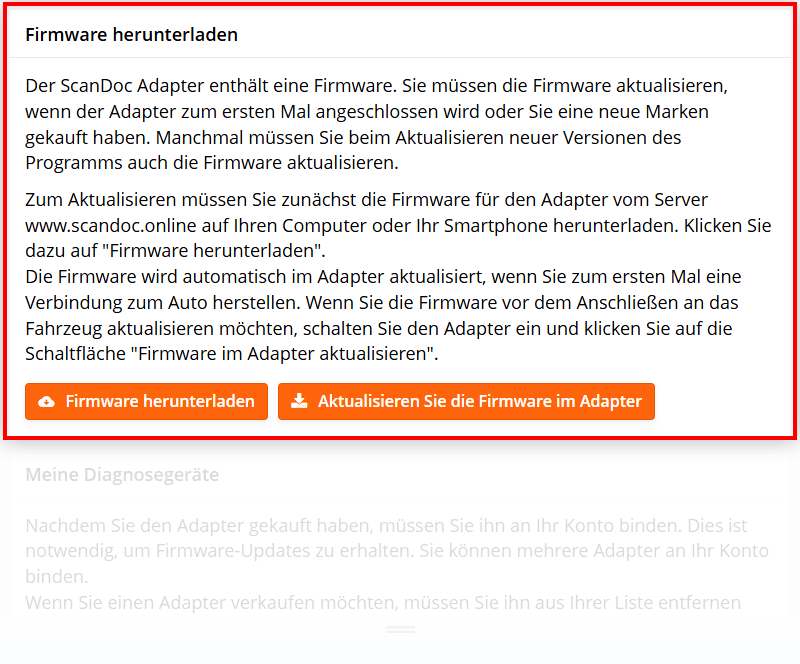
Die Schaltfläche Firmware herunterladen lädt die Firmware für Ihren Scanner vom Server herunter (Internetverbindung erforderlich).
Die Schaltfläche Aktualisieren Sie die Firmware im Adapter überträgt die Firmware auf den Adapter (Verbindung zum WLAN-Netzwerk des Scanners erforderlich).

Nach erfolgreichem Herunterladen der Firmware sehen Sie hier:
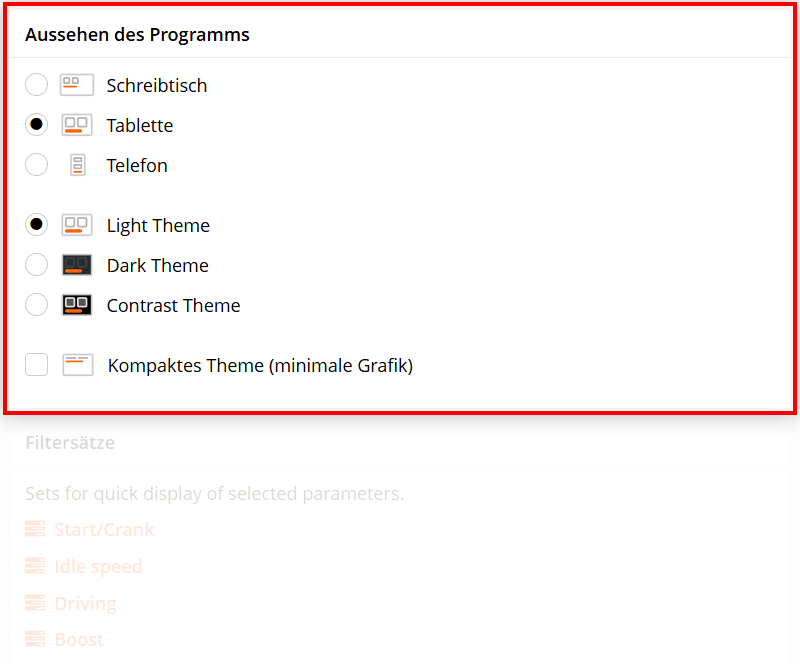
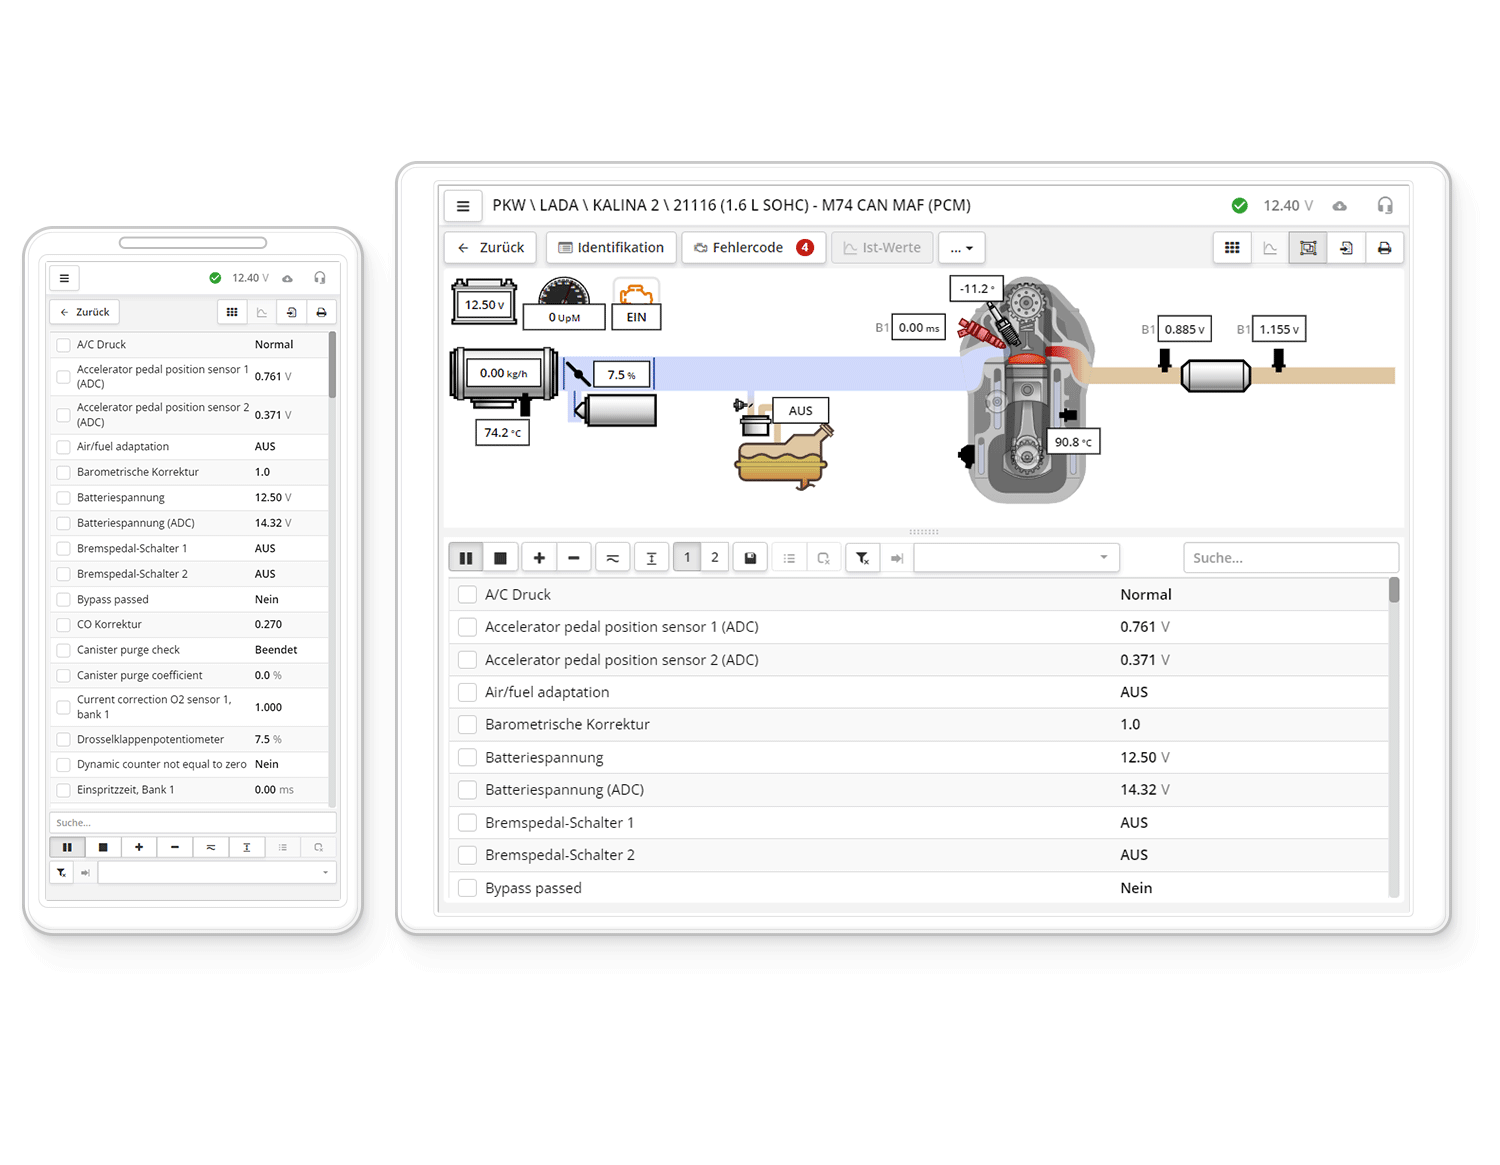
Sie können zwischen verschiedenen Darstellungsoptionen der Oberfläche wählen
| Schreibtisch | - für die Arbeit am Computer optimiert, kleinere Bedienelemente, mehr Informationen auf dem Bildschirm |
| Tablette | - vergrößerte Bedienelemente für die Bedienung mit den Fingern, weniger Informationen auf dem Bildschirm |
| Telefon | - für die Nutzung auf Smartphones optimiert |
| Light Theme | - Standardoberfläche mit hellem Hintergrund |
| Dark Theme | - dunkle Oberfläche verbraucht weniger Akku |
| Contrast Theme | - dunkle Oberfläche mit kontrastreichen Bedienelementen |
| Kompaktes Theme | - schlanke Oberfläche mit minimaler Grafik (Fahrzeugbilder werden nicht angezeigt) |

Dieser Abschnitt enthält:
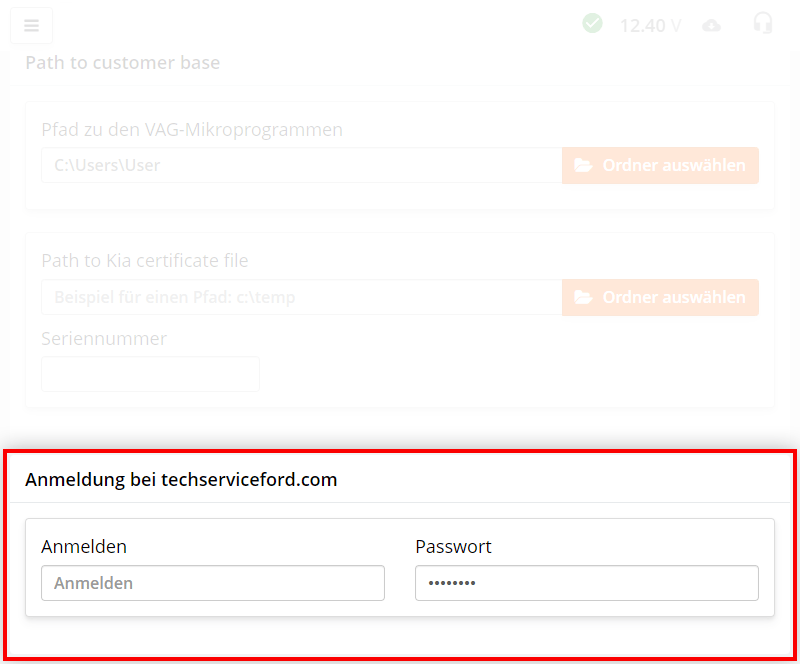
Hier können Sie Ihre Anmeldedaten für den Service zur Erhaltung von In-Codes eingeben. In-Codes werden benötigt für die Schlüsselprogrammierung bei Ford, Mazda und Lincoln Fahrzeugen.
techserviceford.com ist eine externe Website und die Firma Quantex GmbH übernimmt keine Verantwortung für deren Funktionsweise.
Module werden an die Seriennummer des Adapters gebunden und können nicht auf einen anderen Scanner übertragen werden.
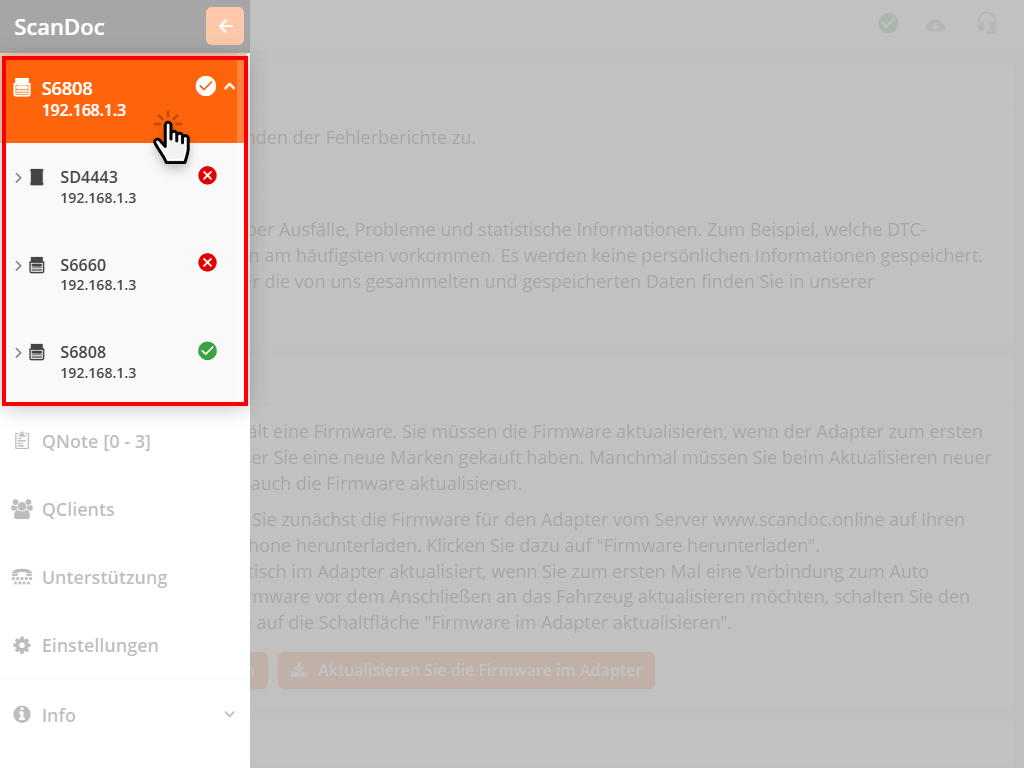
Nach dem Kauf eines zusätzlichen Moduls beim Händler muss die Firmware im Adapter aktualisiert werden. Wenn Ihrem Konto mehrere Scanner zugeordnet sind, wird die Firmware für alle Ihre Adapter heruntergeladen, unabhängig davon, ob die neuen Module auf allen Scannern freigeschaltet sind.
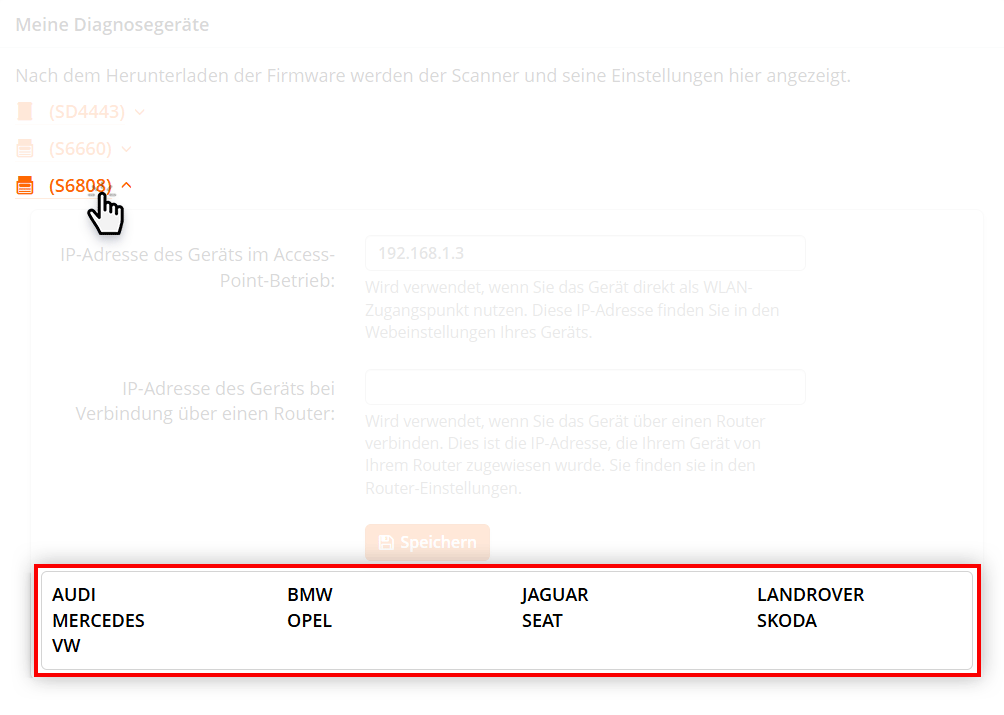
Um die Liste der für Ihren Scanner freigeschalteten Module anzuzeigen, klicken Sie im Bereich Meine Diagnosegeräte auf den Link mit der Seriennummer des Adapters.
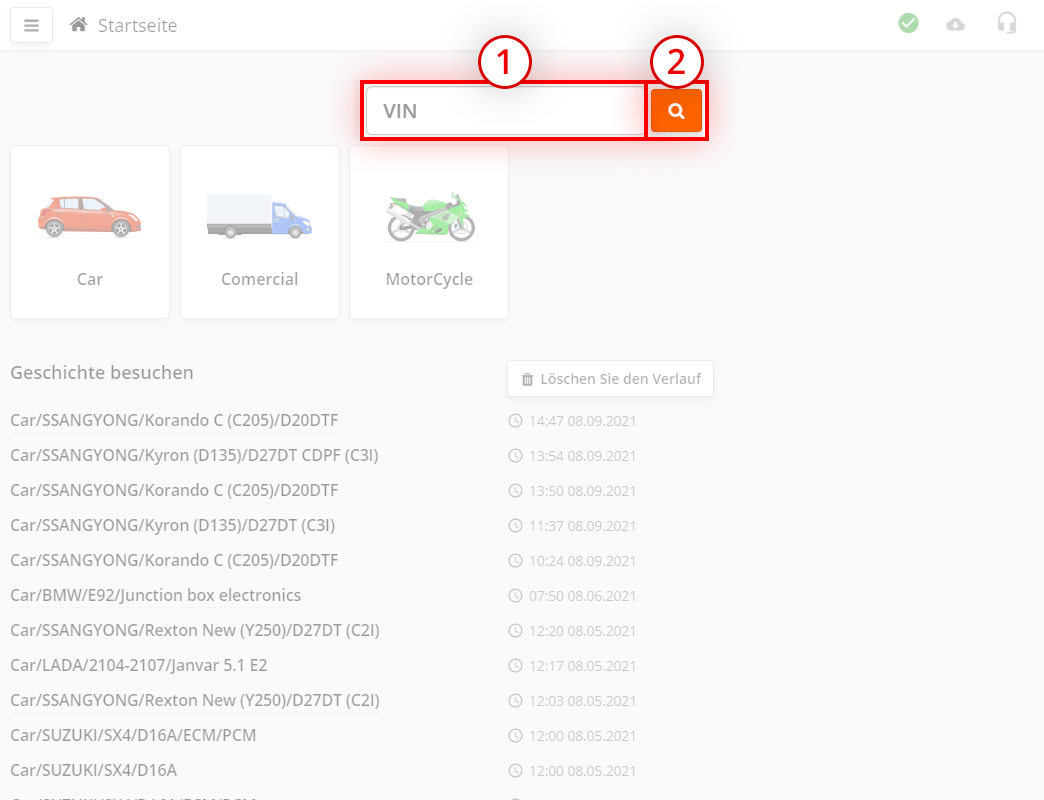
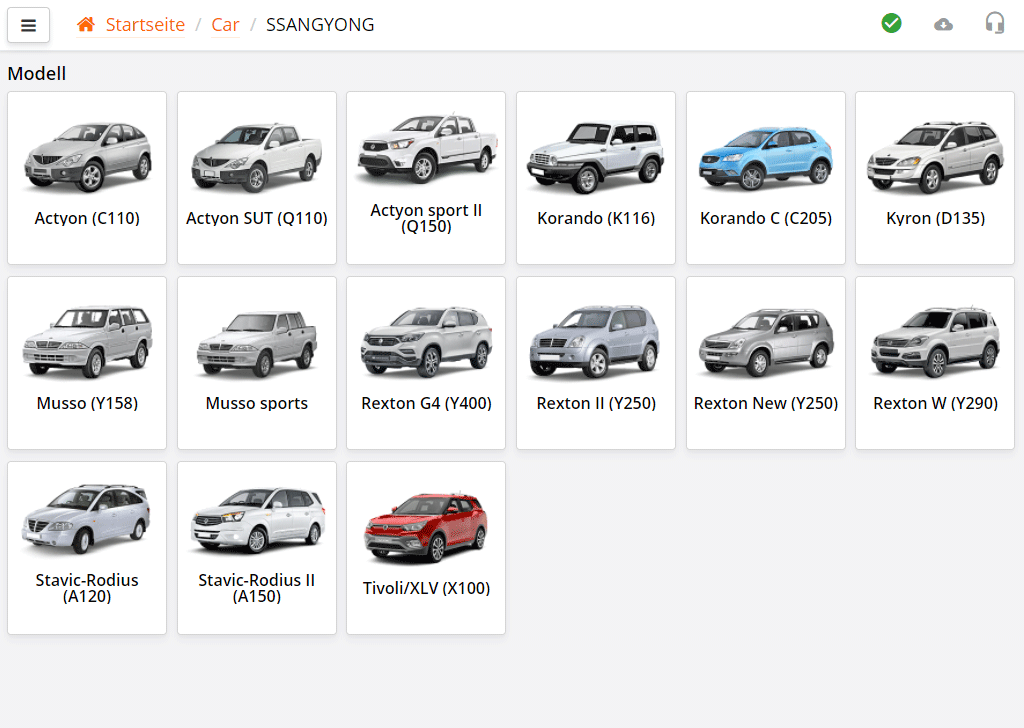
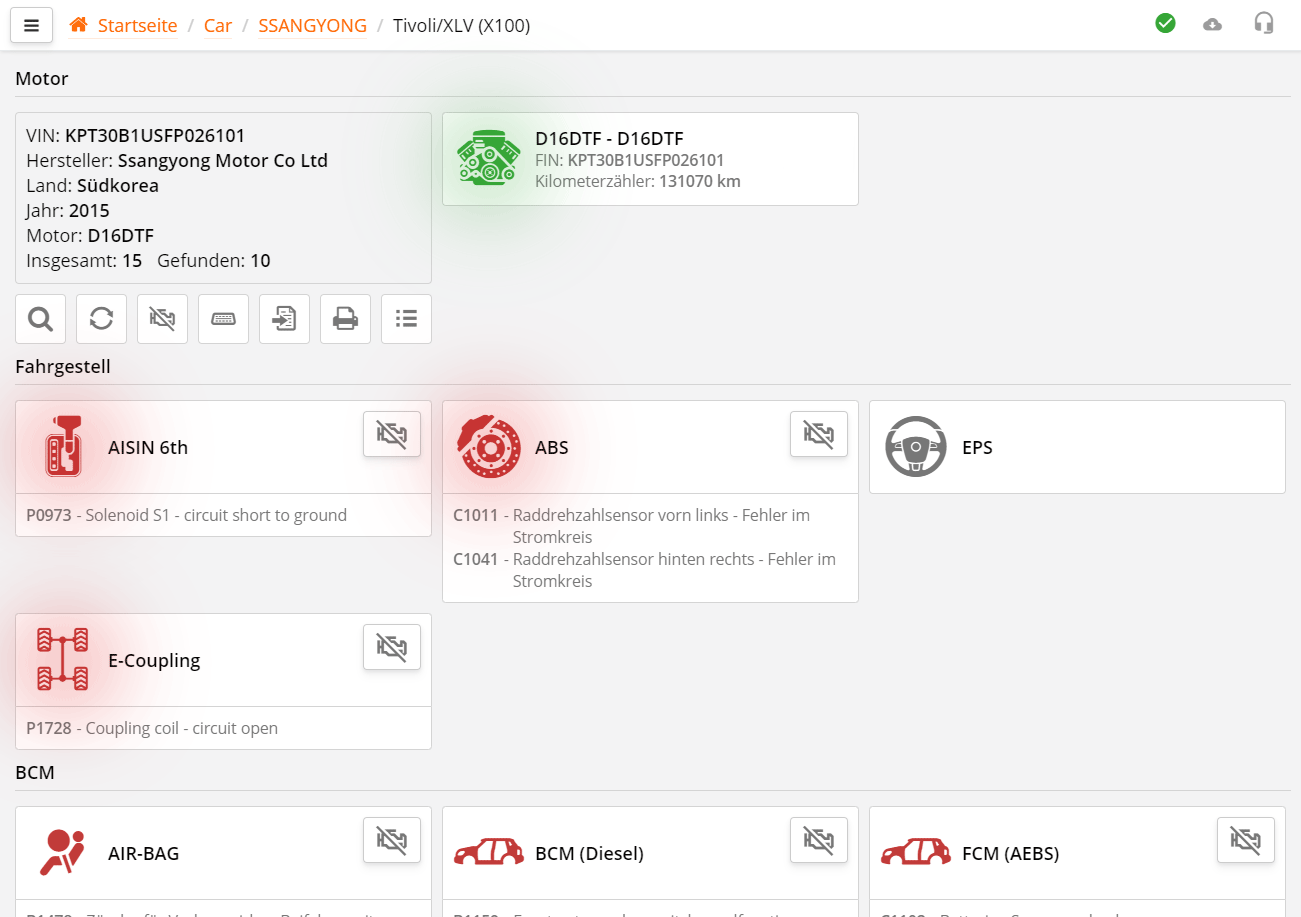
Alternativ können Sie das Steuergerät manuell auswählen. Klicken Sie mit der linken Maustaste auf die entsprechende Kachel, Marke, Modell oder das Fahrzeugsteuergerät.
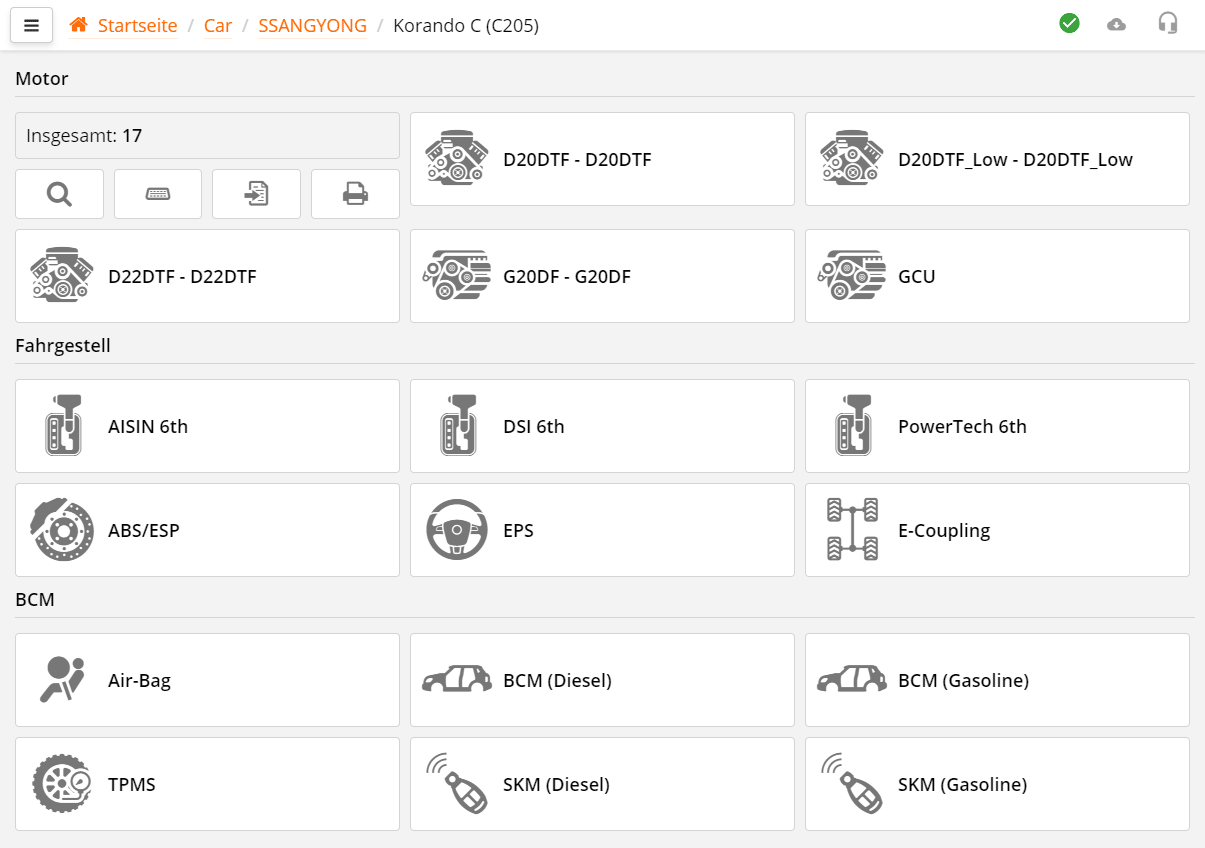
Das Systemauswahlfenster ist zur besseren Übersicht in Gruppen unterteilt: Motor, Fahrwerk, Karosserie und Multimedia.
Dies ermöglicht ein schnelleres Auffinden des gewünschten Steuergeräts.

Hier können Sie auch das Fahrzeugdatenblatt einsehen.
Es enthält Informationen zum Fahrzeug und die maximale Anzahl möglicher Steuergeräte (ECUs).
Wenn Sie über die VIN-Eingabe auf der Hauptseite hierher gelangt sind, werden im Datenblatt zusätzliche Informationen angezeigt.
Schaltflächen für Fahrzeugfunktionen, die sich auf das gesamte Fahrzeug beziehen, nicht auf einzelne Steuergeräte.
Betrachten wir die Funktionen im Detail.
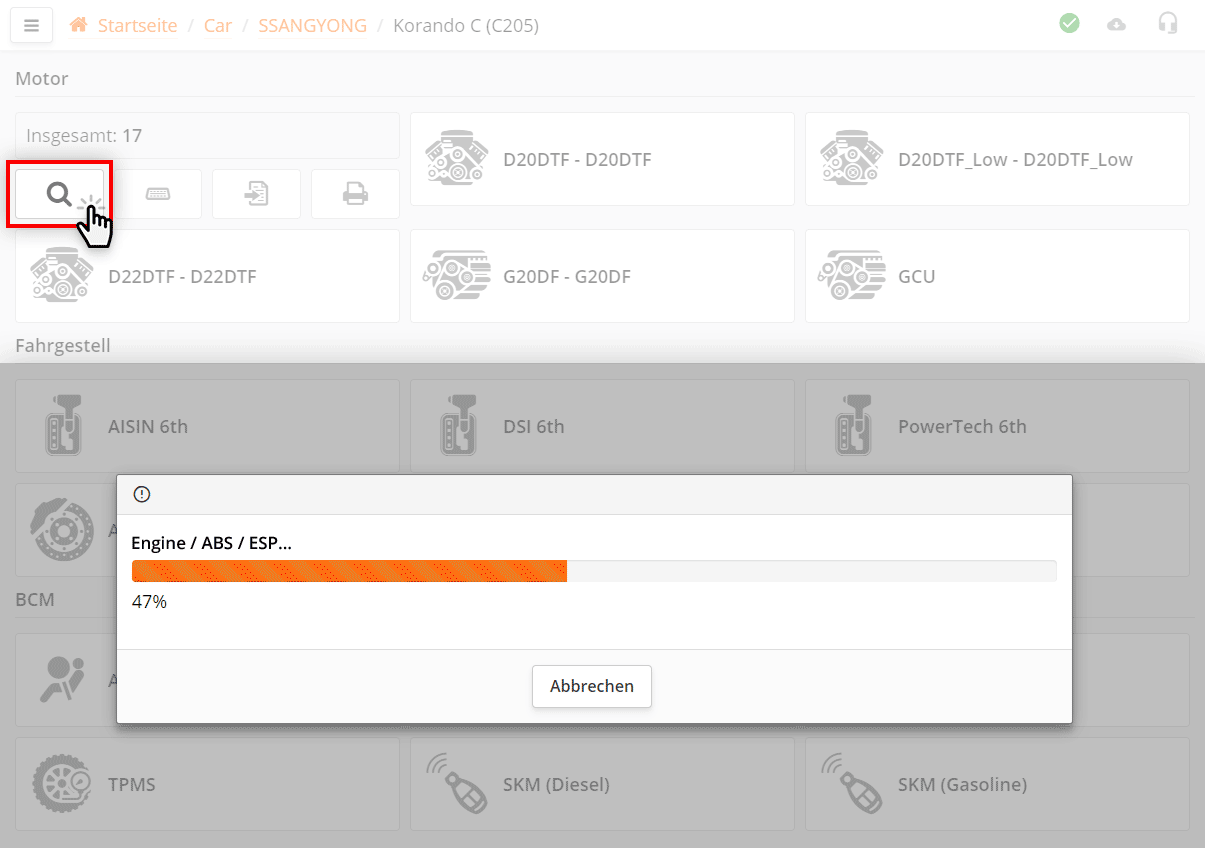
Bei der automatischen Suche versucht das Programm, eine Verbindung zu allen möglichen ECUs des Fahrzeugs herzustellen. Wenn ein Steuergerät vorhanden ist, liest das Programm dessen Identifikation, Fehlercodes (DTCs) und Statusinformationen aus.
Während der automatischen Suche kann das Programm zusätzliche Fahrzeuginformationen abfragen, z.B. welcher Klimaanlagentyp verbaut ist.
Je mehr potenzielle Steuergeräte im Fahrzeug vorhanden sind und je langsamer die Kommunikationsprotokolle sind, desto länger dauert die automatische Suche.
Steuergeräte, mit denen keine Verbindung hergestellt werden konnte, werden ausgeblendet.
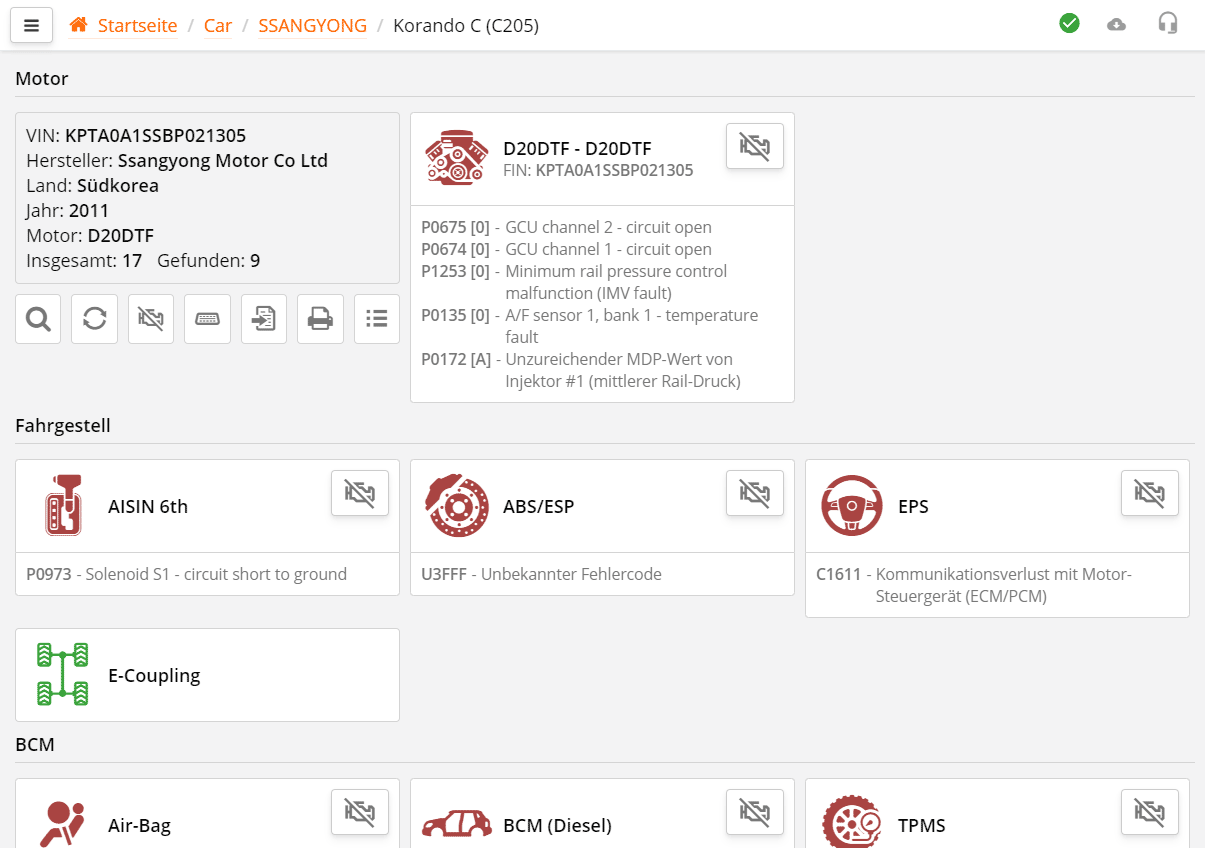
Es wird eine Liste der gefundenen Steuergeräte für Ihr Fahrzeug mit grundlegenden Analyseinformationen angezeigt.
Wenn die VIN-Nummer während der automatischen Suche erkannt wurde oder die Suche über die VIN erfolgte, speichert das Programm die Liste der gefundenen Steuergeräte automatisch. Bei der nächsten Suche mit derselben VIN zeigt das Programm dann nicht die maximale ECU-Liste, sondern das gespeicherte Suchergebnis an.
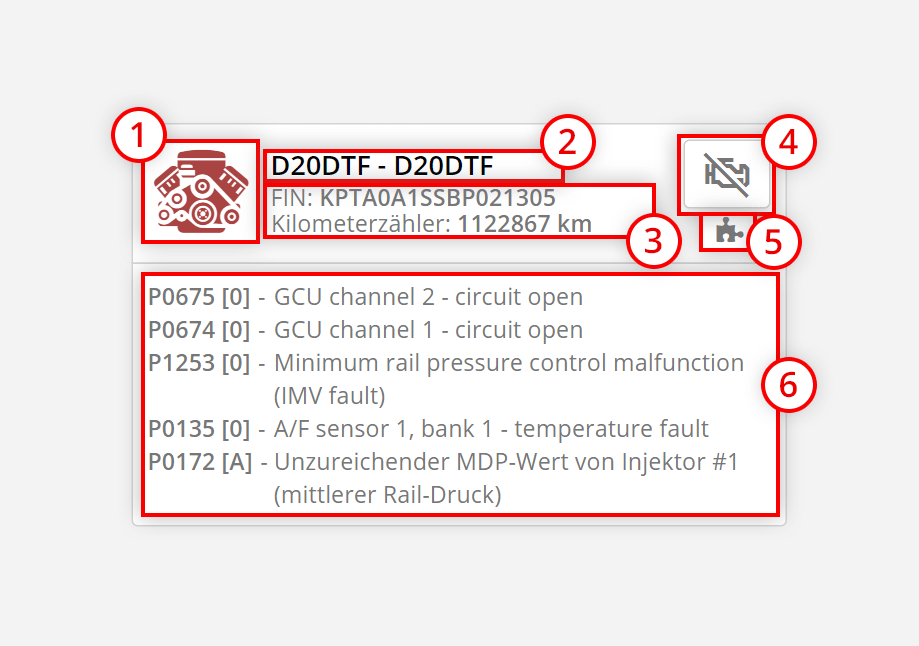
Die Steuergeräte werden grafisch als Kacheln dargestellt, die folgende Elemente enthalten:
Das Icon des Steuergeräts kann verschiedene Farben haben, abhängig vom Prüfergebnis:
Dies dient dazu, die Aufmerksamkeit auf problematische Steuergeräte zu lenken.
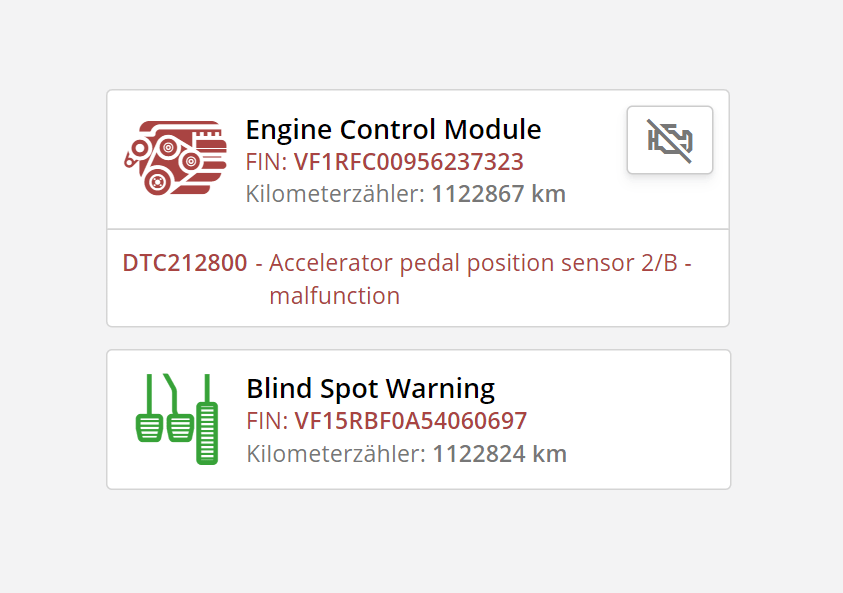
Bei der automatischen Suche vergleicht das Programm die VIN-Nummern aus den Steuergeräten. Bei Abweichungen wird die VIN-Nummer rot markiert.
Kilometerstände werden nicht verglichen, da sie in verschiedenen Steuergeräten leicht abweichen können.
DTC-Fehlercodes mit dem Status "aktiv" oder "aktuell" werden rot hervorgehoben, andere erscheinen grau.
Die Funktion " Aktualisierung" unterscheidet sich von der automatischen Suche dadurch, dass sie nicht versucht, alle möglichen Steuergeräte zu kontaktieren, sondern die zuvor durch die automatische Suche erstellte Liste verwendet.
Dies spart Zeit, wenn sicher ist, dass sich die Anzahl der Steuergeräte im Fahrzeug seit dem letzten Zugriff nicht geändert hat.
Beispiel: Beim ersten Anschluss an das Fahrzeug wurde eine automatische Suche durchgeführt, DTC-Fehlercodes angezeigt und die Diagnose am relevanten Steuergerät durchgeführt. Nach der Reparatur muss das Fahrzeug erneut diagnostiziert werden. Eine erneute Suche aller möglichen Steuergeräte ist unnötig.
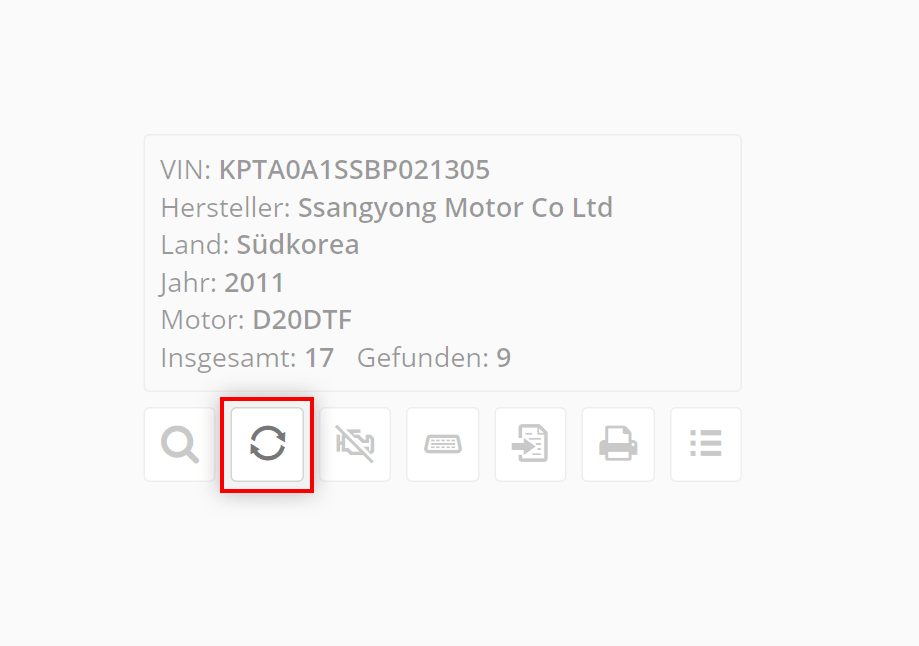
Für eine schnelle Aktualisierung der Steuergeräteinformationen klicken Sie auf
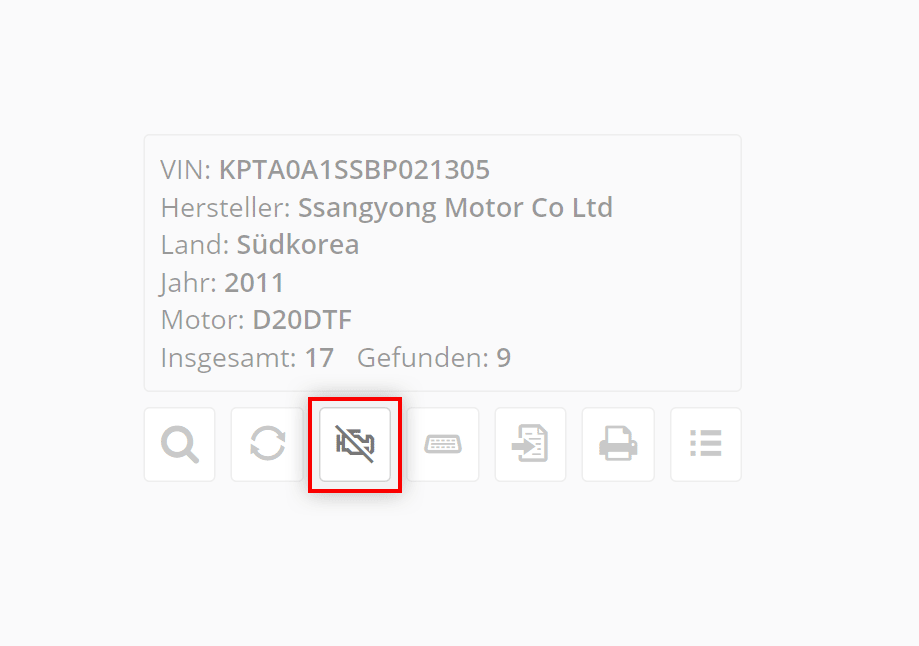
Die Schaltfläche löscht DTC-Fehlercodes in allen gefundenen Steuergeräten.
Wird typischerweise verwendet, um schnell alle Fehlercodes im Fahrzeug zu löschen, ohne jedes Steuergerät einzeln aufrufen zu müssen.
Klicken Sie darauf und aktualisieren Sie dann die Steuergeräte mit zur Kontrolle.
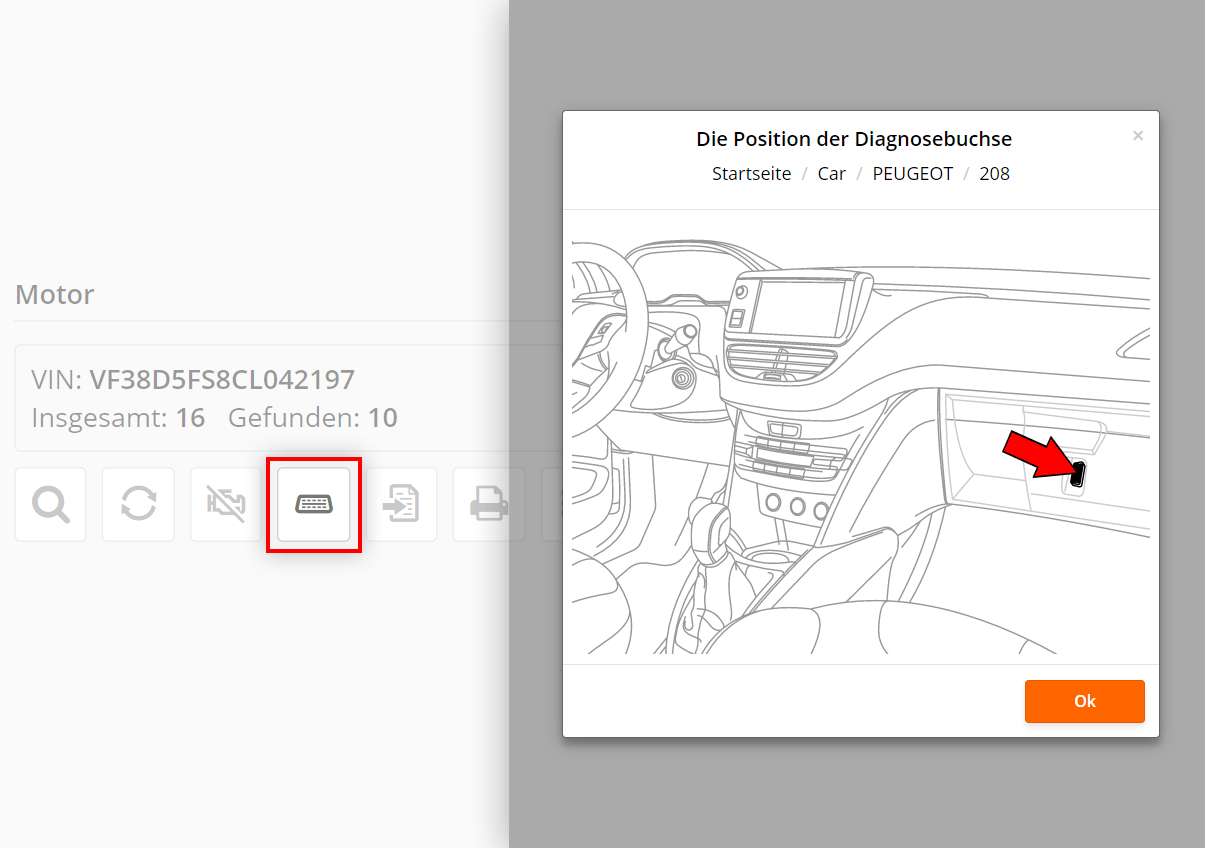
Die Schaltfläche zeigt die Position des OBD-Diagnosesteckers im ausgewählten Fahrzeugmodell.
Manchmal befindet sich der Stecker an unerwarteten Stellen, z.B. im Handschuhfach.
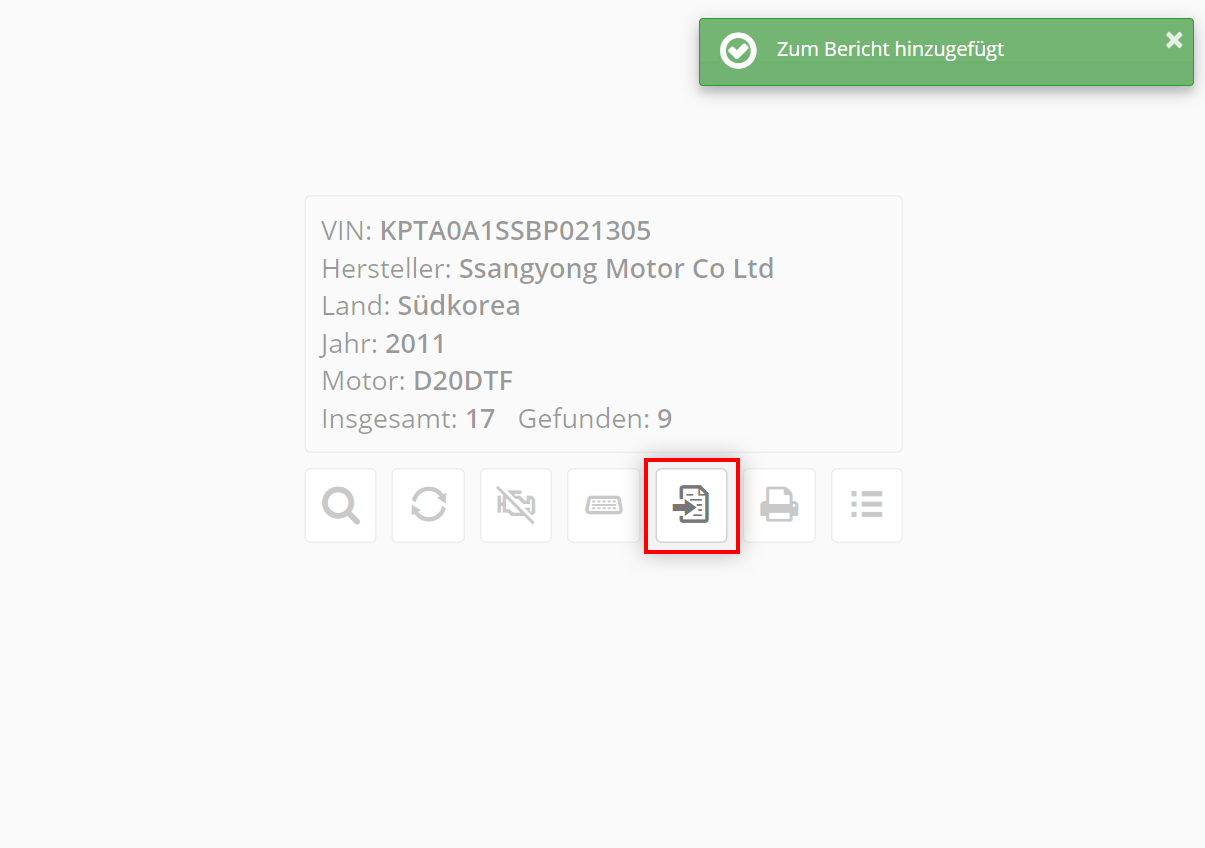
Mit der Schaltfläche können Sie die automatischen Suchdaten im Kundenverwaltungsprogramm QClients speichern, zur späteren Analyse, Archivierung oder Ausdruck.
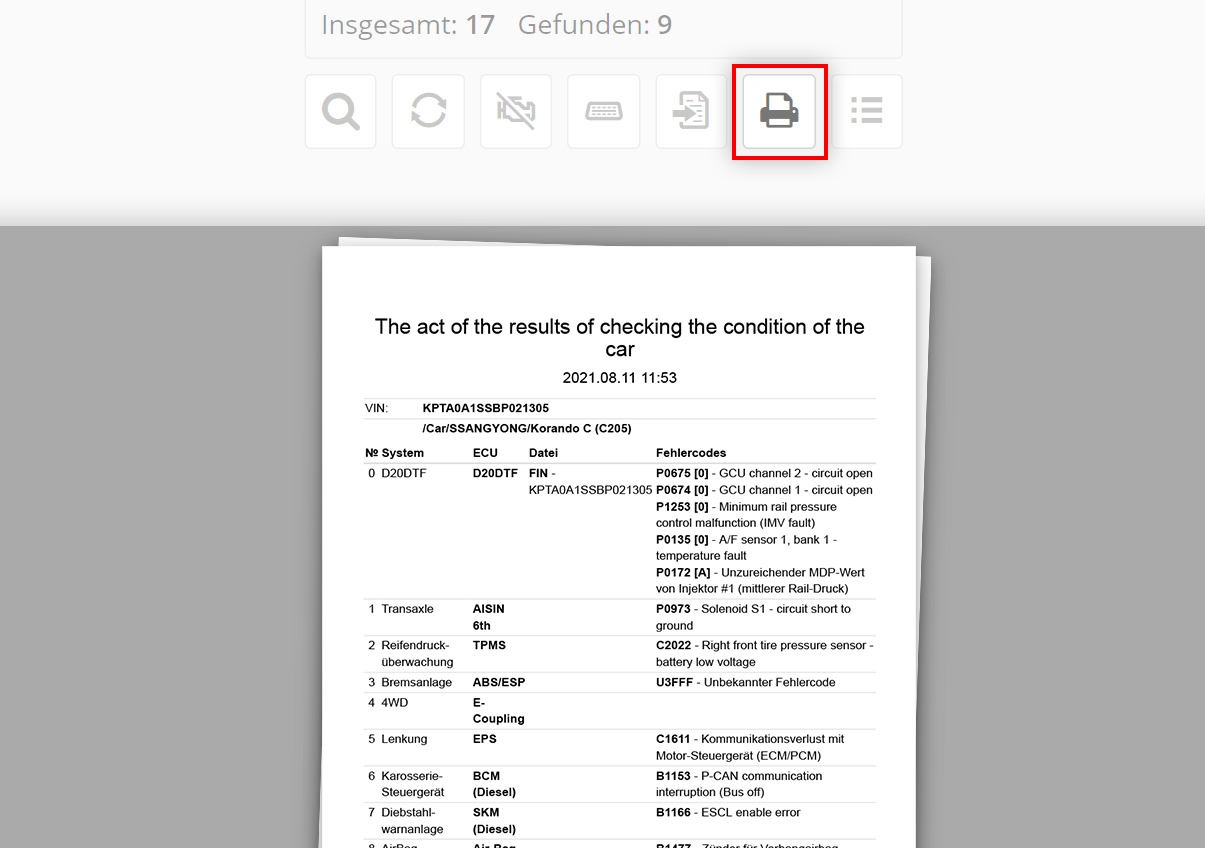
Die Schaltfläche druckt die aktuellen Ergebnisse der automatischen Suche aus.
Der Schnelldruck ist praktisch, wenn Sie schnell eine Liste der Steuergeräte mit DTC-Fehlercodes benötigen, ohne die Suchergebnisse speichern zu müssen.

Durch Klick auf zeigt das Programm alle verfügbaren Utilities für das Fahrzeug an.
Klicken Sie auf den Utility-Namen, um ihn auszuführen.
Dies beschleunigt die Arbeit, da Sie nicht suchen müssen, in welchem Steuergerät sich der gewünschte Utility befindet. Beispielsweise kann die Lenkwinkelsensor-Kalibrierung im Lenkhilfe-Steuergerät oder im ABS-Steuergerät liegen.
Hier sehen Sie die tatsächlich im Fahrzeug vorhandenen Utilities, nicht alle möglichen. Diese Liste wird ebenfalls unter der VIN-Nummer des Fahrzeugs gespeichert. Gleiche Fahrzeugmodelle mit identischen Motoren können unterschiedliche Ausstattungen haben, und die Software in den Steuergeräten kann unterschiedliche Utilities unterstützen.
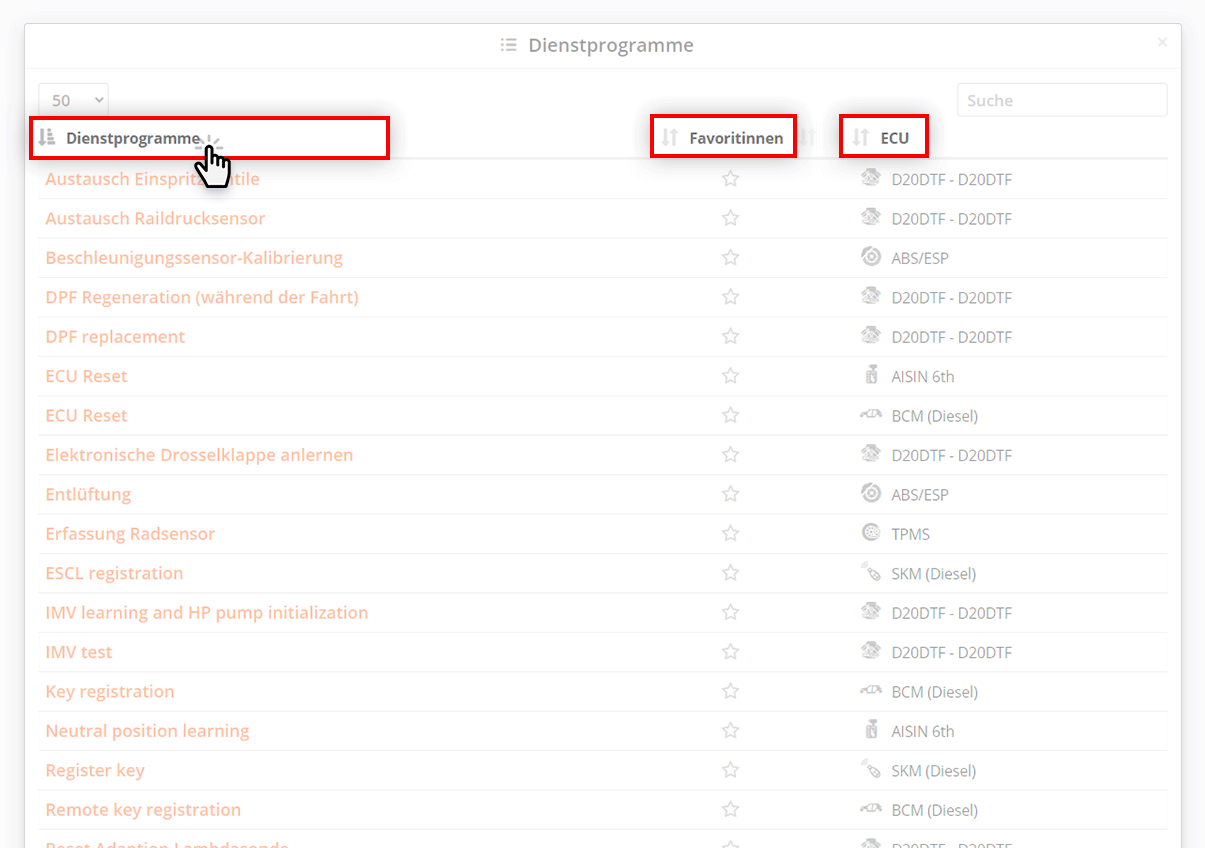
Die Utility-Liste kann nach Name, Favoriten oder dem zugehörigen System sortiert werden. Klicken Sie zur Sortierung auf die Spaltenüberschrift.
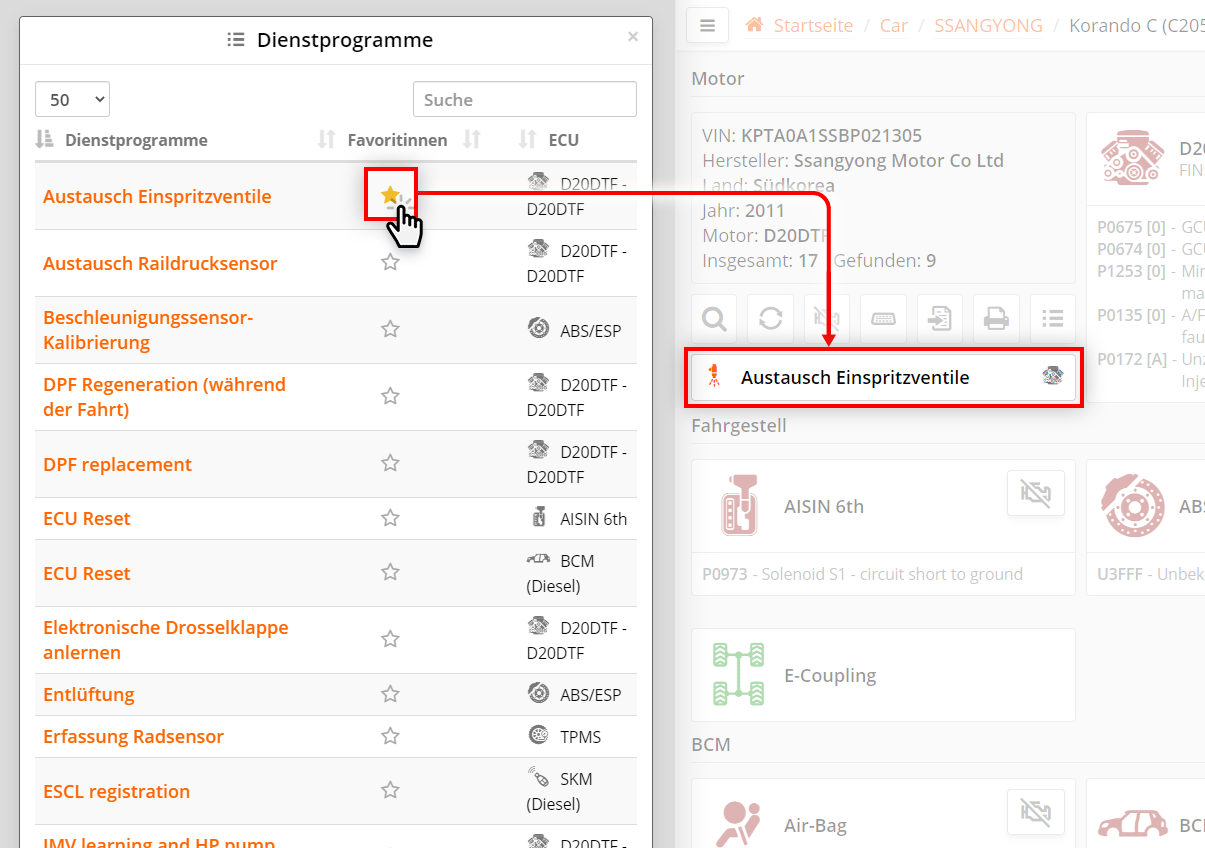
Durch Klick auf das Sternsymbol wird ein Utility zu den Favoriten hinzugefügt. Es erscheint dann auf der automatischen Suchseite unter der Fahrzeugkarte und kann direkt von dort gestartet werden.
Wird in einem anderen Fahrzeug ein gleichnamiges Utility gefunden, wird es automatisch auf der Suchseite angezeigt.
Erneutes Klicken auf das Sternsymbol entfernt das Utility aus den Favoriten und von der Suchseite.
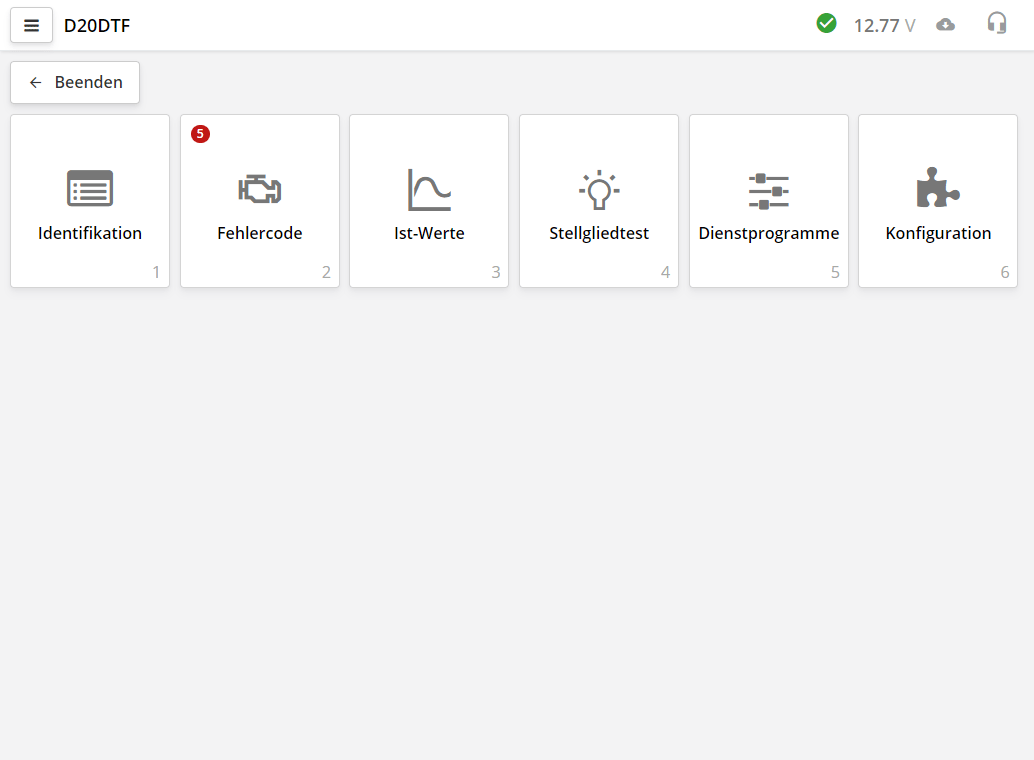
Nach erfolgreicher Verbindung mit dem Steuergerät (ECU) zeigt das Programm die Registerkarten des Diagnosemoduls an.
Unterschiedliche Steuergeräte können unterschiedlich viele Registerkarten haben.
Auf der Registerkarte für DTC-Fehlercodes wird sofort die Anzahl der Fehler angezeigt.
Abhängig vom ECU-Typ oder Diagnoseprotokoll kann die Initialisierung zwischen 0,5 und 15 Sekunden dauern. Manche Steuergeräte benötigen mehr Zeit. Dies kann sowohl an den Besonderheiten des Diagnoseprotokolls als auch am Auslesen der Fahrzeugkonfiguration durch den Scanner liegen.
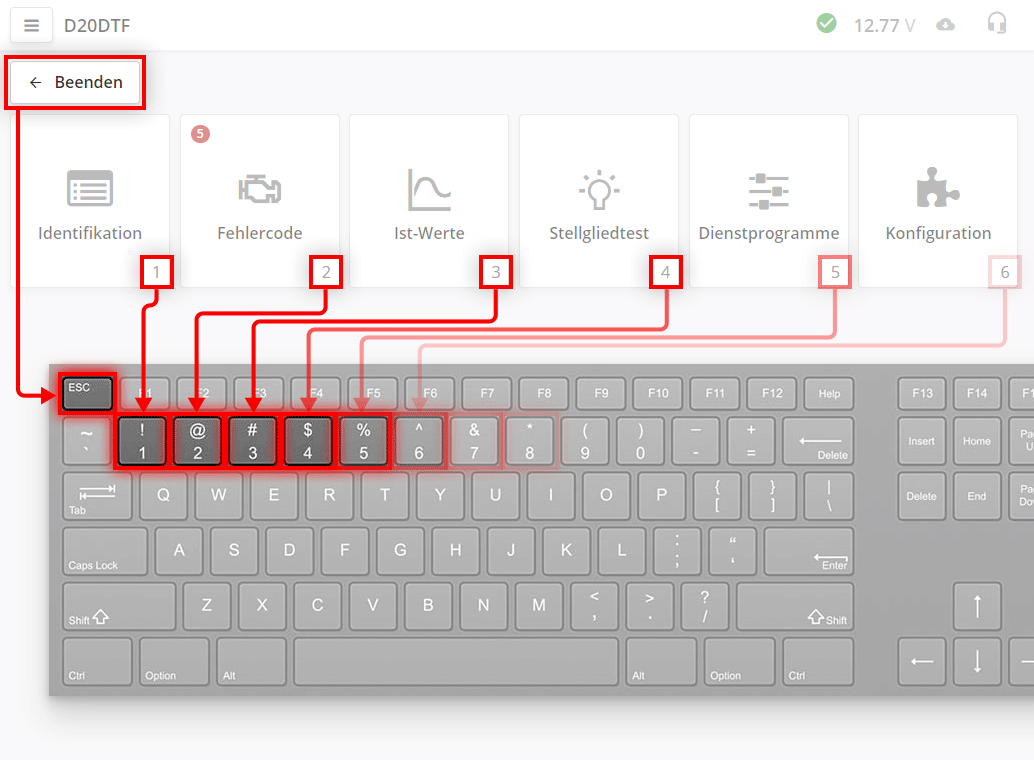
Für schnellen Zugriff auf die Registerkarten stehen Tastenkürzel zur Verfügung.
Die Esc-Taste entspricht der Schaltfläche Beenden im
Programm.
Zifferntasten entsprechen den Registerkartennummern. Die Ziffernhinweise unten in den Registerkarten zeigen die jeweiligen Tastenkürzel.
Zum Beispiel: Drücken Sie 2 für den direkten Zugriff auf "DTC-Fehlercodes".
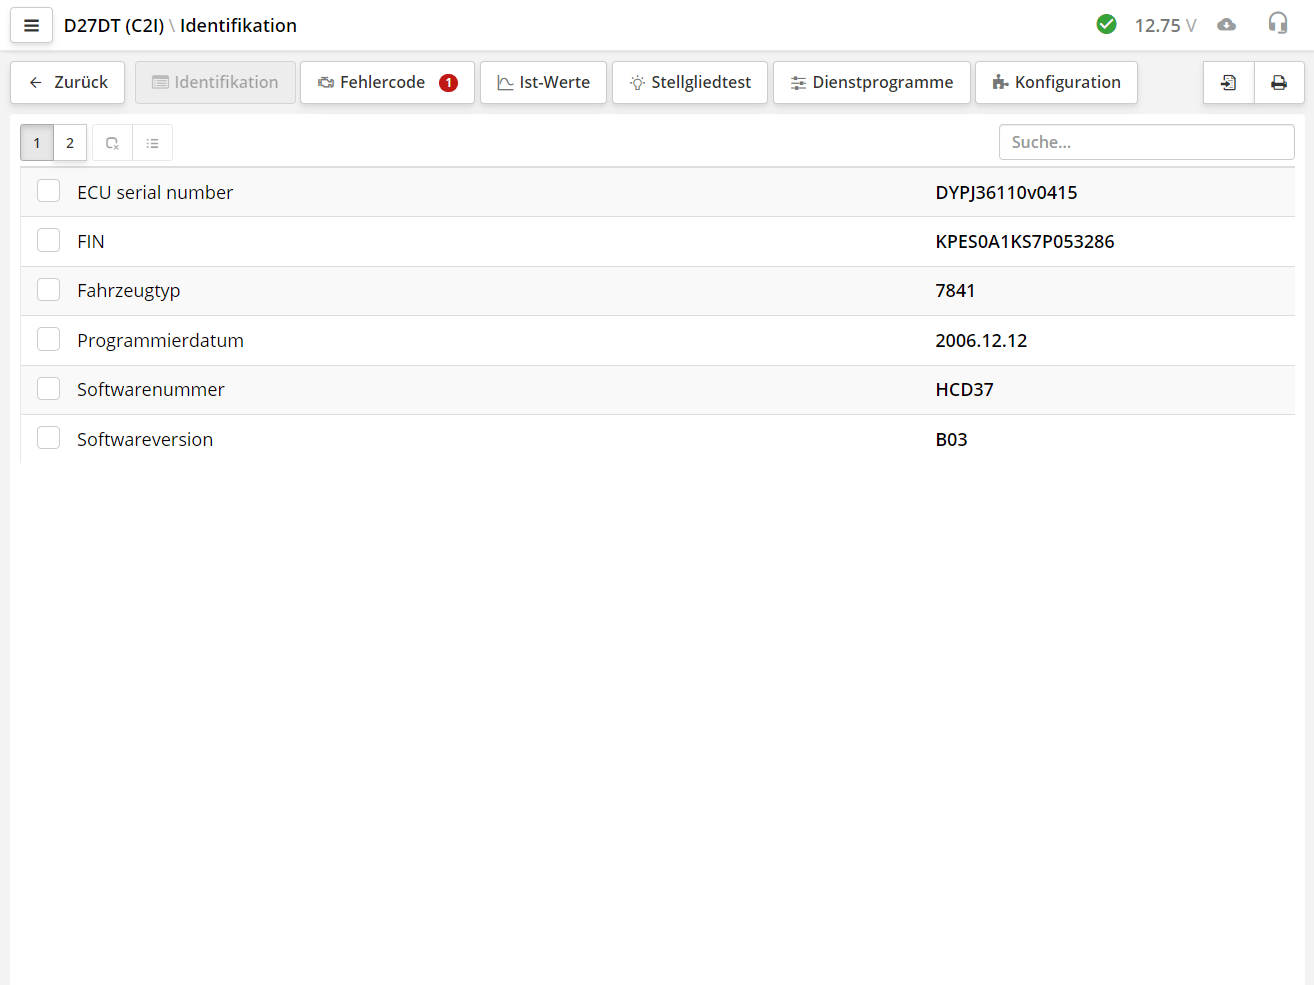
Im Identifikationsbereich werden die Stammdaten des Steuergeräts angezeigt. Diese Daten sind notwendig zur Bestimmung der Software- und Hardwareversion sowie der Kalibrierungsversionen. Die Identifikationsdaten enthalten zusätzliche Informationen, die für die korrekte Diagnose dieses Steuergeräts erforderlich sind.
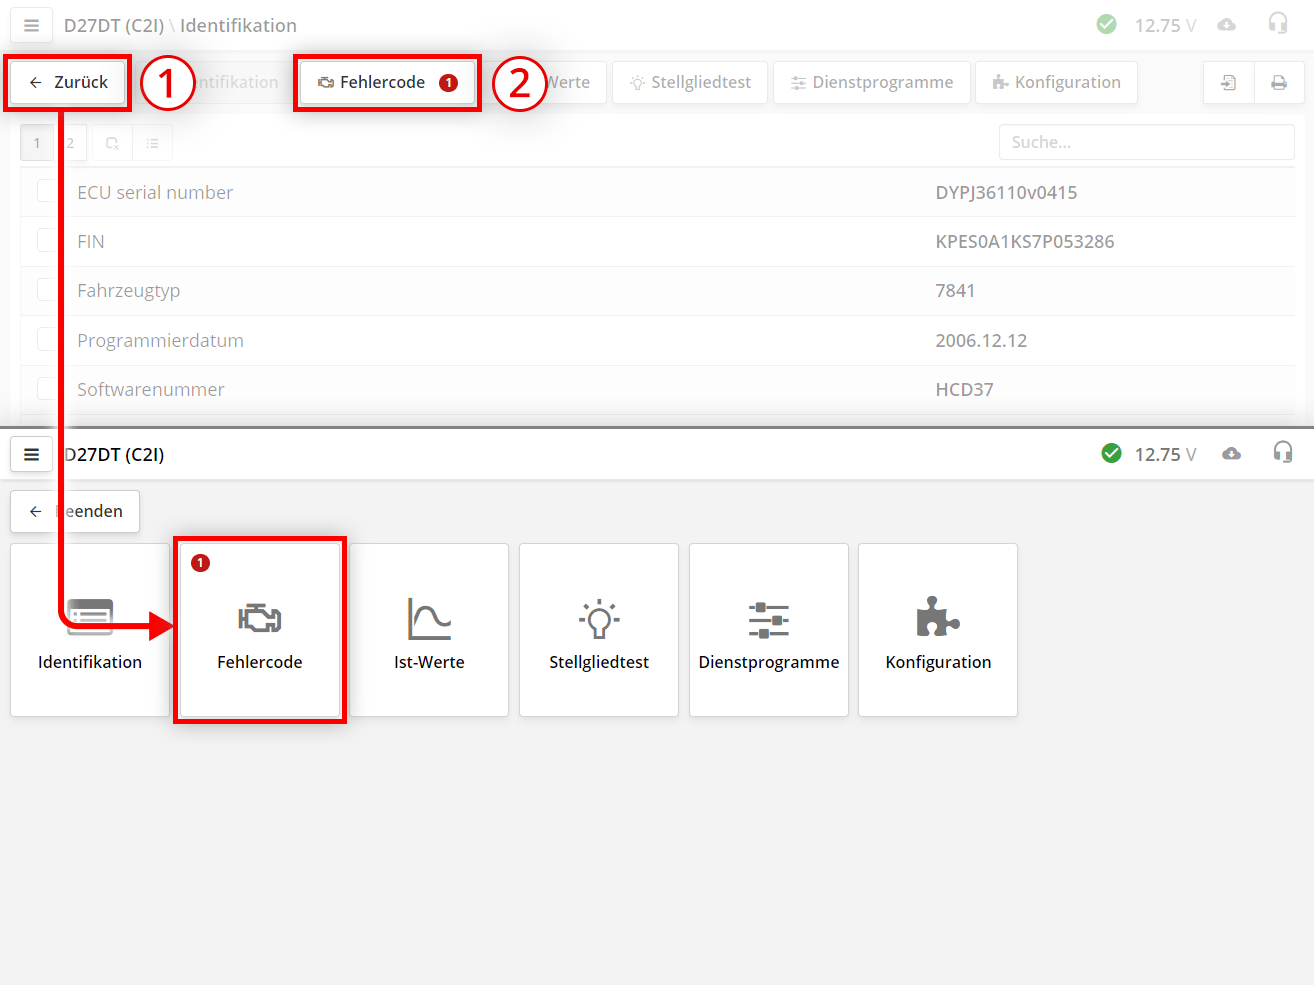
So wechseln Sie zur nächsten Registerkarte:
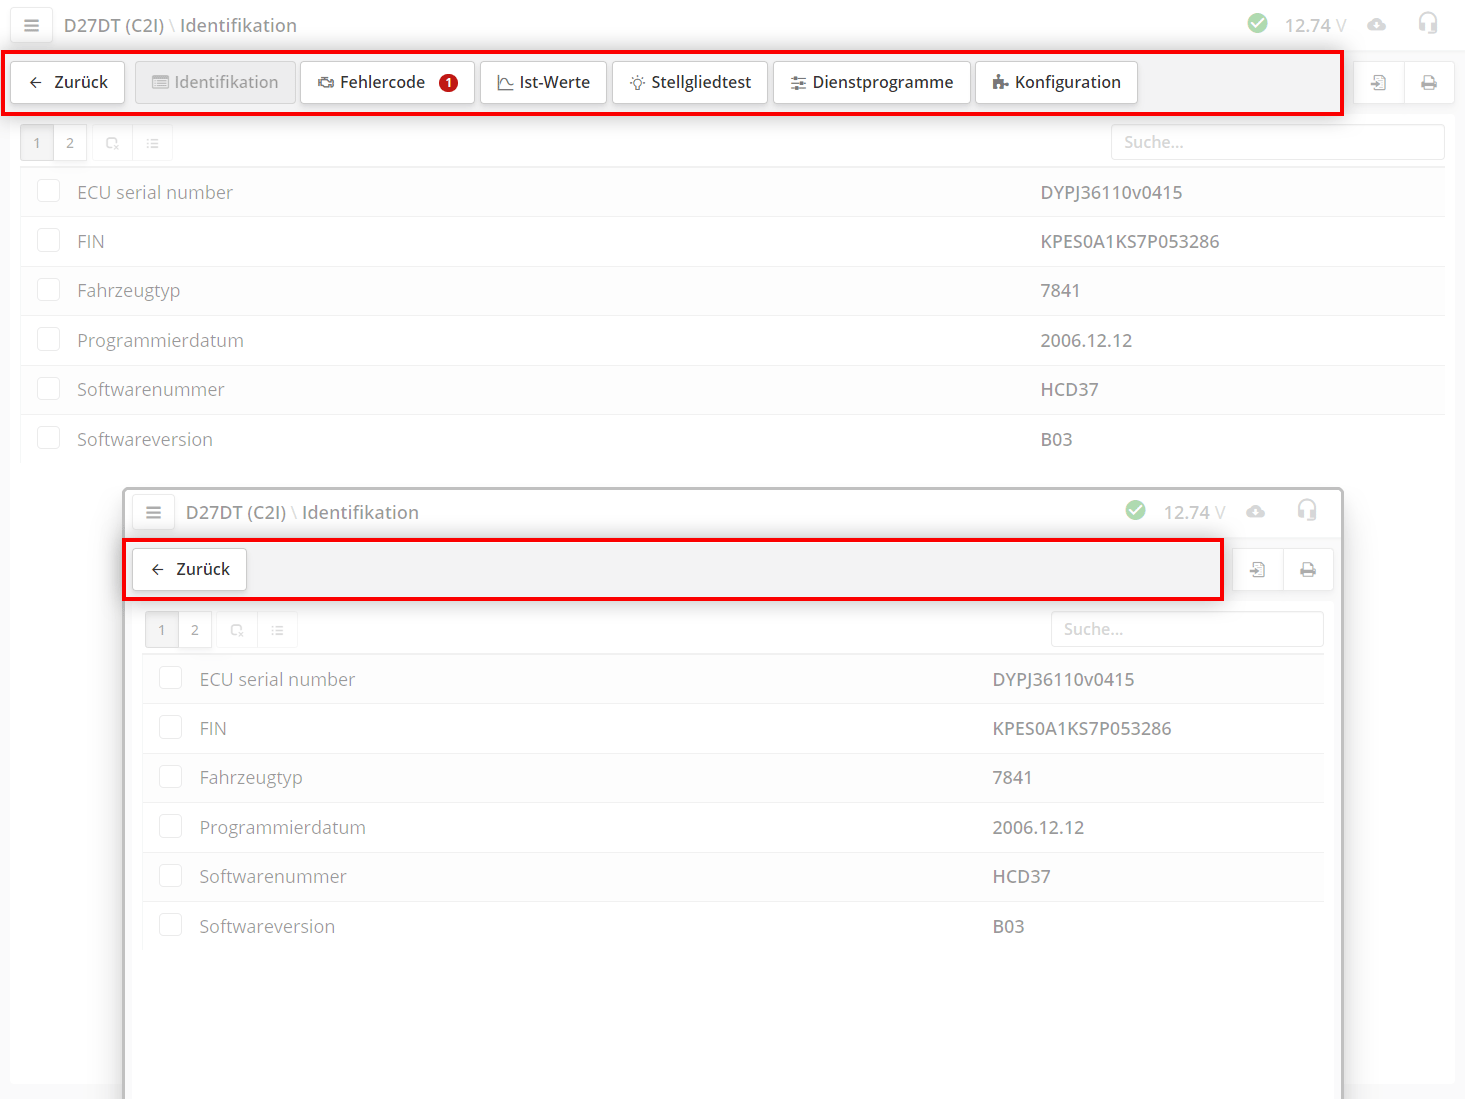
Die Registerkarten-Schaltflächen werden ausgeblendet, wenn die Bildschirmauflösung nicht ausreicht, um sie in einer Zeile anzuzeigen.
In diesem Bereich werden die im Steuergerät gespeicherten Fehlercodes (DTC) angezeigt, einschließlich ihres Status und ihrer Beschreibung.
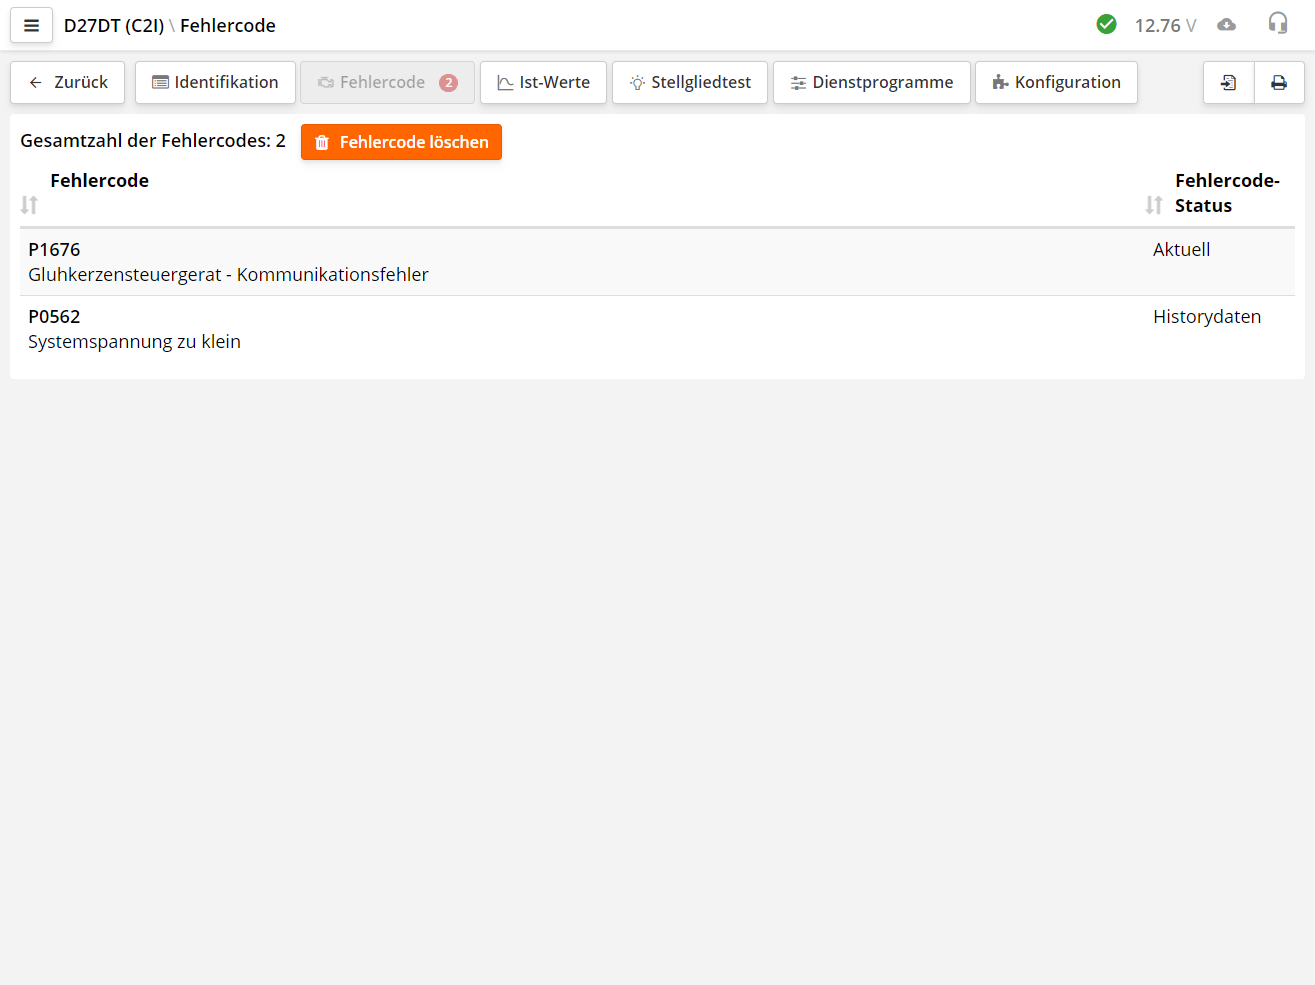
Die meisten Steuergeräte können neben dem Fehlercode auch den aktuellen Status in einer zusätzlichen Spalte anzeigen. Diese Status liefern weitere Informationen, z.B. ob der Code aktiv ist oder momentan nicht vorhanden.
Der Scanner liest den Fehlercode aus und decodiert ihn. Die Fehlernummerierung kann herstellerspezifisch oder nach OBD-II-Standard erfolgen.
Zum Löschen der DTC-Codes aus dem Steuergerät klicken Sie auf Fehlercode löschen
Der OBD-II-Standard sieht auch herstellerspezifische Codes vor, die mit P1000 beginnen.
Fehlercodes gemäß OBD-II-Standard:
| Symbol | Bedeutung |
|---|---|
| P | P - Motor (Powertrain) B - Karosserie (Body) C - Fahrwerk (Chassis) U - Kommunikation (Communication) |
| 0 | 0 - Standardisierte OBD-II-Codes 1 - Herstellerspezifische Codes |
| 1 | Code für Fahrzeugsystem oder -komponente |
Einige Herstellernormen verwenden ausschließlich numerische Fehlercodes.
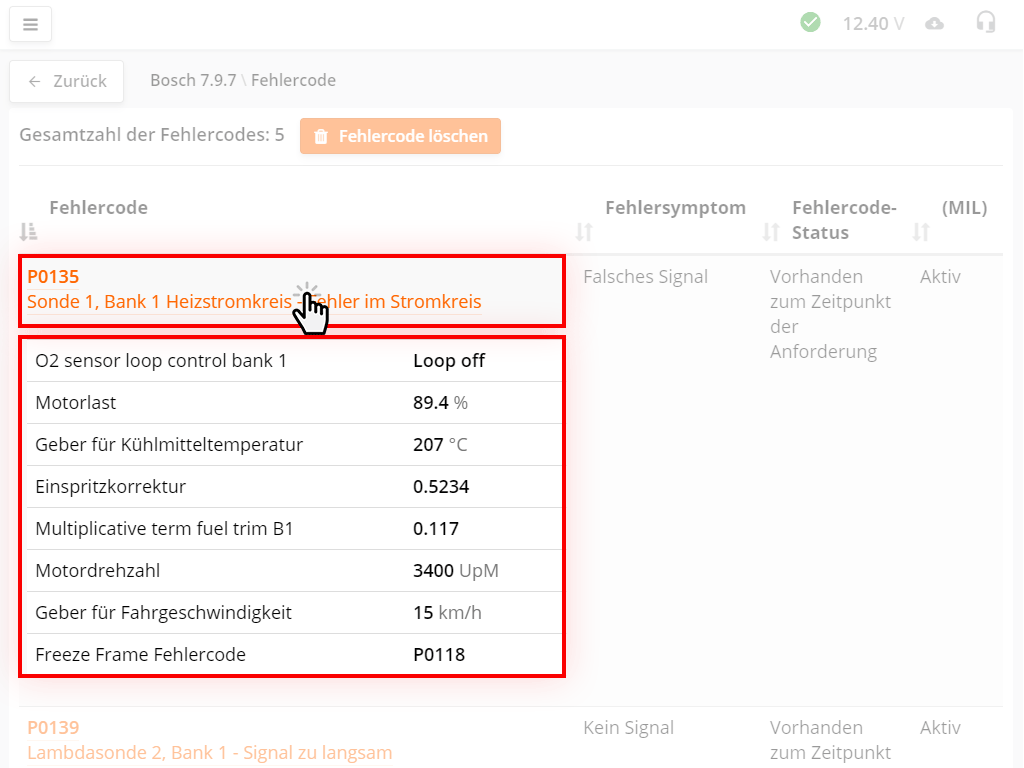
Einige Steuergeräte unterstützen den Freeze-Frame-Modus (Standbild). Bei Auftreten eines Fehlers werden bestimmte Parameterwerte im Steuergerät gespeichert. Dies ermöglicht die Bestimmung der Fehlerbedingungen. Für jeden Fehlercode wird ein separater Freeze Frame gespeichert.
Ist ein Freeze Frame verfügbar, wird der Fehlercode als orangefarbener Link angezeigt. Klicken Sie auf den Fehlercode, um die Freeze-Frame-Daten anzuzeigen, die unter dem Fehlercode erscheinen.
Manche Steuergeräte speichern mehrere Freeze Frames pro Fehlercode - typischerweise Werte vor, während und nach dem Fehlerauftritt.
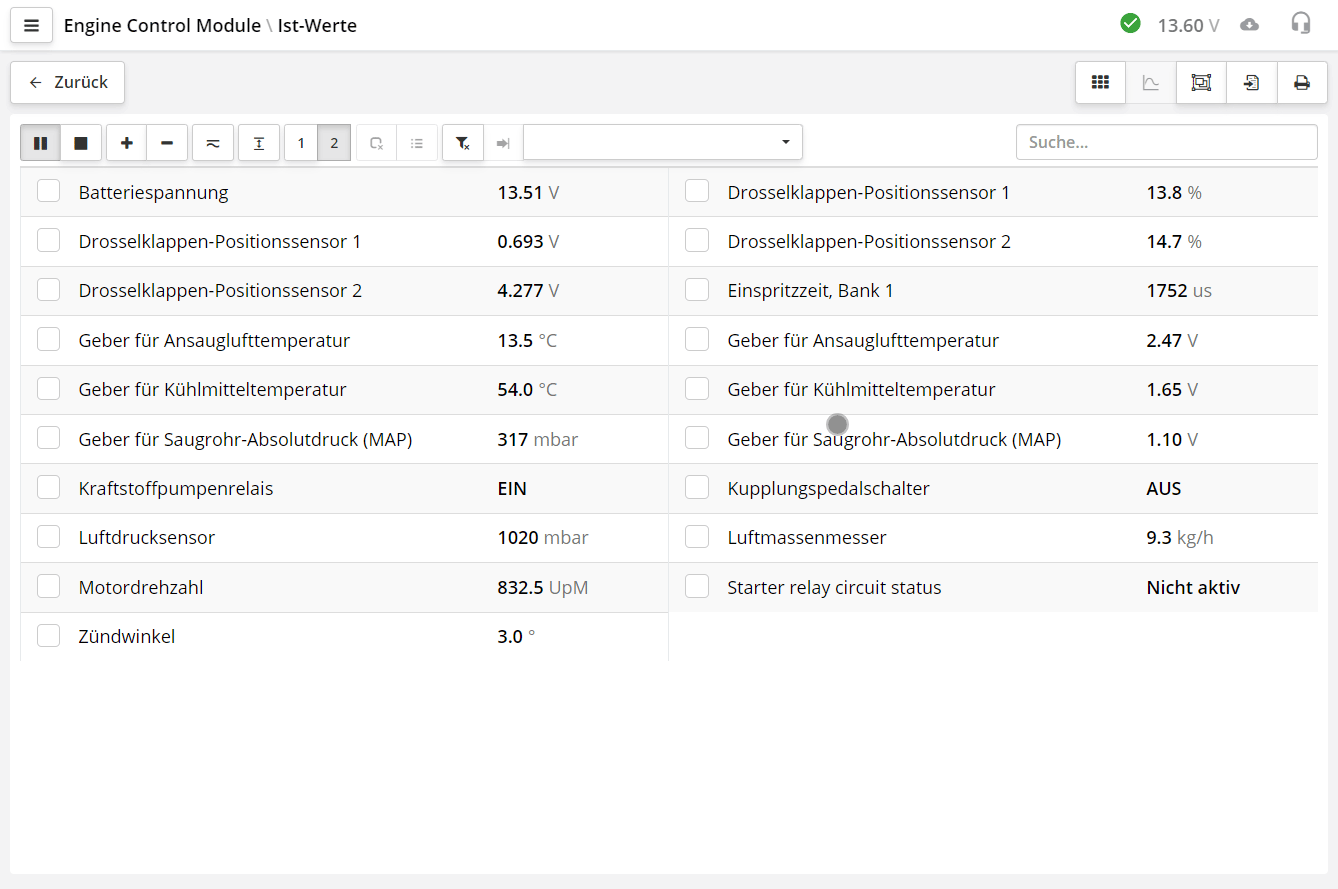
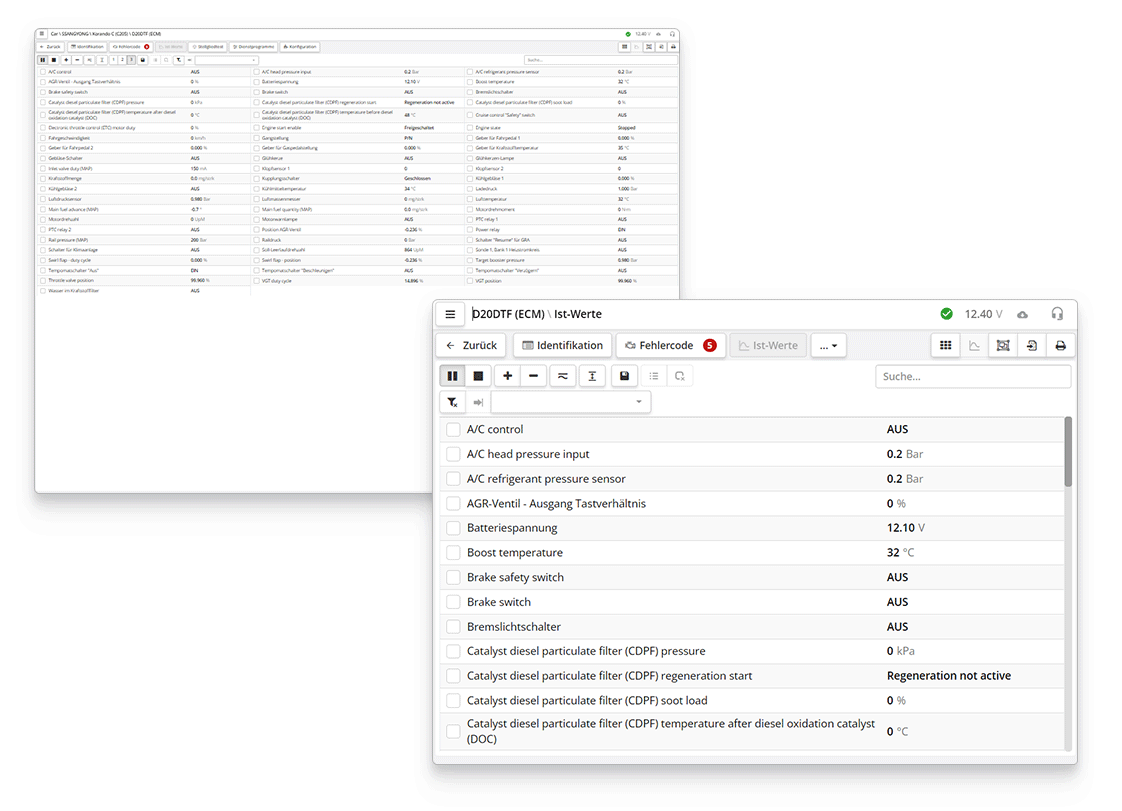
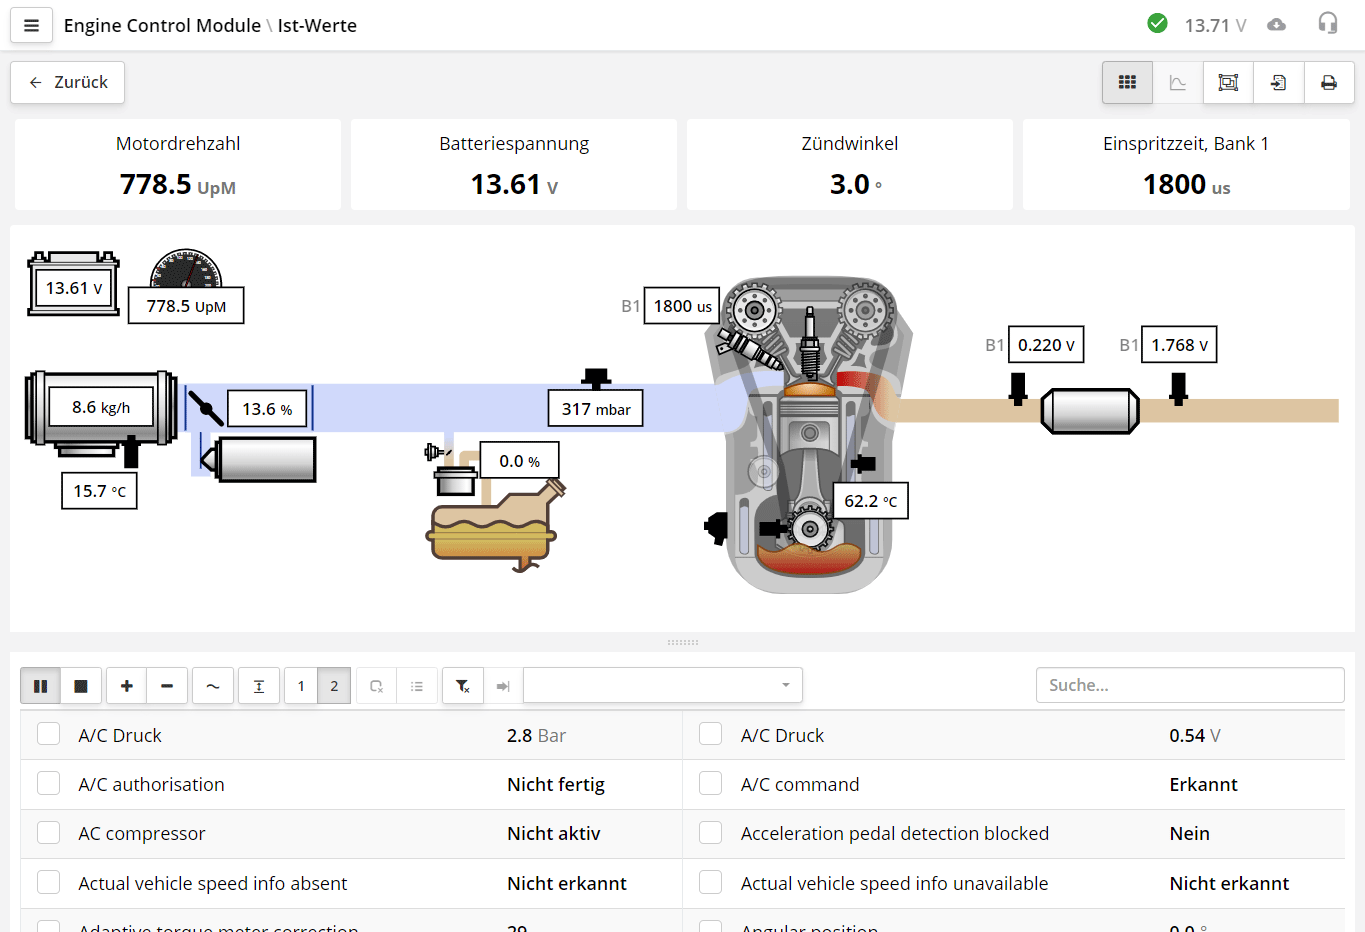
Im Bereich "Ist-Werte" können Sie Echtzeitdaten von Sensoren, Aktoren oder Systemzuständen anzeigen, die vom Steuergerät abgefragt werden. Jeder Parameter wird mit Name, Wert und gegebenenfalls Maßeinheit angezeigt.
Die Anzeige umfasst Parameter, Werte und Maßeinheiten.
Die Parameterliste kann per Fingerwisch oder Mausrad gescrollt werden. Beachten Sie, dass nur die sichtbaren Daten vom Steuergerät abgefragt werden. Nach dem Scrollen kann es eine kurze Verzögerung geben, bis neue Daten angezeigt werden. Diese Verzögerung hängt von der Antwortgeschwindigkeit des Steuergeräts ab.
Bei ECUs mit ISO-9141-, KW71- oder KW-1284-Protokoll wird jeder Diagnoseparameter einzeln abgefragt. Jede Abfrage dauert etwa 0,1 Sekunden. Daher benötigt die Anzeige von 10 Parametern etwa 1 Sekunde. Je mehr Parameter angezeigt werden, desto länger dauert die Bildschirmaktualisierung.
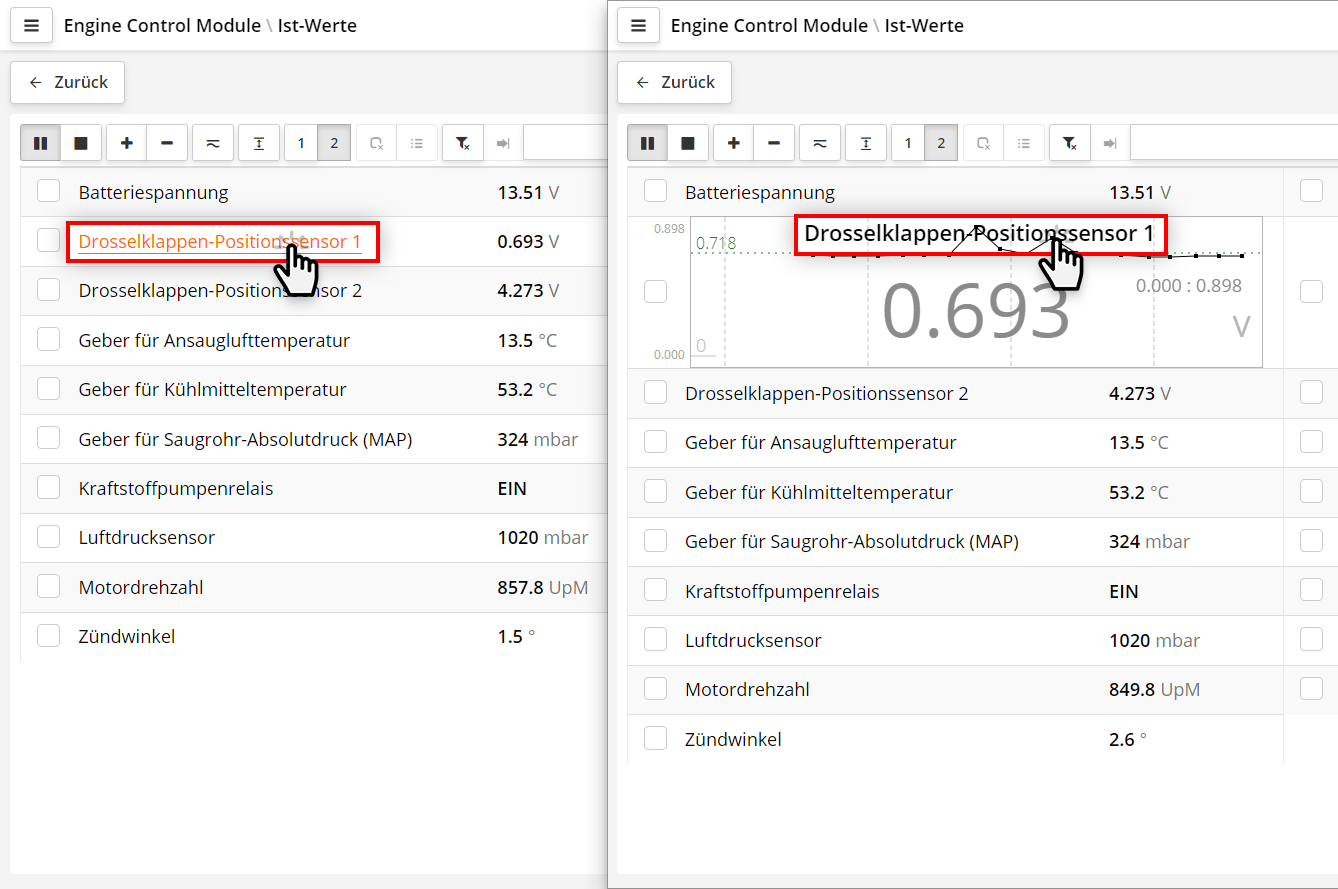
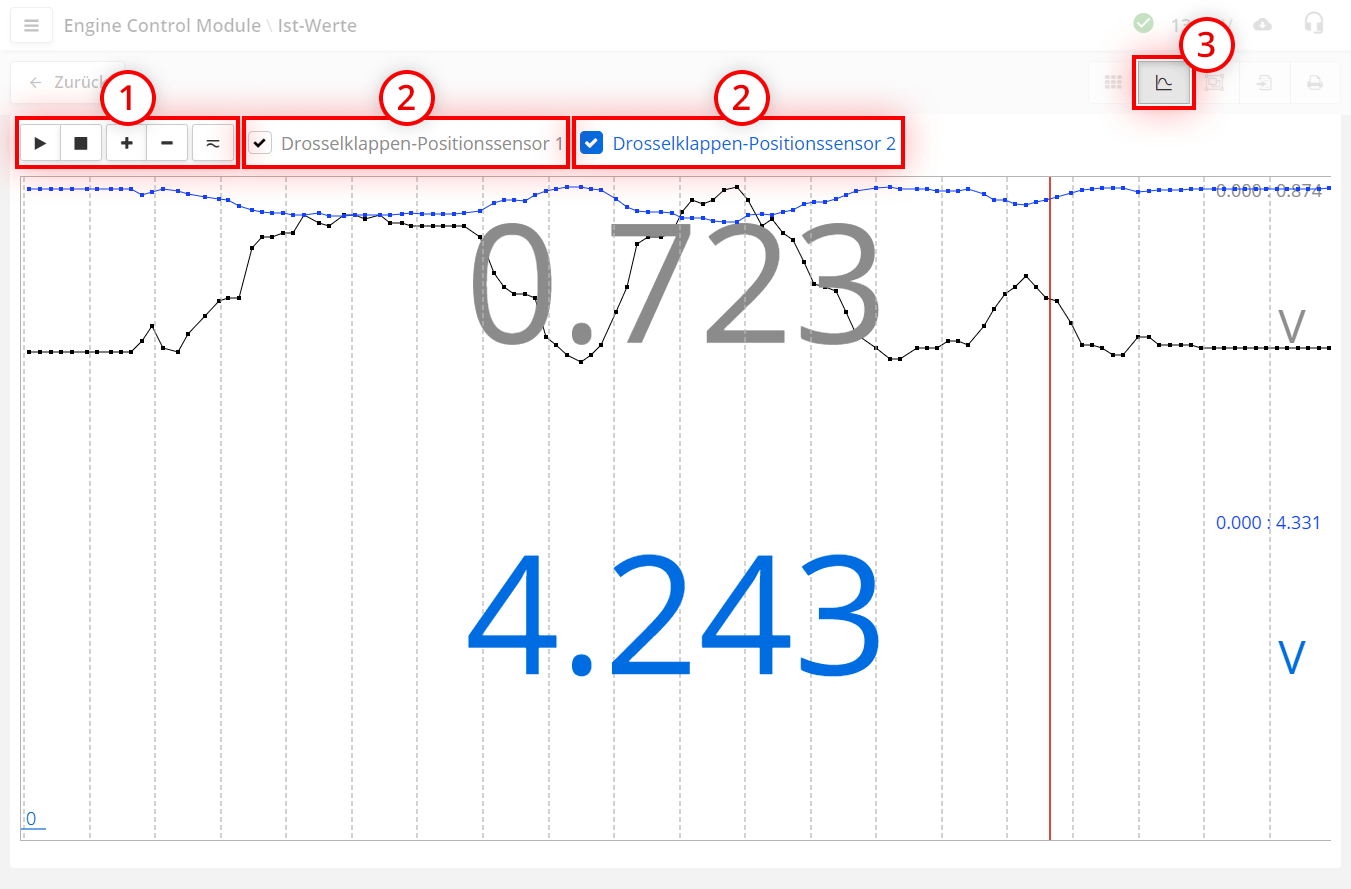
Durch Klick auf den Parameternamen wird der Parameter als Diagramm angezeigt. Ein erneuter Klick schaltet zurück zur numerischen Anzeige.
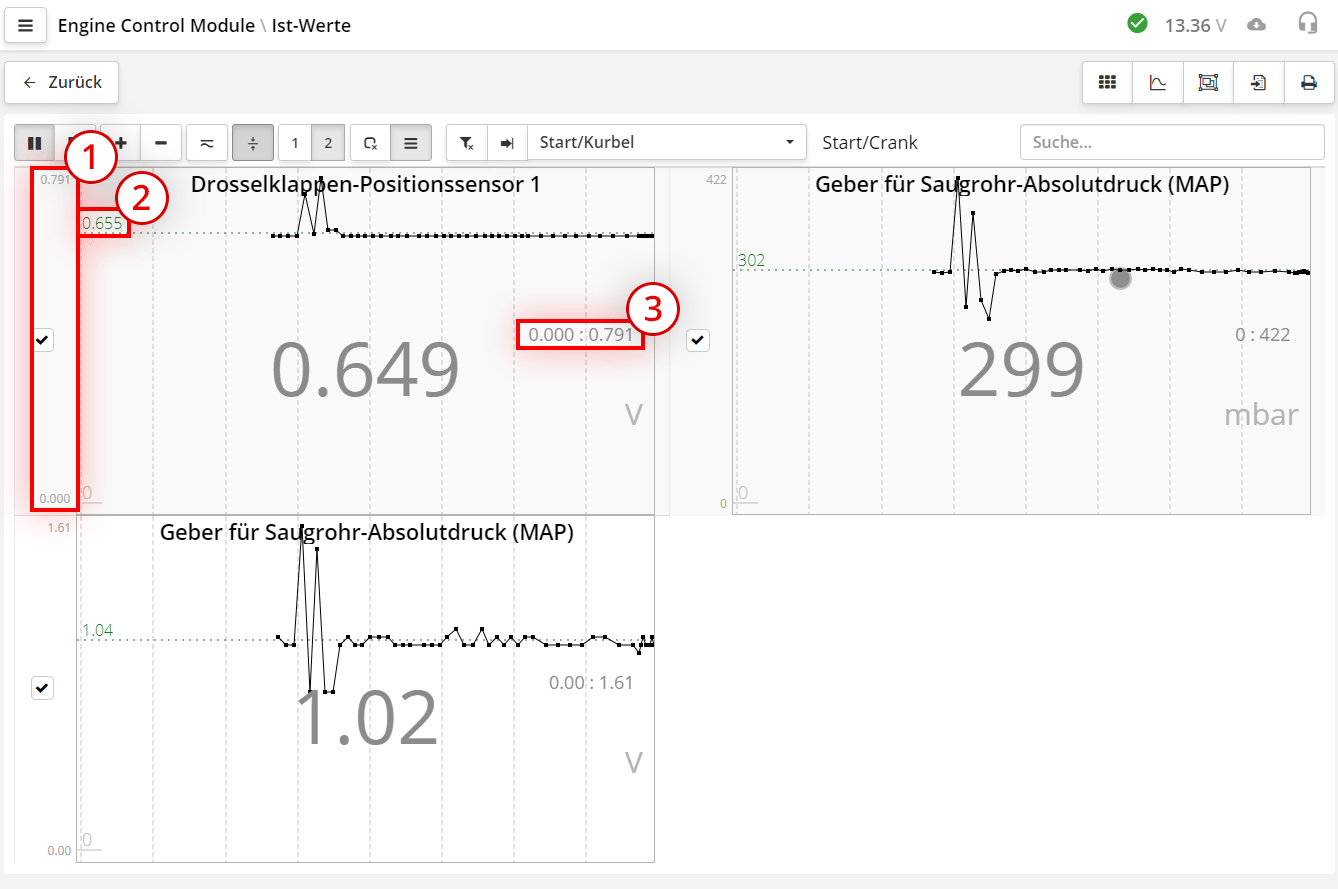
Das Diagramm zeigt neben Namen und Werten folgende Informationen:
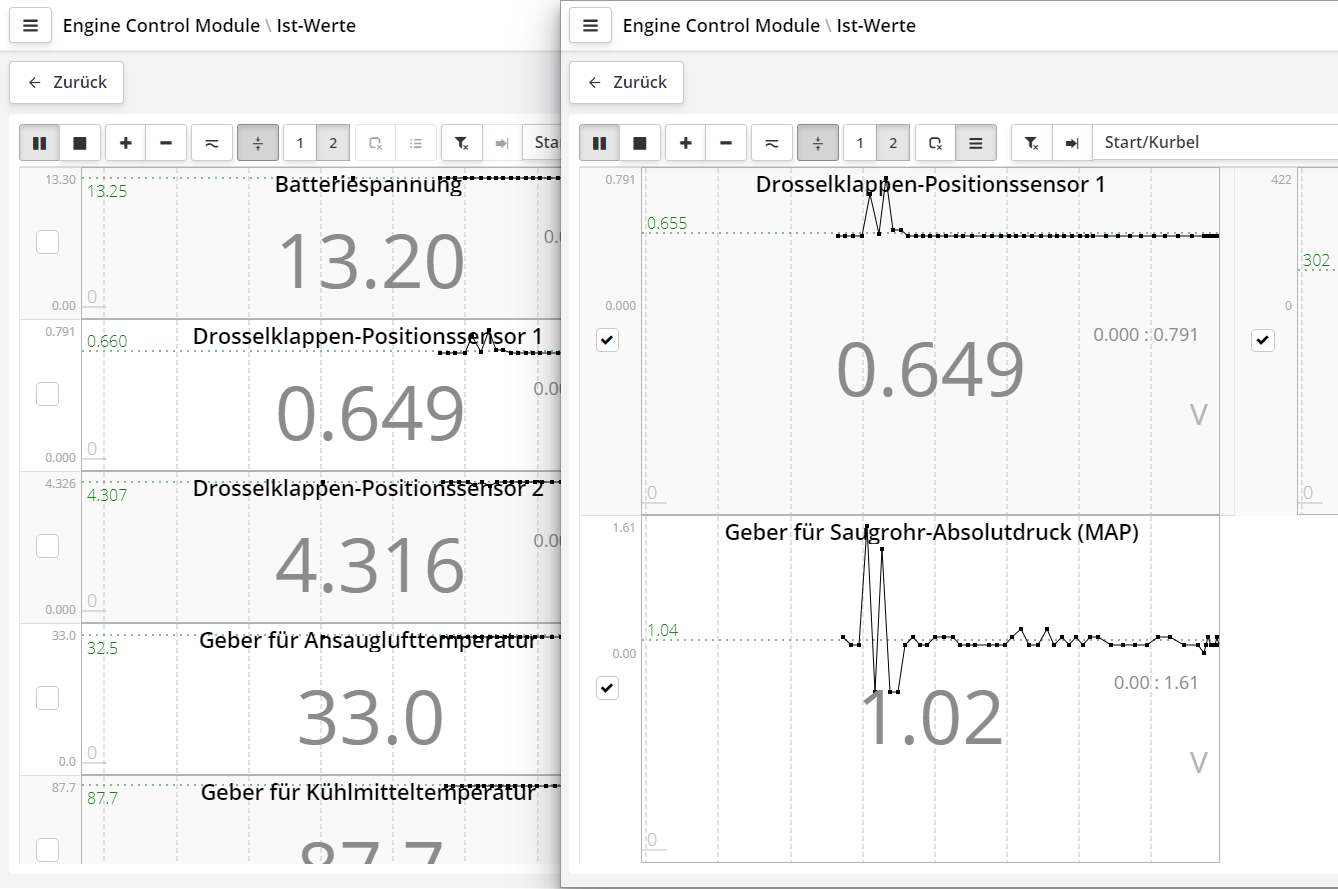
Bei wenigen Diagrammen werden diese über die gesamte Bildschirmhöhe gestreckt. Bei vielen Diagrammen haben diese eine feste Größe und können gescrollt werden.
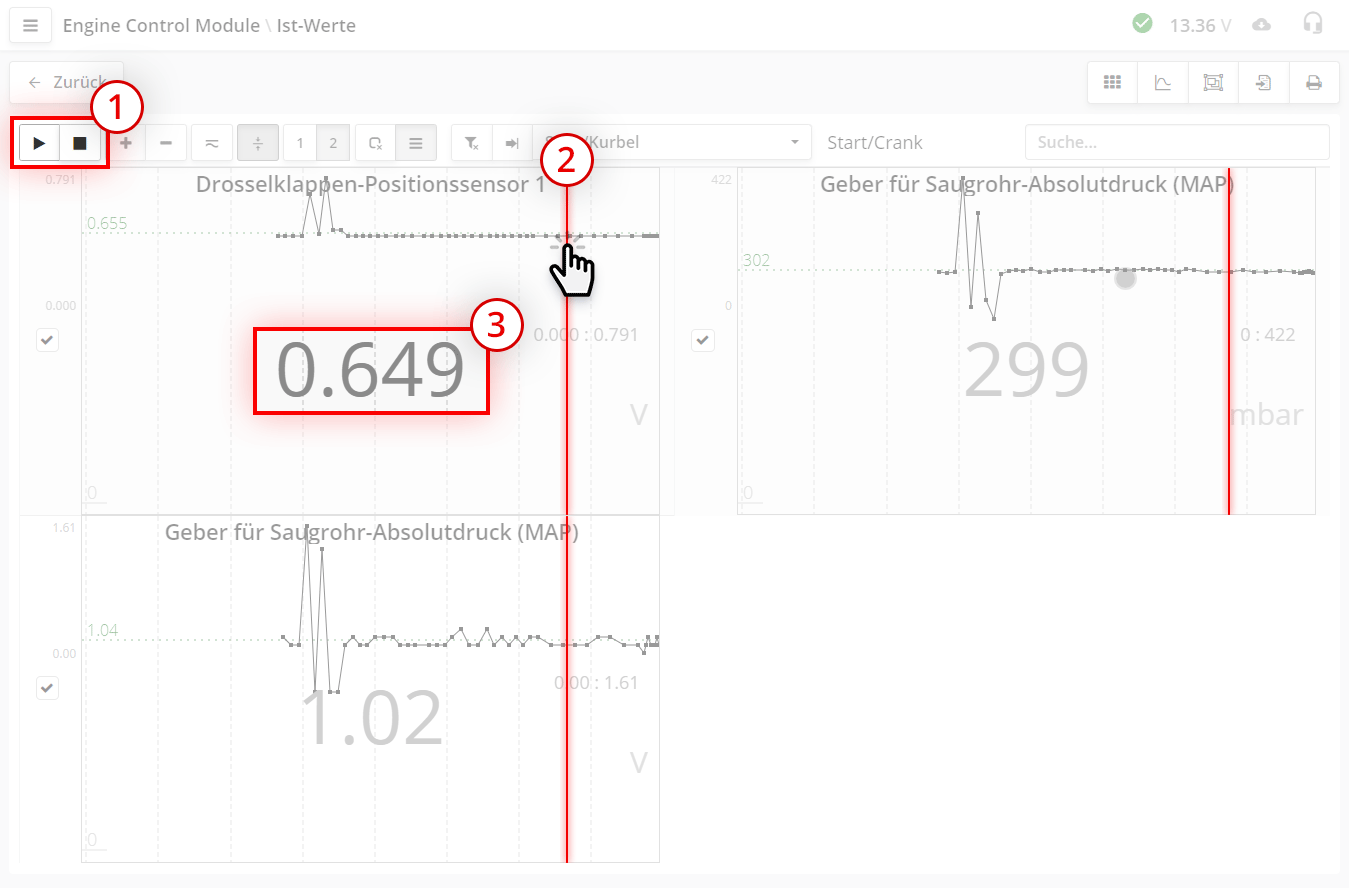
Der Unterschied zwischen "Pause" und "Stop": Bei Fortsetzung nach Pause bleiben die bisherigen Daten erhalten, während nach Stop das Diagramm geleert wird. Der Pause-Modus ist nützlich, um kurze Ereignisse im Langzeitverlauf zu analysieren. Sie pausieren bei einem bestimmten Ereignis und wissen, dass längere Zeit keine relevanten Daten folgen. Vor dem nächsten relevanten Ereignis starten Sie die Aufnahme erneut. Das Diagramm speichert 1000 Messwerte - bei schnellen Signalen entspricht dies etwa 3 Minuten Aufzeichnung.
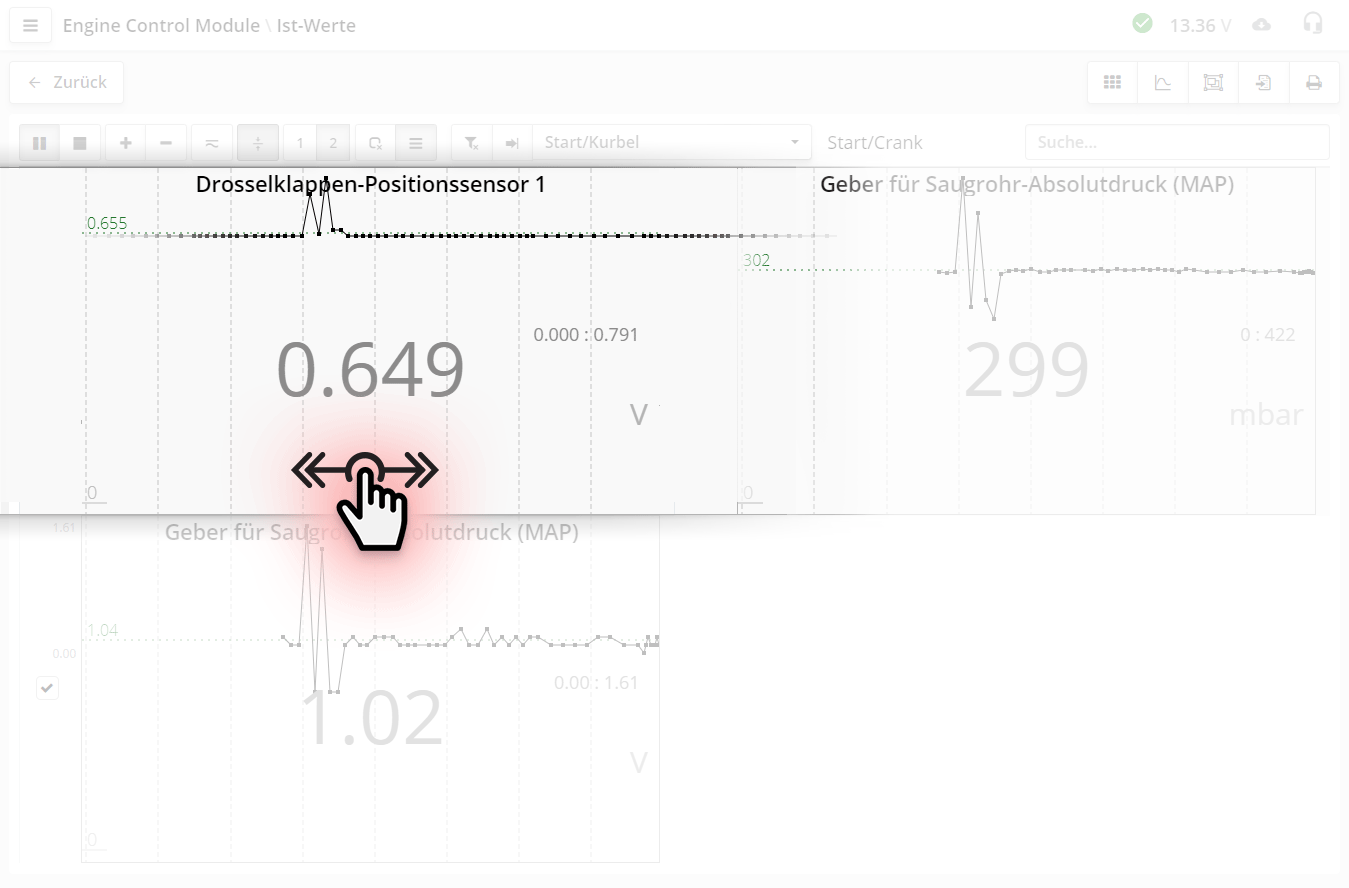
Durch Wischgeste oder Ziehen mit gedrückter linker Maustaste kann das Diagramm horizontal gescrollt werden.
Im Angehaltenen Modus werden keine Daten vom Steuergerät gelesen. Zum Fortsetzen der Aufnahme klicken Sie auf .
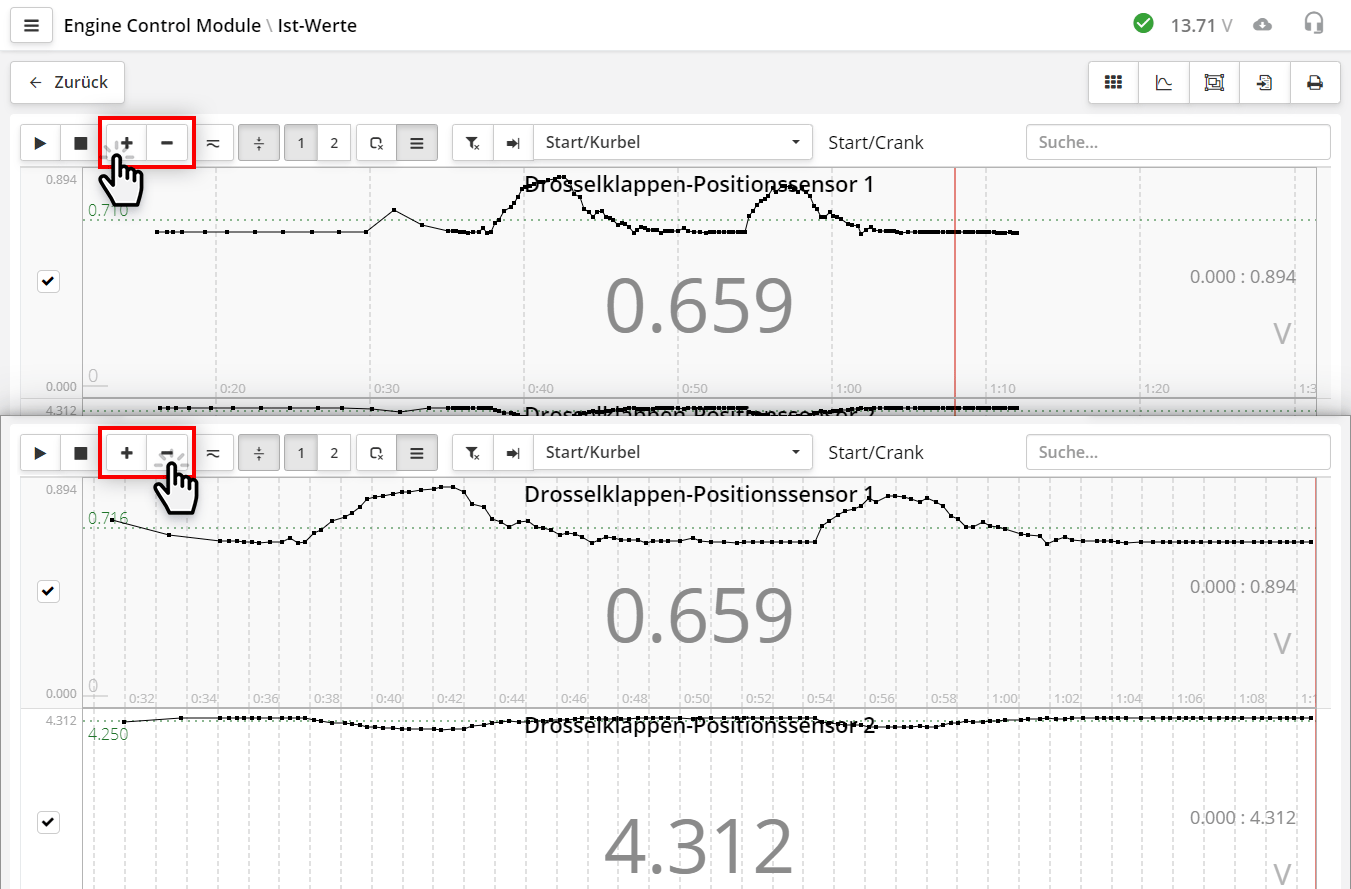
Die Schaltflächen (Plus) und (Minus) ändern den Zeitmaßstab.
Jeder Klick verdoppelt oder
halbiert die Zeitskala. Der gewählte Maßstab wird automatisch in den Programmeinstellungen gespeichert und beim nächsten Start wiederhergestellt.
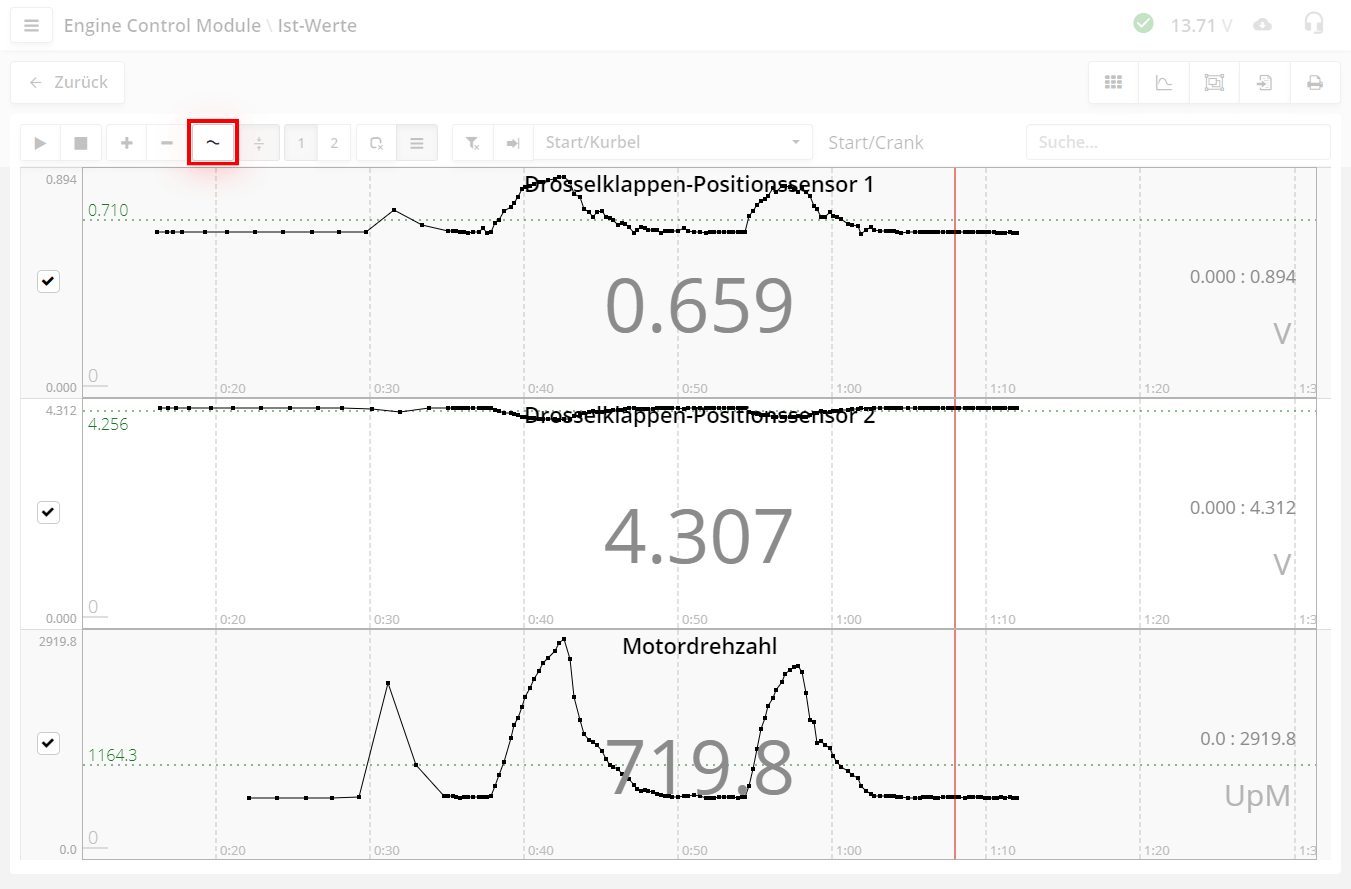
Der erste Modus heißt Offener-Eingang-Modus.
Dieser Modus verwendet automatische vertikale Skalierung. Das Programm passt den Maßstab so an, dass der sichtbare Diagrammbereich die gesamte Höhe ausnutzt - beginnend entweder vom Minimalwert oder von der Nullinie. Dadurch sehen Sie
den gesamten Wertebereich im Detail. Dies ist der primäre und am häufigsten genutzte Arbeitsmodus.
Allerdings gibt es eine Besonderheit: Da die automatische Skalierung sich ständig an die aktuellen Werte anpasst, können unerwartete
Effekte auftreten. Beispielsweise bei Radsensoraufzeichnungen während des Bremsens: Wenn das Fahrzeug zum Stillstand kommt und die Geschwindigkeitskurven fallen, scheinen sie kurz vor dem Stillstand wieder anzusteigen. Dies ist jedoch
nur ein Skalierungseffekt - bei sehr kleinen Geschwindigkeitsänderungen vergrößert sich der Maßstab, wodurch minimale Schwankungen sichtbar werden. Tipp: Für die Analyse langsamer Veränderungen entweder einen größeren Zeitmaßstab wählen
oder den aktuellen vertikalen Wertebereich beachten.
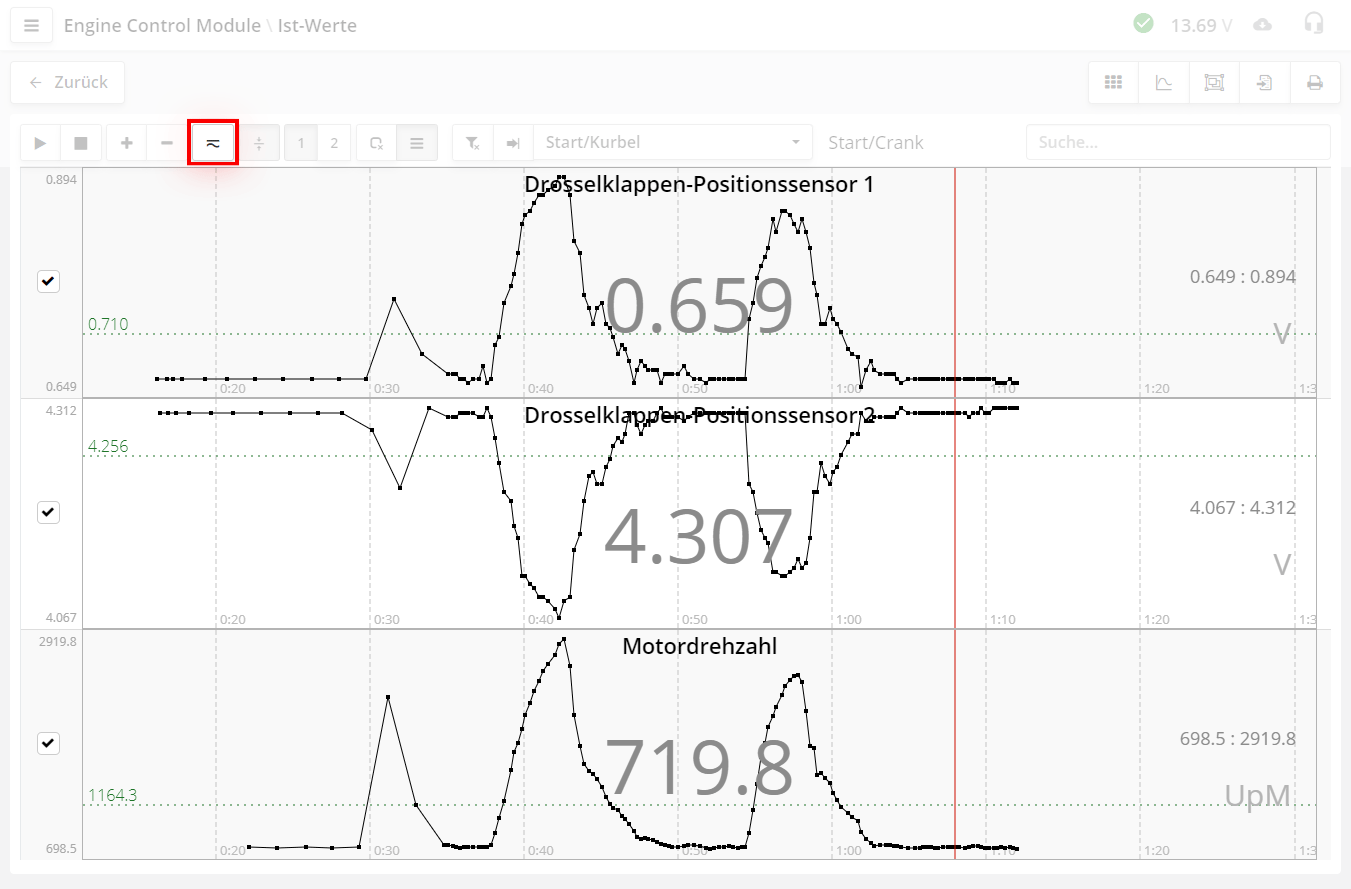
Der zweite Modus heißt Geschlossener-Eingang-Modus.
Auch dieser Modus verwendet automatische vertikale Skalierung, allerdings wird der Maßstab nicht von der Nullinie, sondern zwischen Minimum und Maximum des Diagramms berechnet. Dadurch wird der konstante Offset entfernt. Dieser Modus ist nützlich, um kleine Schwankungen bei großem konstanten Grundwert zu analysieren - beispielsweise Druckschwankungen von wenigen Bar bei einem Grunddruck von hundert Bar.
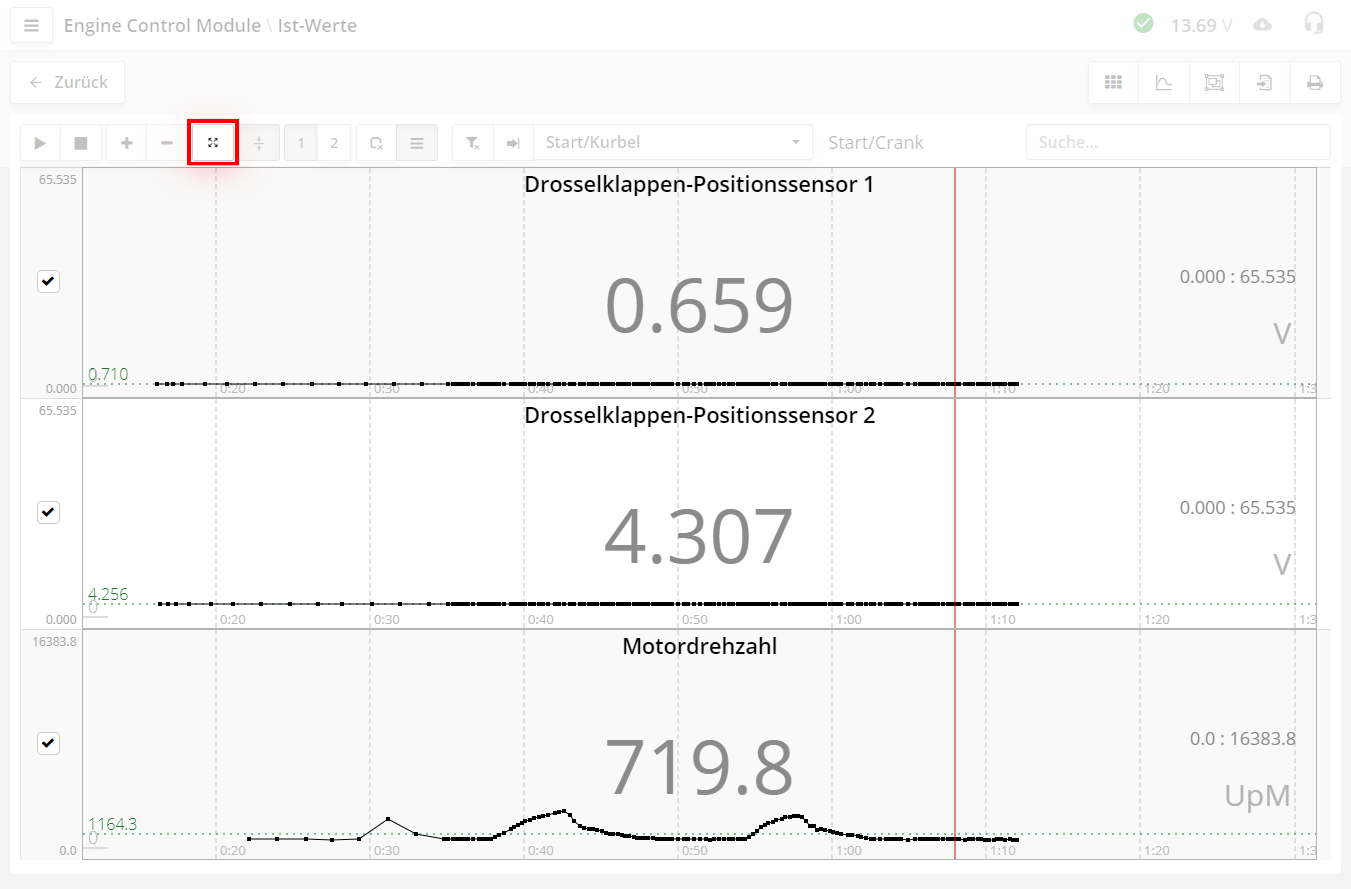
Der dritte Modus ist der Standardmodus ohne automatische Skalierung.
Das Diagramm zeigt den gesamten möglichen Parameterbereich an. Wenn der Wertebereich nicht vom Hersteller definiert ist, wird der maximale Zahlenwert verwendet. Diese Werte können sehr groß sein, wodurch Änderungen möglicherweise kaum sichtbar sind.
Wählen Sie den Anzeigemodus je nach Anwendungsfall.
- Schaltfläche zum Anzeigen aller Parameter als Diagramme oder numerische Werte.
Bei sehr vielen Parametern kann es je nach Rechnerleistung zu geringfügigen Verzögerungen kommen.

123 - Anzeigeoptionen für Parameter.
Sie können 1, 2 oder 3 Spalten wählen. Abhängig von der Bildschirmauflösung werden diese Schaltflächen ausgeblendet
(auf einem Smartphone-Bildschirm wird beispielsweise nur eine Spalte angezeigt).
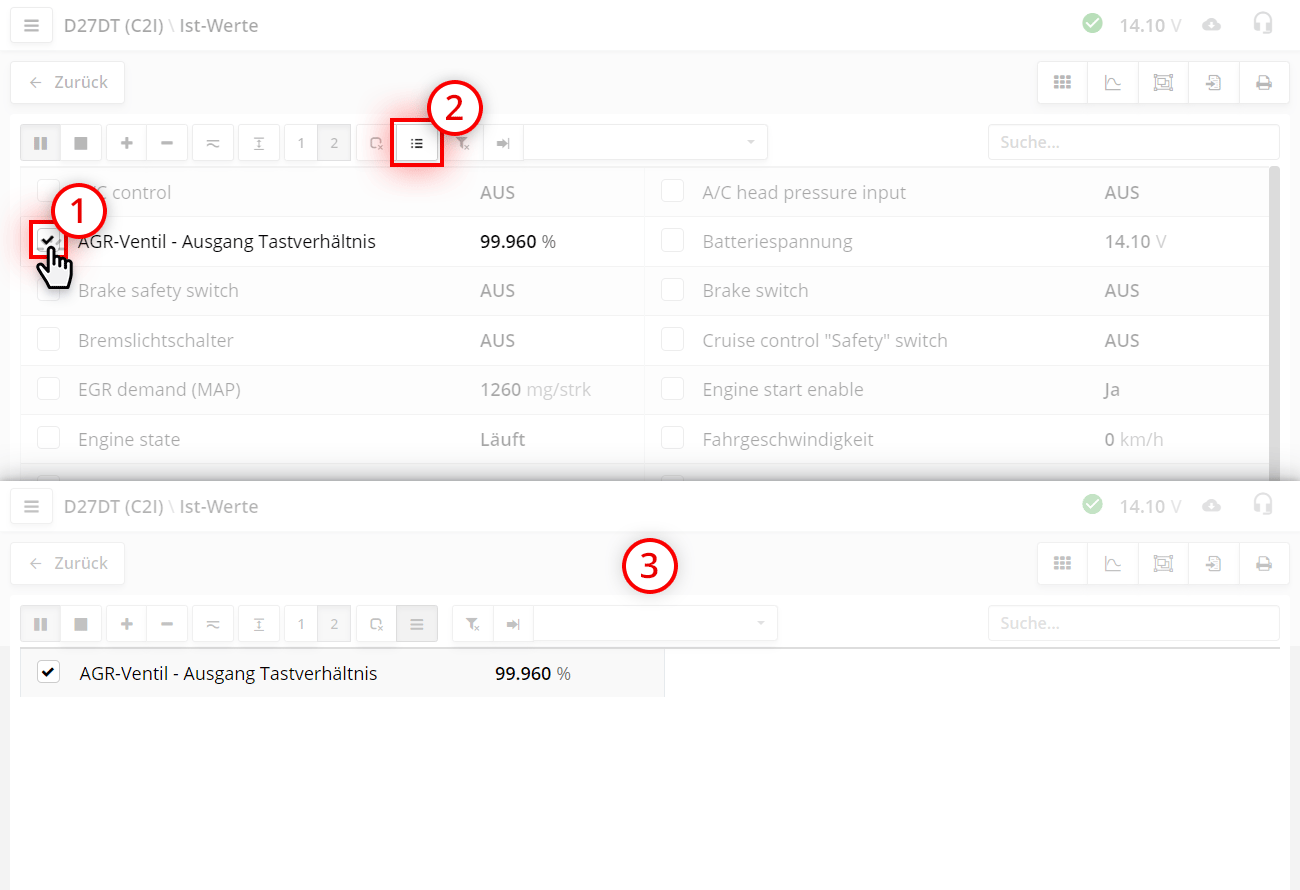
Jeder Parameter hat links ein Auswahlkästchen
Durch Aktivieren markieren Sie Parameter für die weitere Bearbeitung.
Dies ist nützlich, wenn Sie maximale Anzeigegeschwindigkeit benötigen, um schnelle Parameteränderungen zu verfolgen. Je mehr Parameter angezeigt werden, desto langsamer ist die Aktualisierung. Für die Analyse schneller Änderungen sollten Sie daher weniger Parameter auswählen.
Ein erneuter Klick auf stellt den Normalmodus wieder her.
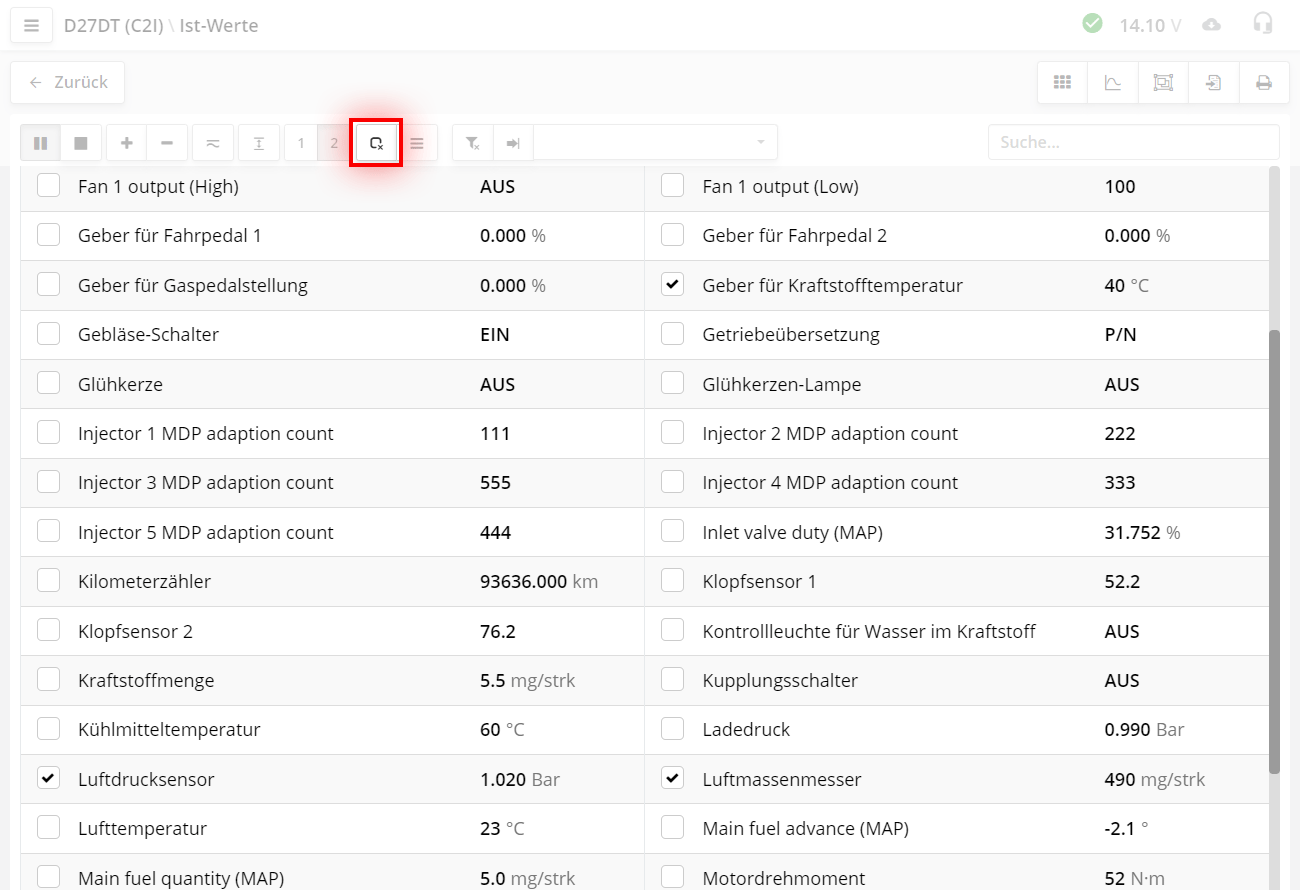
Die Schaltfläche entfernt alle Parameterauswahlen.
Dies ist praktisch, wenn viele Parameter an verschiedenen Stellen markiert wurden und Sie nicht die gesamte Liste durchsuchen möchten.
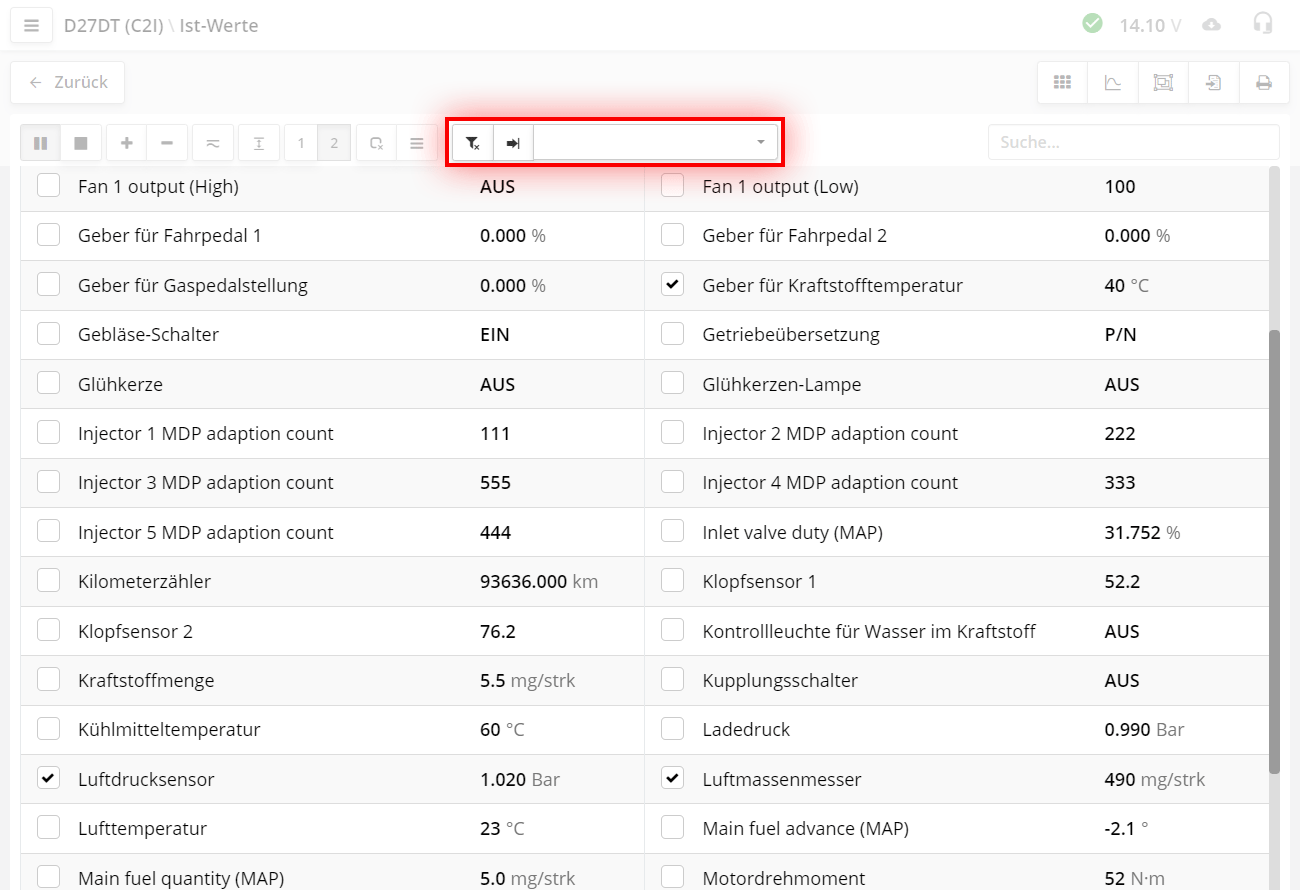
Die Dropdown-Liste dient der Filterauswahl.
Weitere Details finden Sie im Abschnitt Arbeiten mit Filtern.
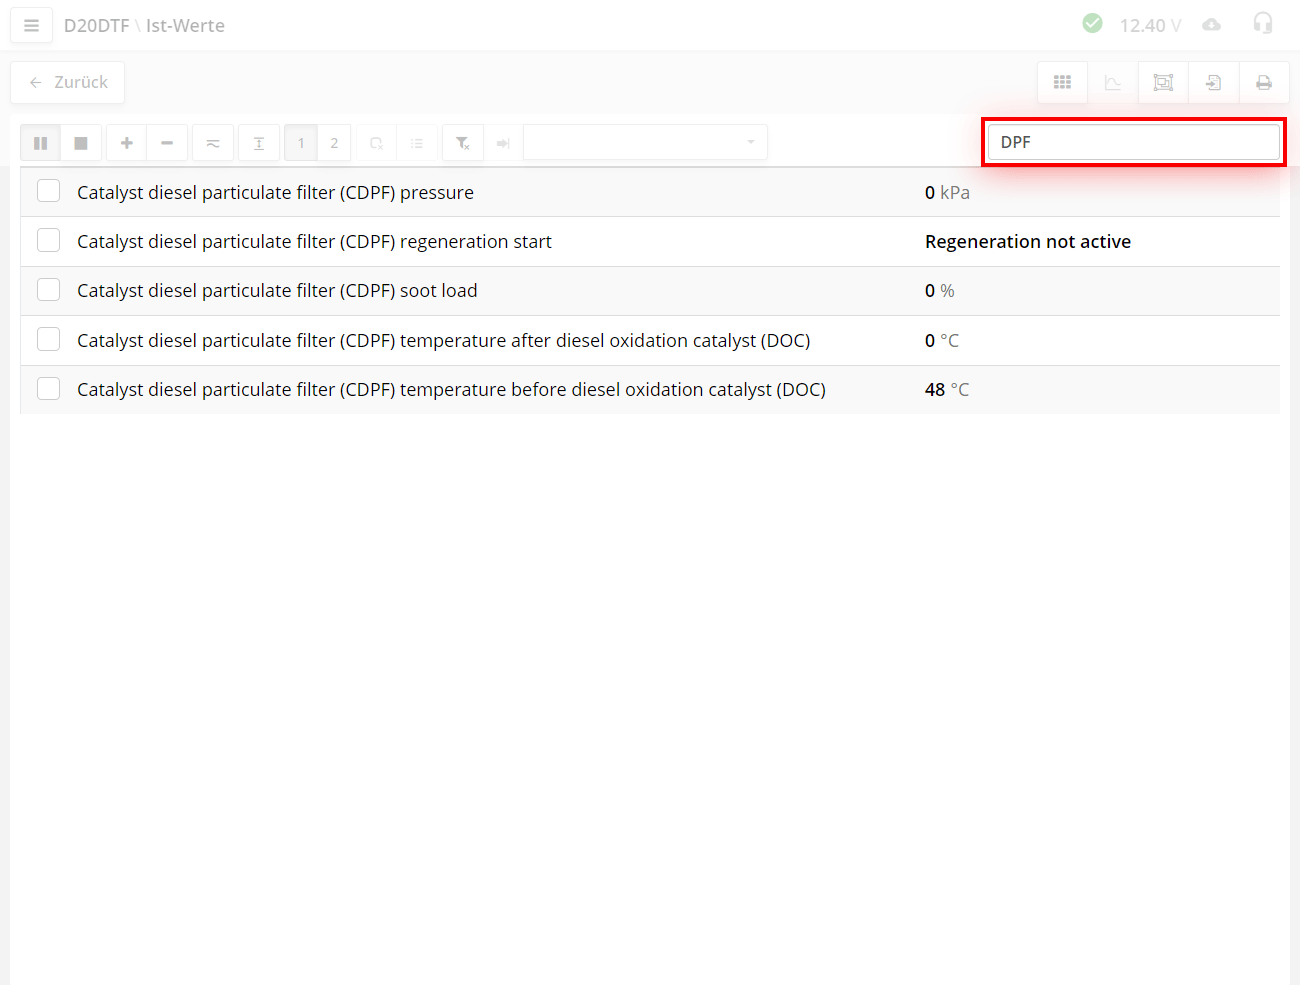
Suchfunktion.
Um nur Parameter anzuzeigen, die ein bestimmtes Wort oder Kürzel enthalten (z.B. "DPF"), geben Sie den Suchbegriff ein. Die Parameterliste wird während der Eingabe dynamisch gefiltert.
Löschen Sie den Suchtext, um die Filterung aufzuheben.
Die Suche durchsucht alle ausgelesenen Parameter, auch wenn sie aktuell nicht angezeigt werden.

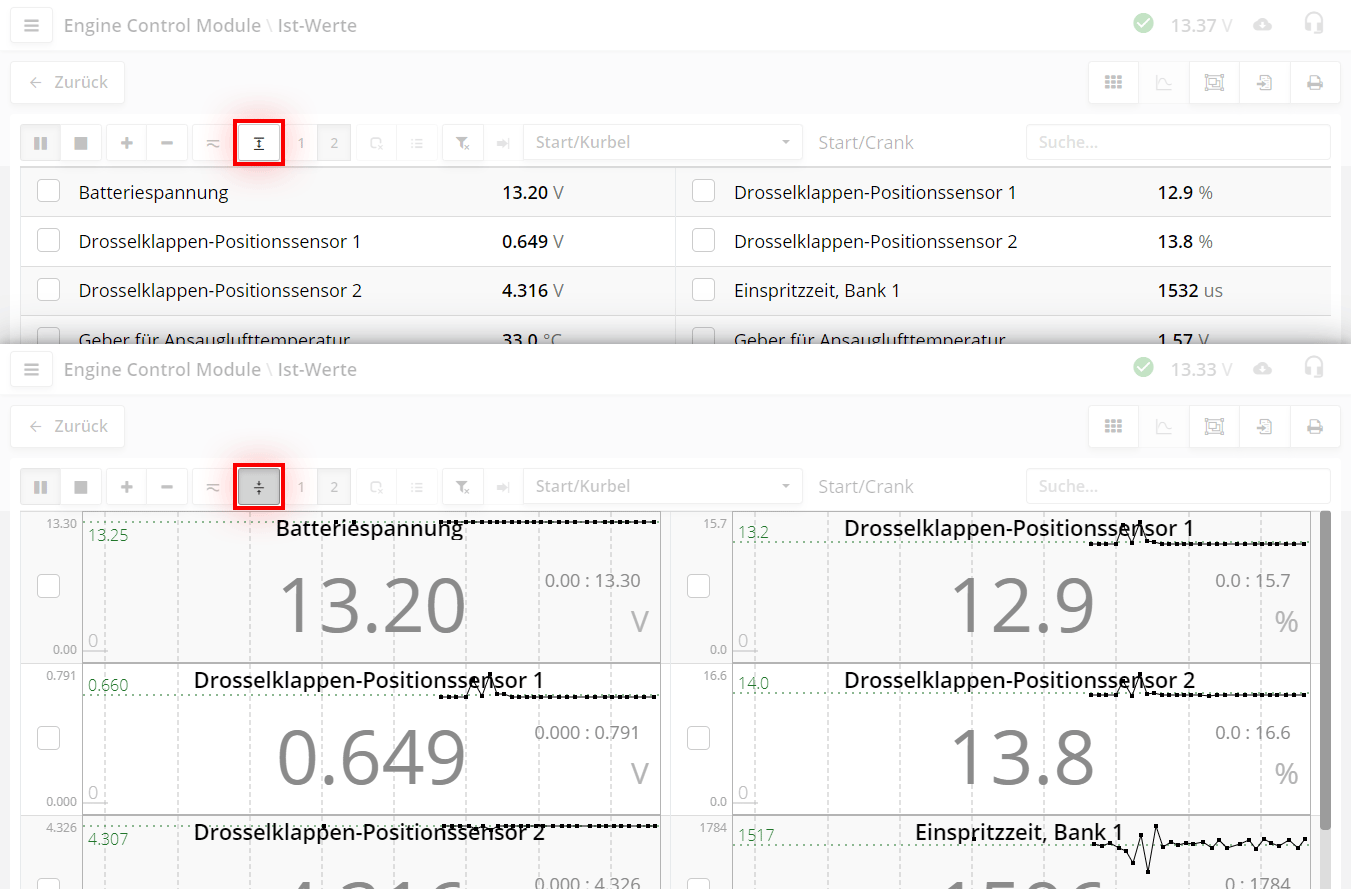
- Indikator-Schaltfläche.
Indikatoren sind häufig verwendete Parameter für eine schnelle Überwachung der wichtigsten Werte.
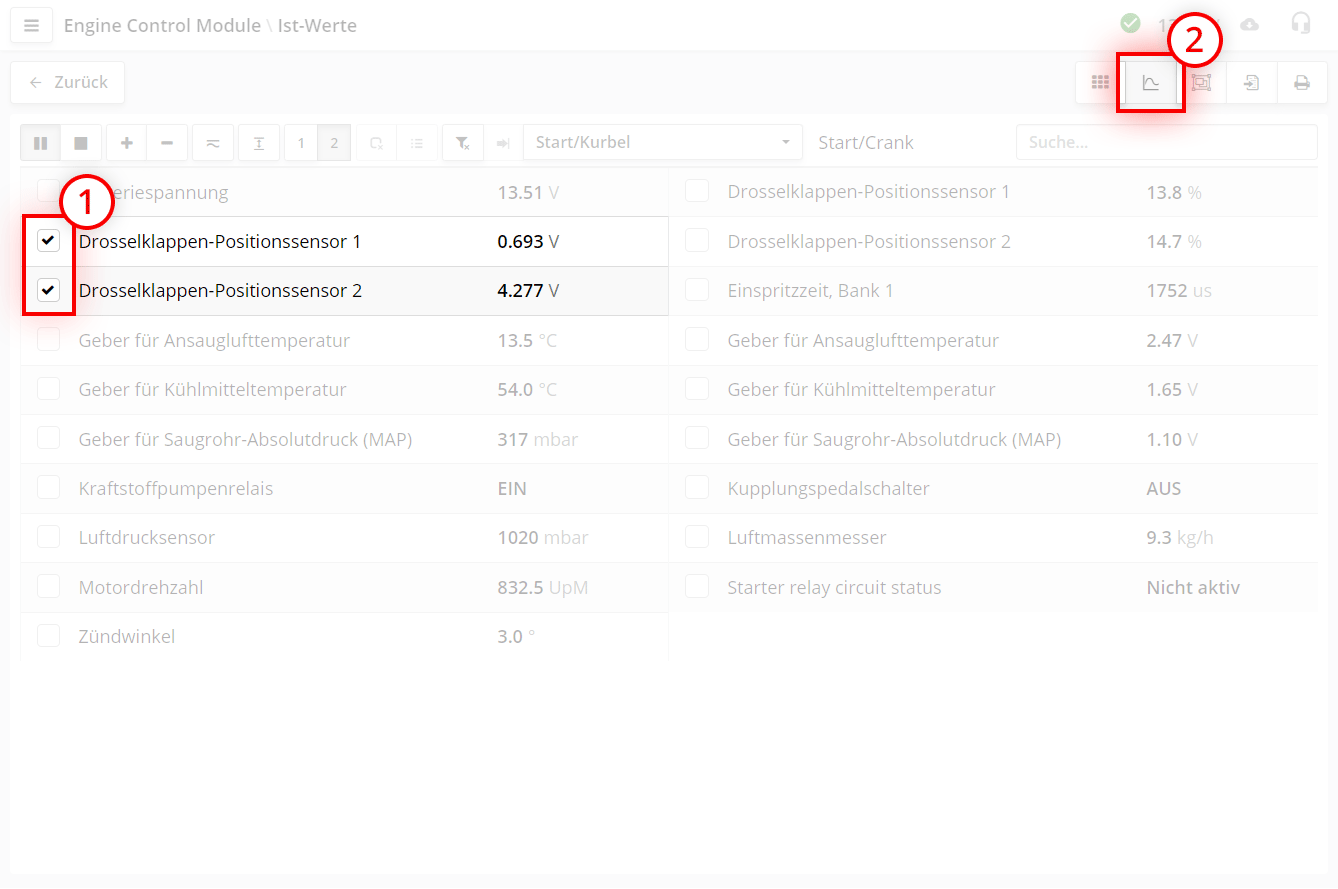
- Schaltfläche für Diagrammüberlagerung.
Dieser Modus ermöglicht die gleichzeitige Darstellung zusammenhängender Parameter, z.B. bei Drosselklappenpositionssensoren. Der Modus wird aktiviert, wenn Parameter markiert sind. Es können 1 bis 4 Parameter überlagert werden.
Funktionsweise:
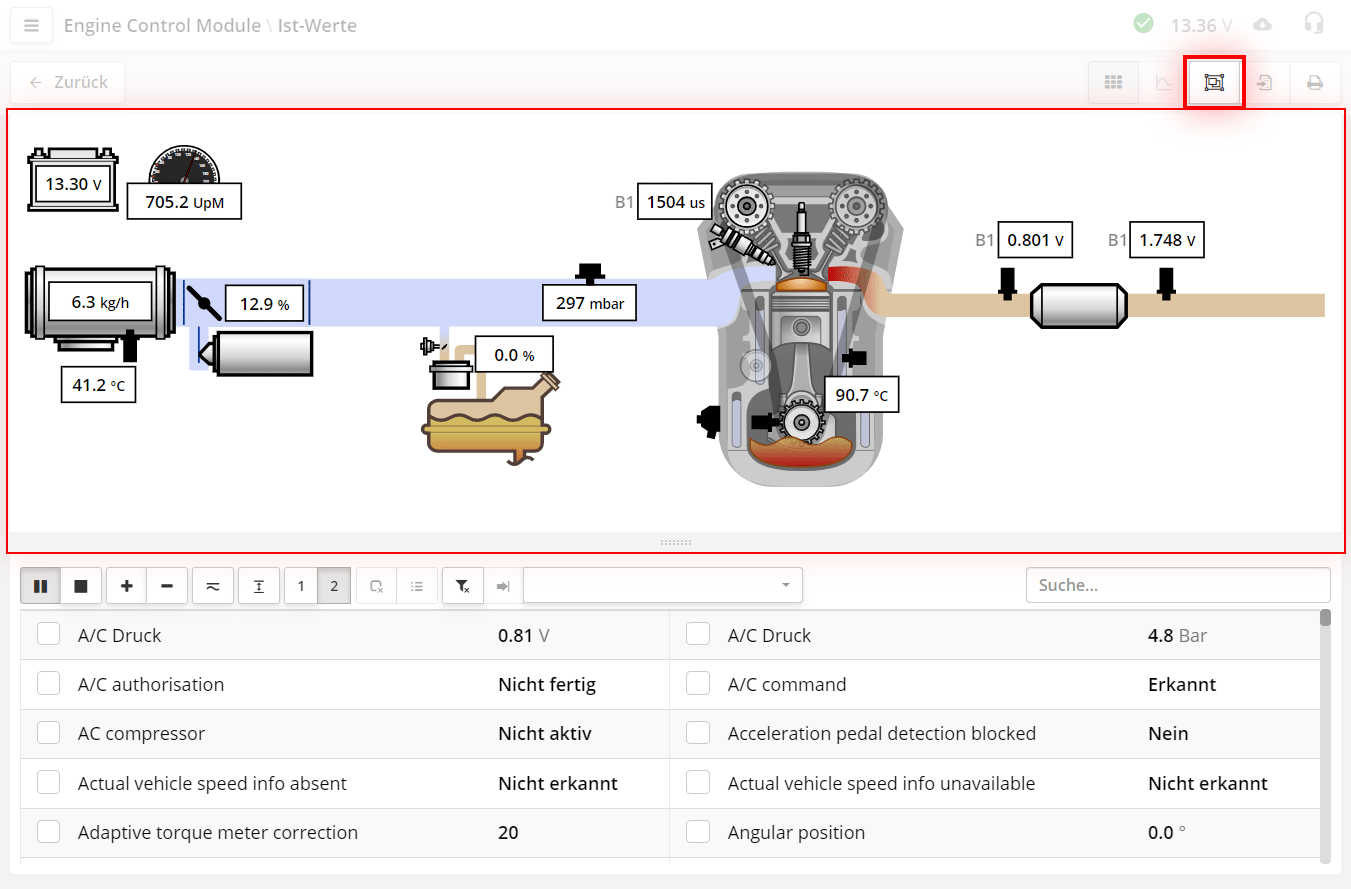
- aktiviert den "Schema"-Modus.
Das Schema zeigt die verbauten Komponenten des Systems und deren Schlüsselparameter an.
Das Schema wird für jedes Steuergerät automatisch anhand der vorhandenen Parameternamen generiert. Es ermöglicht eine schnelle Übersicht über das System - z.B. Anzahl der Lambdasonden, ob ein Luftmassenmesser oder ein Saugrohrdrucksensor verbaut ist usw.
Zudem dient das Schema zum schnellen Auffinden der zugehörigen Parameter.
Das Schema ist nicht auf allen Geräten verfügbar.
Auf Smartphones kann das Schema nicht angezeigt werden, da der Bildschirm zu klein ist.
Das in den Einstellungen gewählte Programmdesign hat ebenfalls keinen Einfluss auf die Schema-Anzeige.
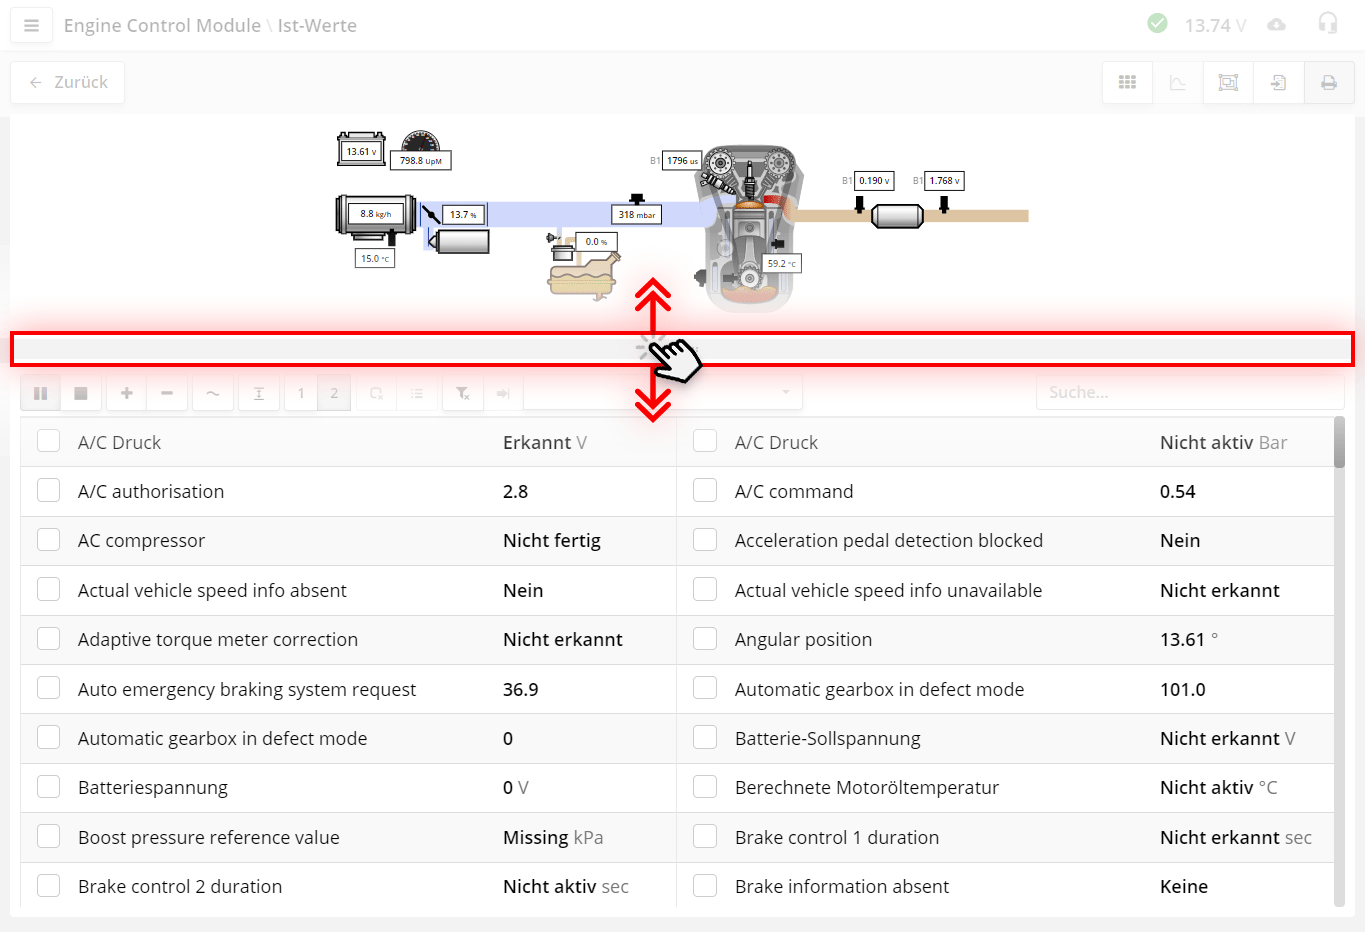
Zum Anpassen der Schemagröße ziehen Sie den Schieberegler. Dies ist besonders nützlich bei großen Schemata mit vielen Parametern.
Die Schemagröße wird in den Browser-Einstellungen gespeichert und bleibt bei der nächsten Nutzung erhalten.
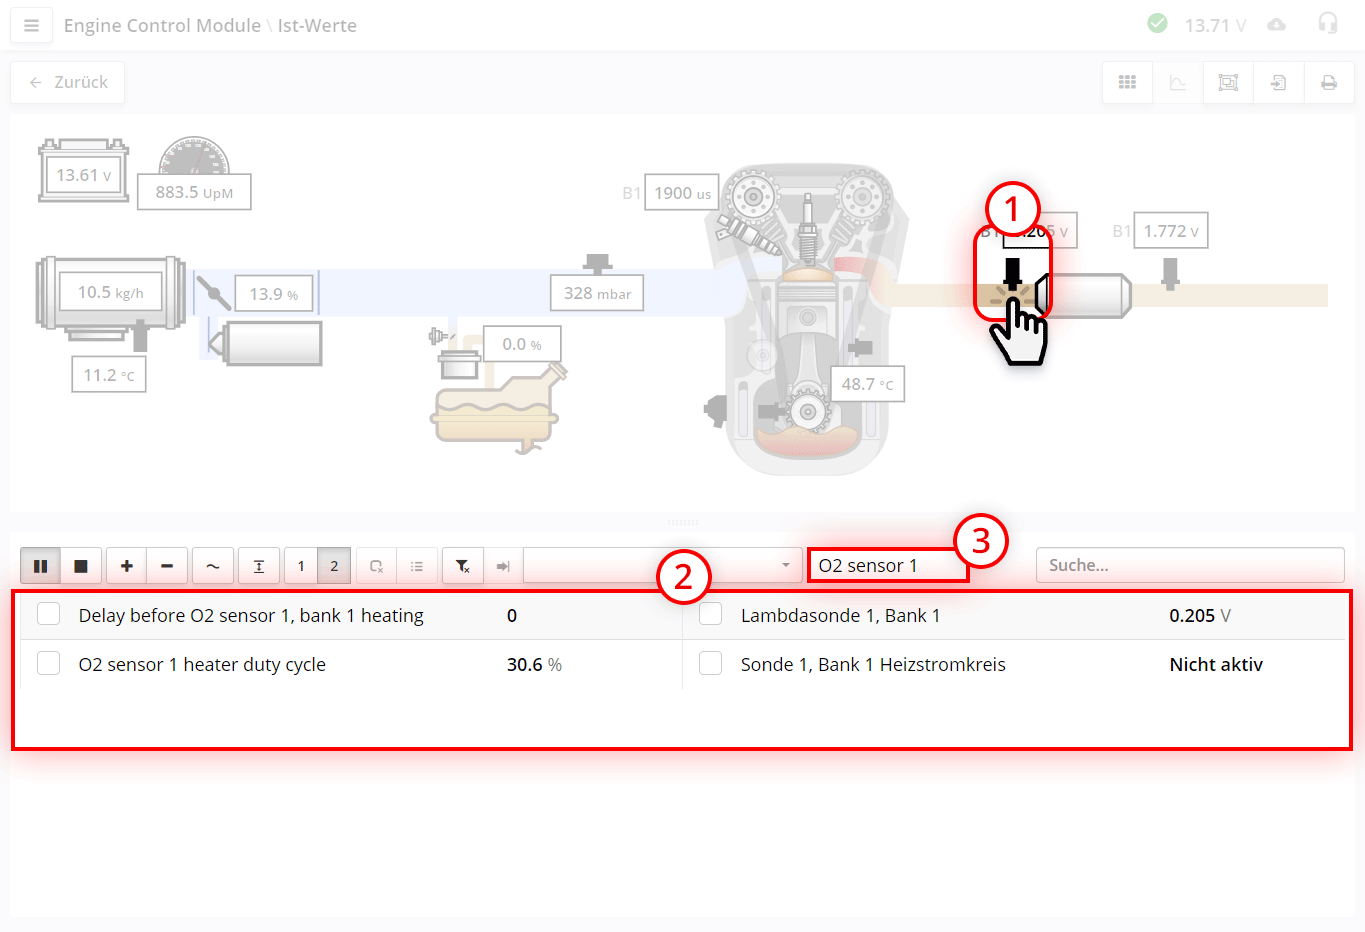
Das Schema ist im Wesentlichen eine Sammlung von Filtern.
Durch Anklicken verschiedener Schema-Komponenten können Sie relevante Parameter finden. Für Parameter aus verschiedenen Systemen können Sie die Auswahlkästchen aktivieren.

Komponenten mit gespeicherten DTC-Fehlercodes werden rot blinkend hervorgehoben.
Hinweis: Die Anzeige nicht verbauter Systeme im Schema ist kein Fehler. Manche Steuergeräte sind universell für Motorgruppen ausgelegt und enthalten Parameter für Systeme, die im konkreten Motor nicht vorhanden sind.
Schema und Indikatoren können gleichzeitig angezeigt werden.
Bei der Fehlerdiagnose wissen Sie oft genau, welche Parameter Sie benötigen, sind sich aber unsicher, ob diese im jeweiligen Steuergerät verfügbar sind.
Die relevanten Parameter hängen von der konkreten Situation und Fehlerart ab. Bei Startproblemen können beispielsweise folgende Parameter wichtig sein: Drehzahlsignal der Kurbelwelle, Status der Wegfahrsperre oder Einspritzzeiten.
Im Ist-Wertebereich können Sie gezielt Filter erstellen, um nur die benötigten Parameter anzuzeigen. Diese Filtersets ermöglichen den schnellen Zugriff auf vorausgewählte Parameter.
Bei Zündaussetzern benötigen Sie beispielsweise Drehzahldaten, Informationen zu Zündaussetzern und Zündwinkel. Für jeden Fehlerfall können Sie ein spezifisches Filterset anlegen und bei Bedarf einfach auswählen.
Filter sind im Wesentlichen Ihre persönliche Diagnosemethodik - nicht bloß Parameterlisten für bestimmte Steuergeräte. Mit Filtern erhalten Sie in zwei Klicks alle relevanten Parameter für den jeweiligen Diagnosefall.
Bei der Installation des Programms bieten wir einen grundlegenden Satz von Filtern an. Wir haben bewusst keine vollständige Liste erstellt, da Diagnostiker individuelle Methoden haben, und es einfacher ist, Filter hinzuzufügen, als sie zu entfernen. Sie können diese löschen, eigene erstellen oder bearbeiten. Dies erfolgt in den Einstellungen.
Wir empfehlen Ihnen, vor Beginn aller Arbeiten in Ruhe festzulegen, welche Filter Sie benötigen, und diese einmalig anzulegen. Es ist nicht notwendig, sie sofort zu befüllen. Später, während der Arbeit, können Sie Parameter für die Fehlersuche hinzufügen und sie dem gewünschten Filter zuweisen.
Die Arbeit mit Filtern erfolgt im Einstellungsfenster des Programms.
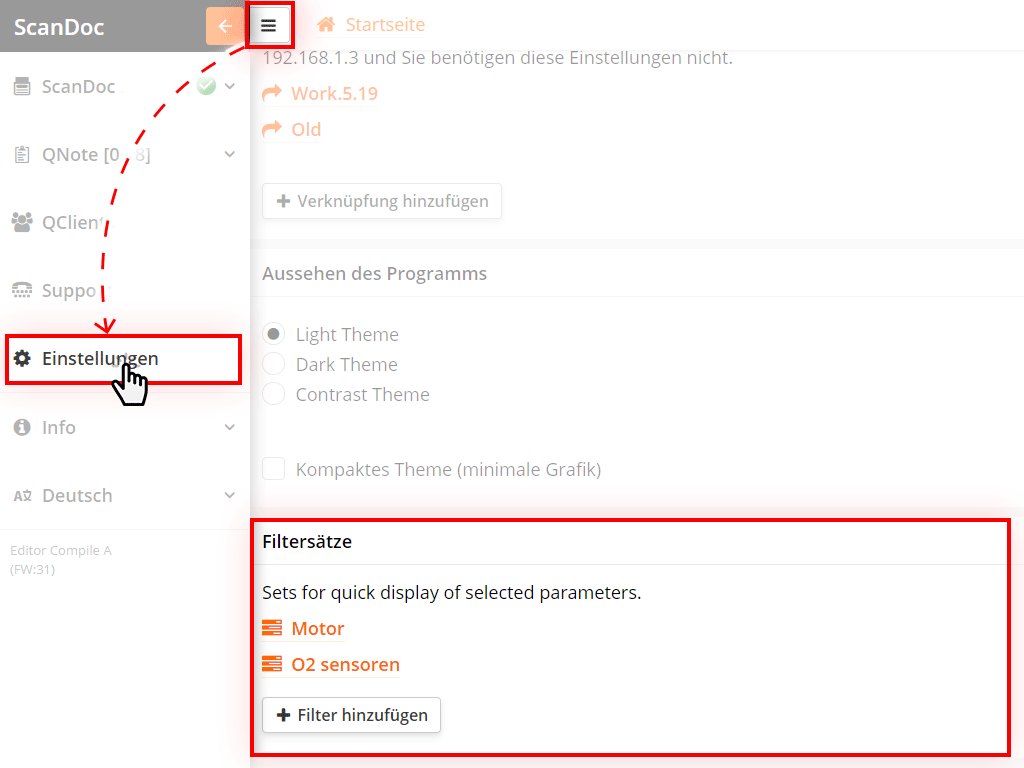
Klicken Sie auf die Schaltfläche im oberen Teil des Fensters, ein zusätzliches Seitenmenü wird angezeigt.
Klicken Sie im Seitenmenü auf "Einstellungen", Sie gelangen in das Einstellungsfenster des Programms.
Am Ende der Einstellungsliste befindet sich der Punkt "Filtersätze".
Um einen neuen Filter zu erstellen, klicken Sie auf die Schaltfläche Filter hinzufügen.
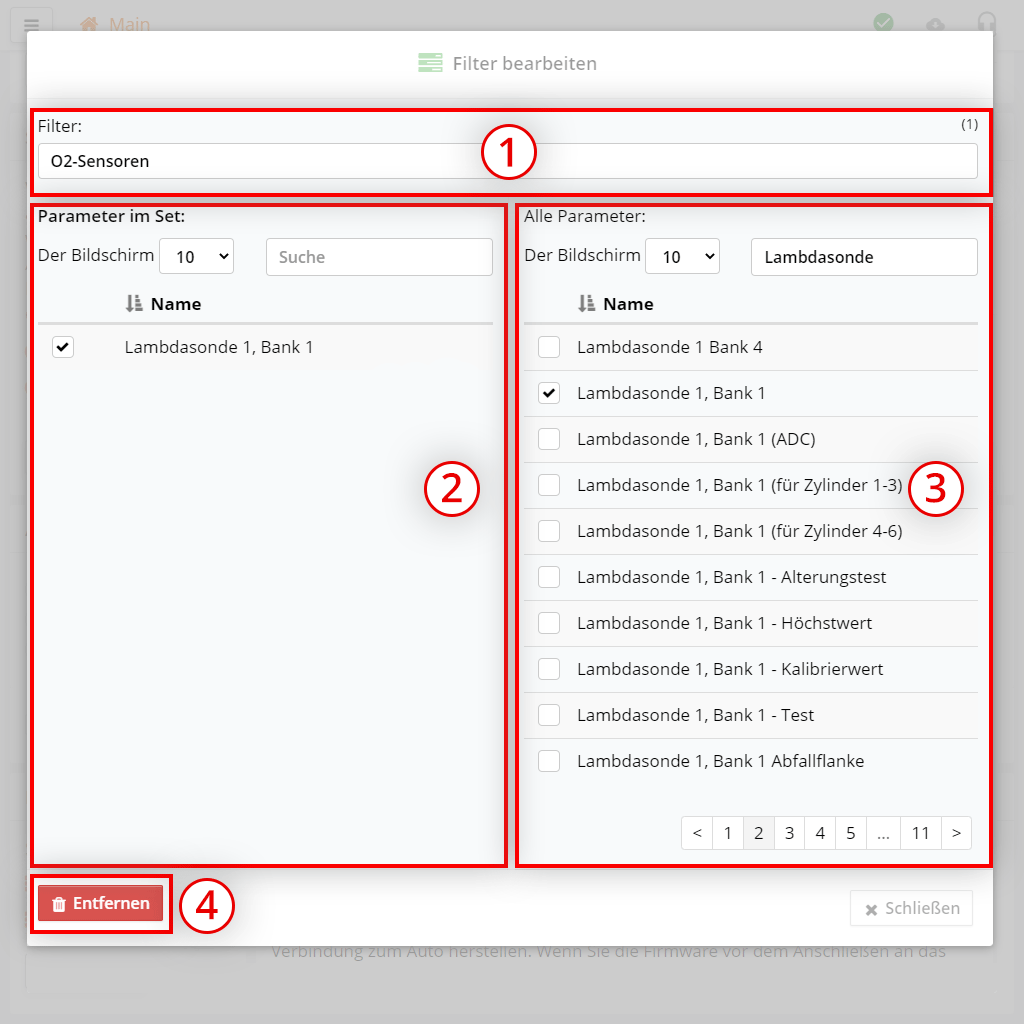
Das Fenster zur Filterbearbeitung wird angezeigt:
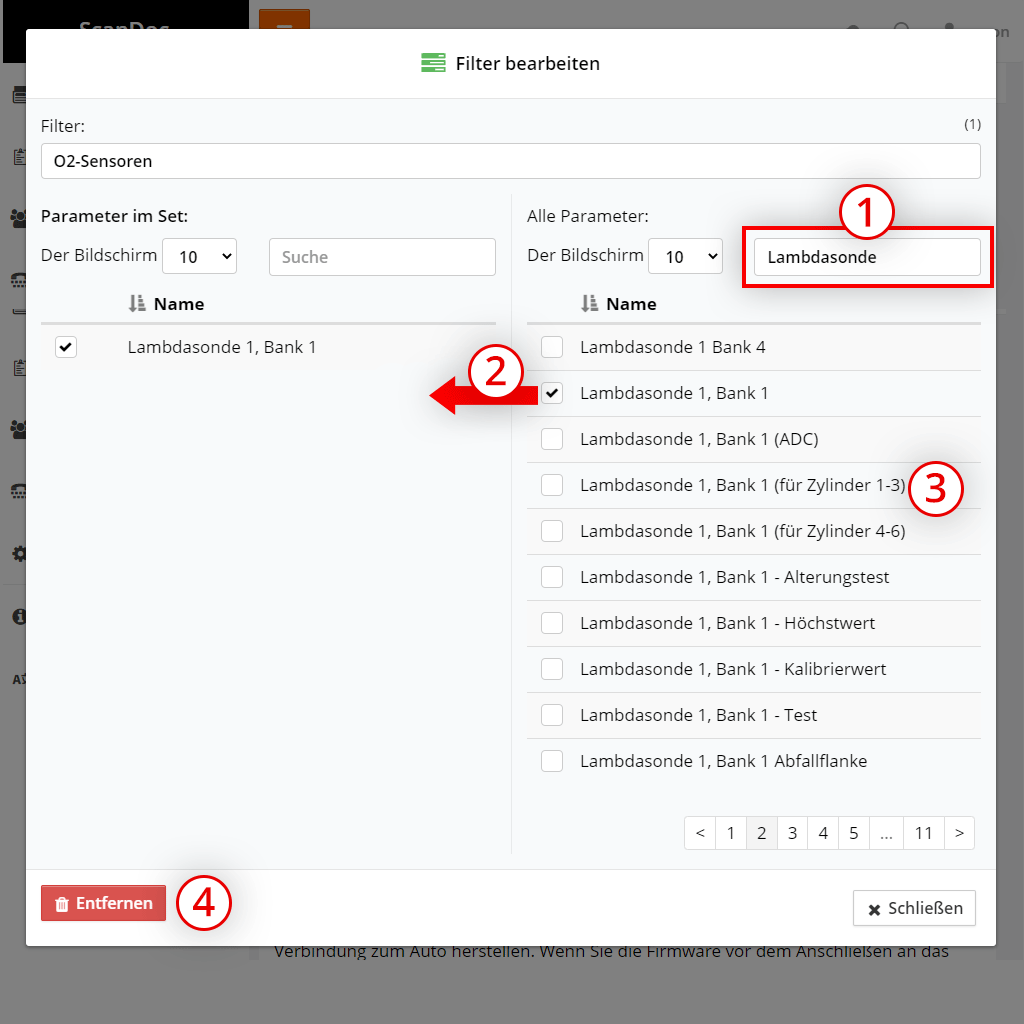
So erstellen Sie schnell einen Satz eigener Parameter:
Wenn Sie einen Parameter aus Ihrem Filter entfernen möchten, deaktivieren Sie das Häkchen in der linken Tabelle.
Der Filter wird automatisch gespeichert. Nach der Bearbeitung der Parameterliste klicken Sie einfach auf Schließen
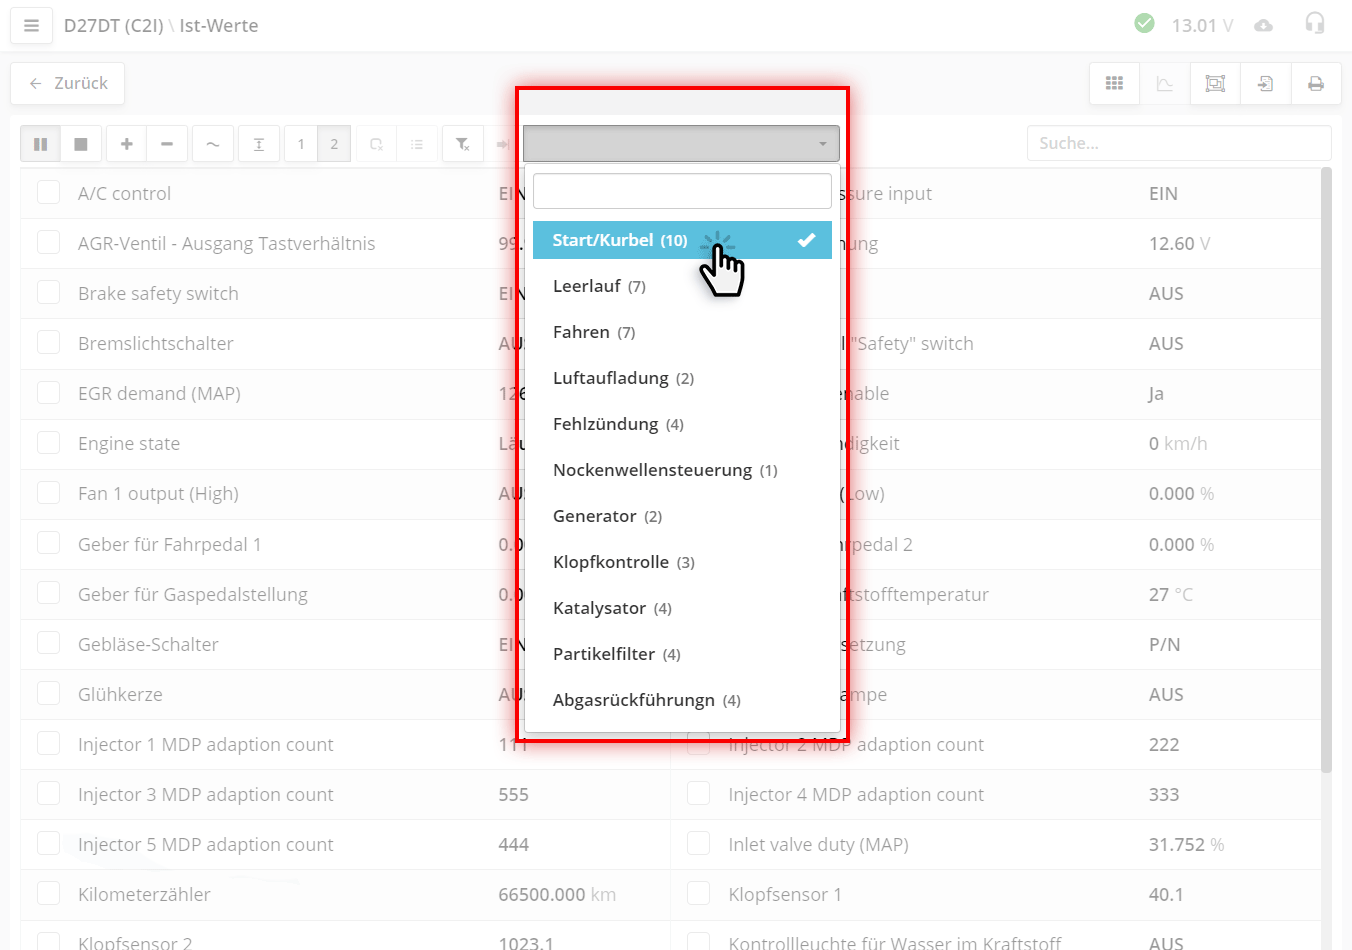
Filter können im Tab "Ist-Werte" angewendet werden.
Über der Parameterliste in den Ist-Werten befindet sich ein Dropdown-Menü mit Filtern.
Klicken Sie auf den Filternamen, um ihn auf die aktuelle Parameterliste anzuwenden.
Wenn Parameter aus dem Filter im aktuellen Steuergerät nicht vorhanden sind, erscheint der Filtername nicht im Dropdown-Menü.
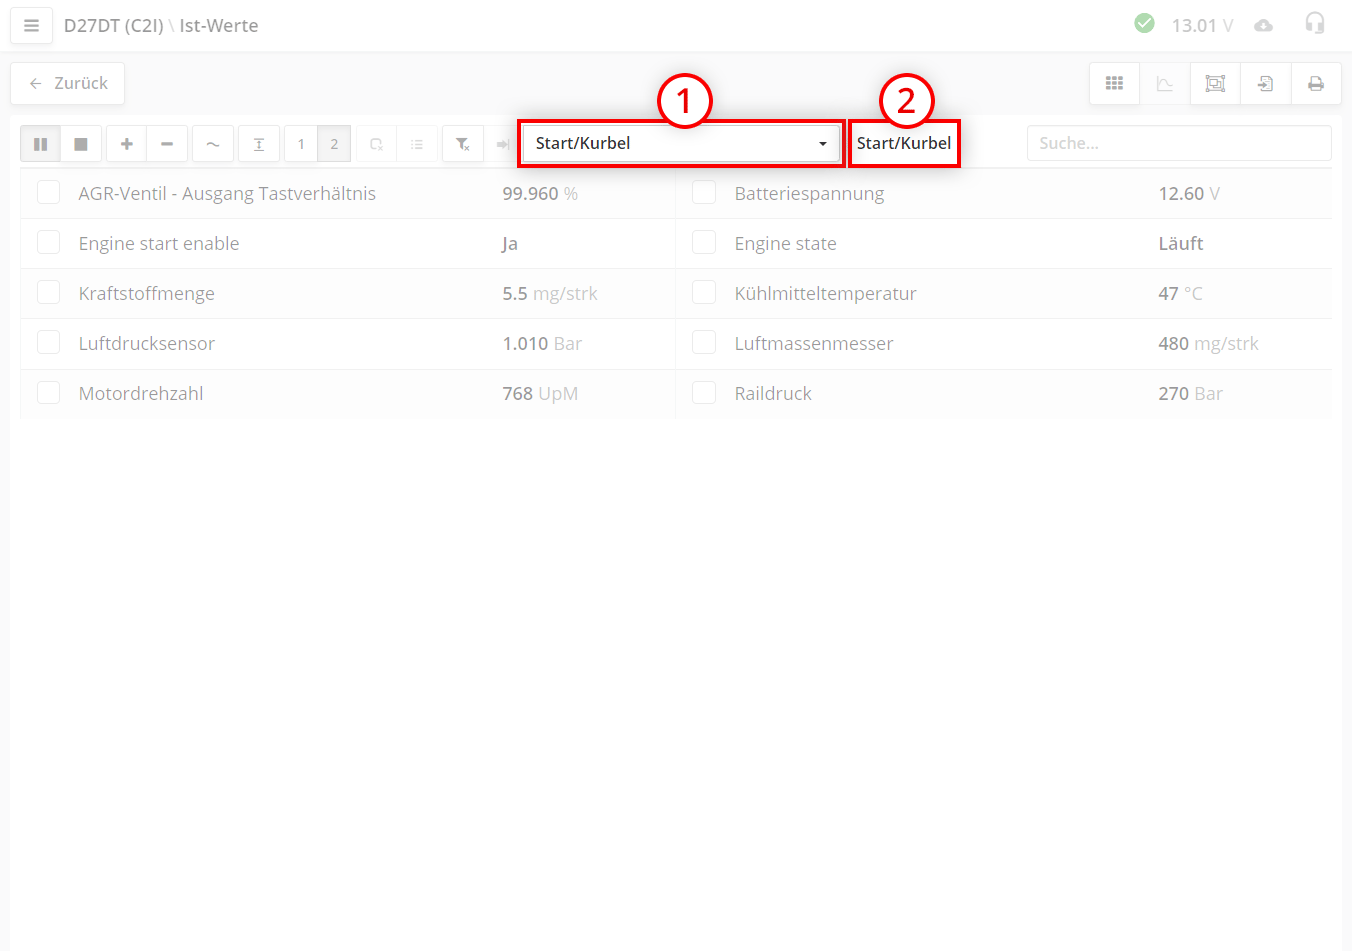
Wenn ein Filter angewendet wird, werden nur die Parameter angezeigt, die im Filter enthalten sind und im Steuergerät vorhanden sind.
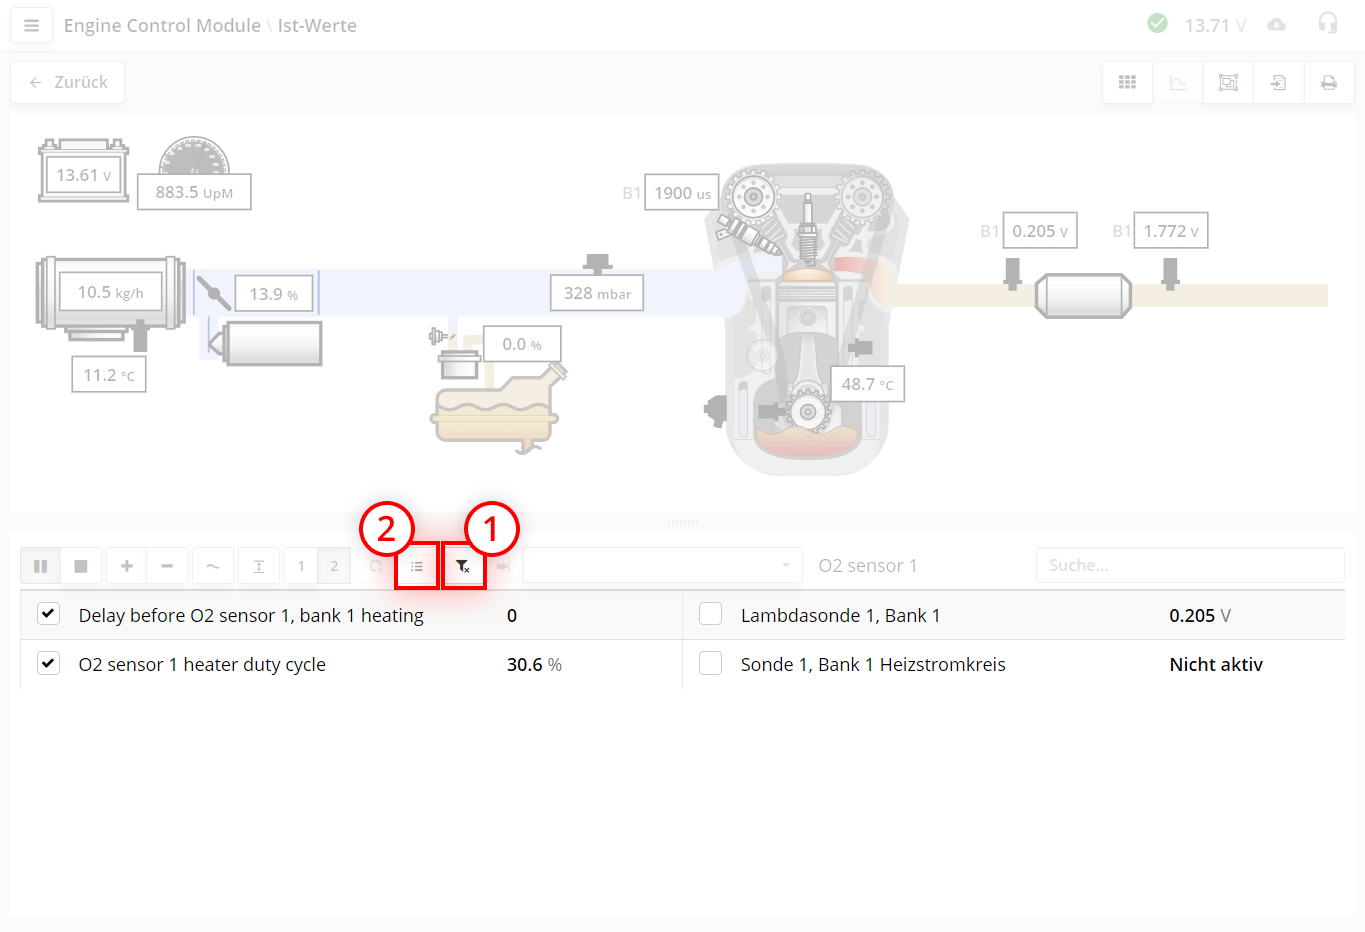
Um den Filter aufzuheben und wieder alle Parameter des Steuergeräts anzuzeigen, klicken Sie auf (Filter löschen).
Wenn Sie während der Arbeit einen Parameter sehen, den Sie vergessen haben in den Filter aufzunehmen, können Sie ihn schnell hinzufügen, ohne die Arbeit zu unterbrechen.
Parameter können nur zu bereits erstellten Filtern hinzugefügt
werden.
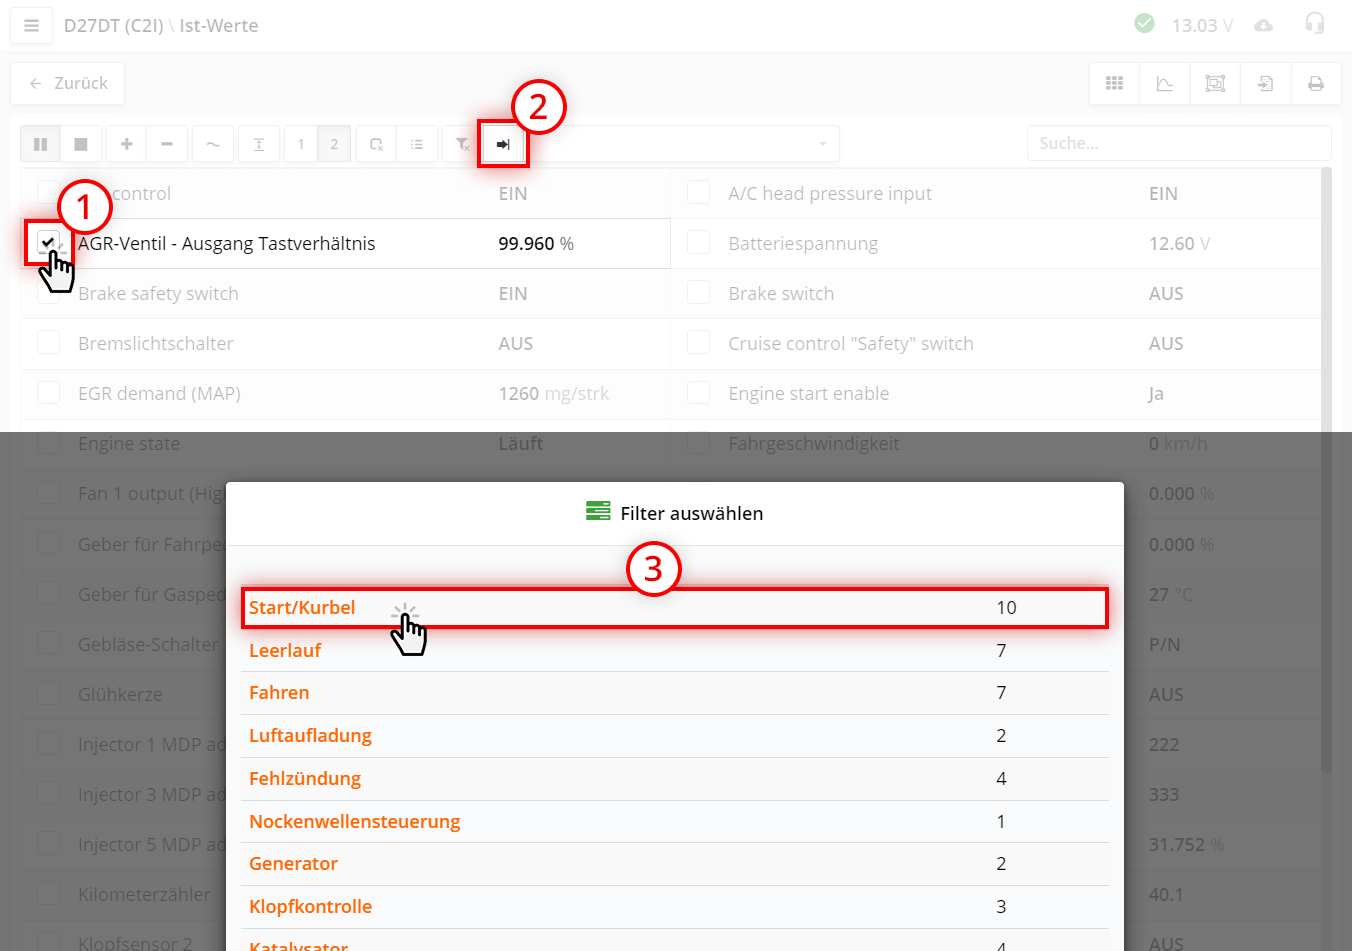
So fügen Sie schnell Parameter zu einem bestehenden Filter hinzu:
Die ausgewählten Parameter sind nun im Filter enthalten.
Gleiche oder ähnliche Parameter in verschiedenen Steuergeräten können unterschiedliche Namen haben.
Fügen Sie Parameter während der Arbeit zum Filter hinzu. Mit der Zeit sammeln sich alle möglichen Varianten der benötigten Parameter im Filter an, und Sie müssen nur noch selten neue Parameter hinzufügen.
Machen Sie sich keine Sorgen, wenn der Filter Parameter enthält, die in diesem Steuergerät nicht vorhanden sind. Das Programm zeigt nur die Parameter an, die tatsächlich in diesem speziellen Steuergerät vorhanden sind, auch wenn der Filter hunderte ähnlicher Parameter enthalten kann. Hauptsache, sie sind für den jeweiligen Fall relevant.
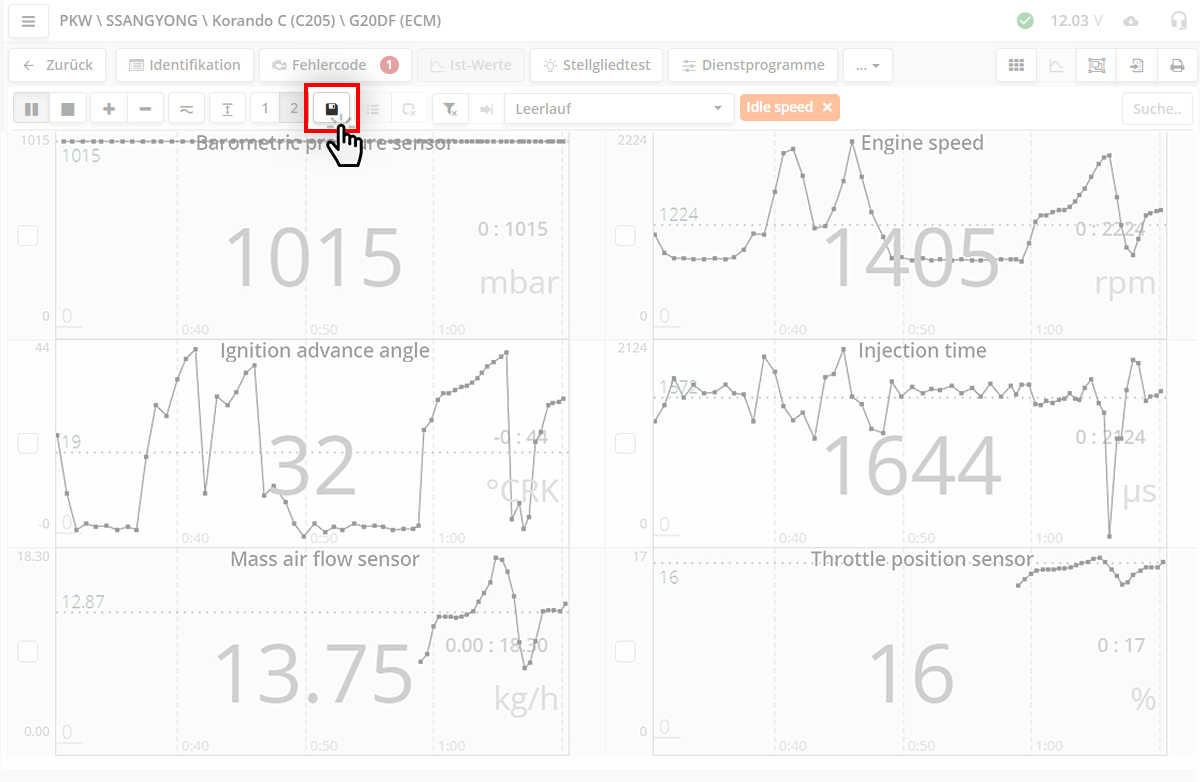
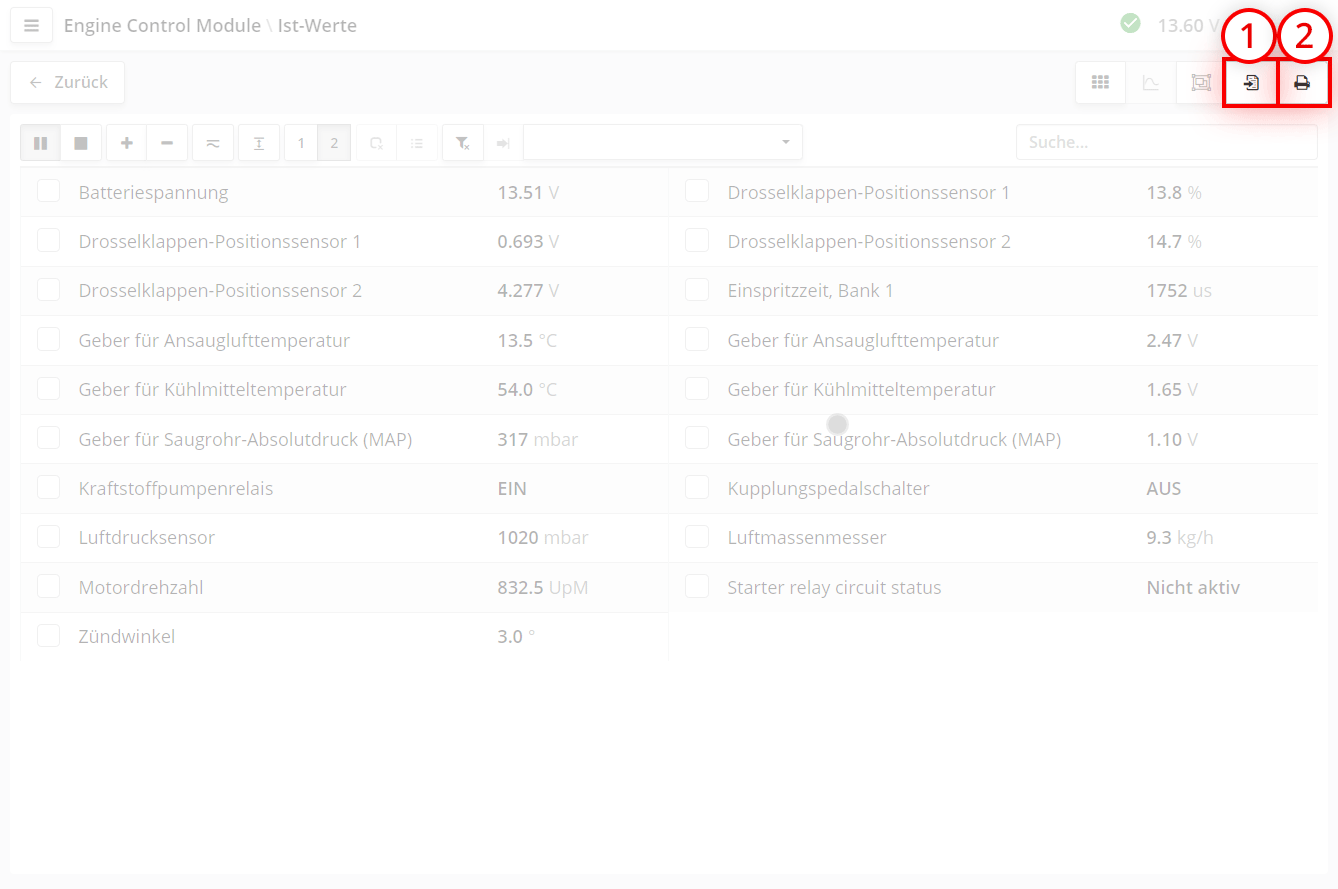
Sie können die Ist-Werte speichern. Klicken Sie dazu im Ist-Werte-Fenster auf
Die Daten werden im Clients-Programm auf dem aktuellen Gerät gespeichert.
Bei erfolgreicher Speicherung erscheint eine Benachrichtigung in der oberen rechten Ecke des Programms.
Viele Steuergeräte ermöglichen die temporäre Steuerung von Aktoren (Einspritzdüsen, Motoren, Magnetventile) zur Funktionsprüfung.
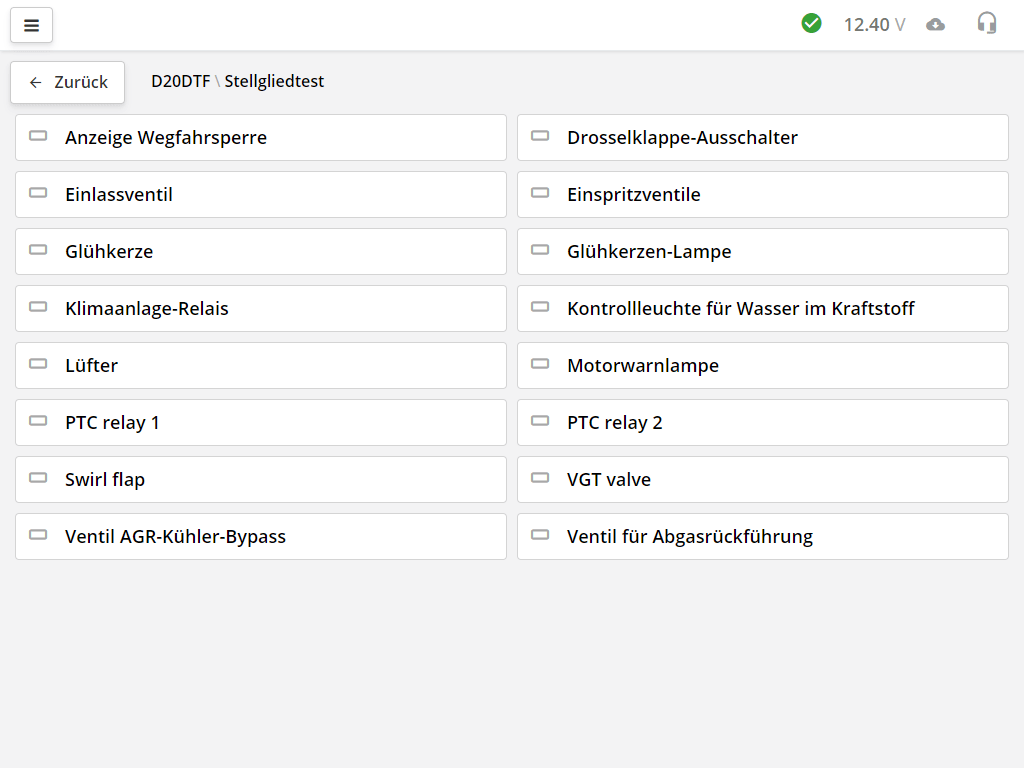
Die verfügbaren Aktortests hängen vom jeweiligen Steuergerätemodell ab.
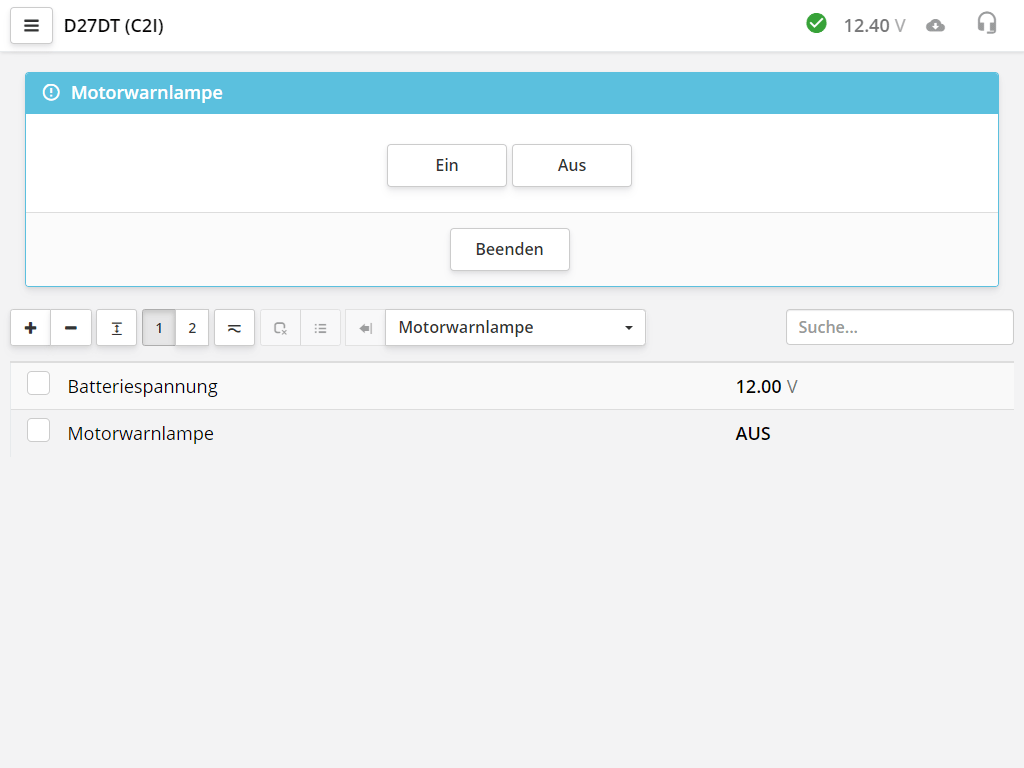
Nach Auswahl eines Aktors kann dieser über Tasten oder Regler gesteuert werden. Zur besseren Übersicht werden oft aktuelle Parameterwerte angezeigt. Jeder Aktor wird auf spezifische Weise getestet.
Oft ist es notwendig, zusätzliche Parameter zu überwachen. Für jeden Test steht ein Filter zur Verfügung. Falls dafür Parameter vorhanden sind, wird er automatisch aktiviert.
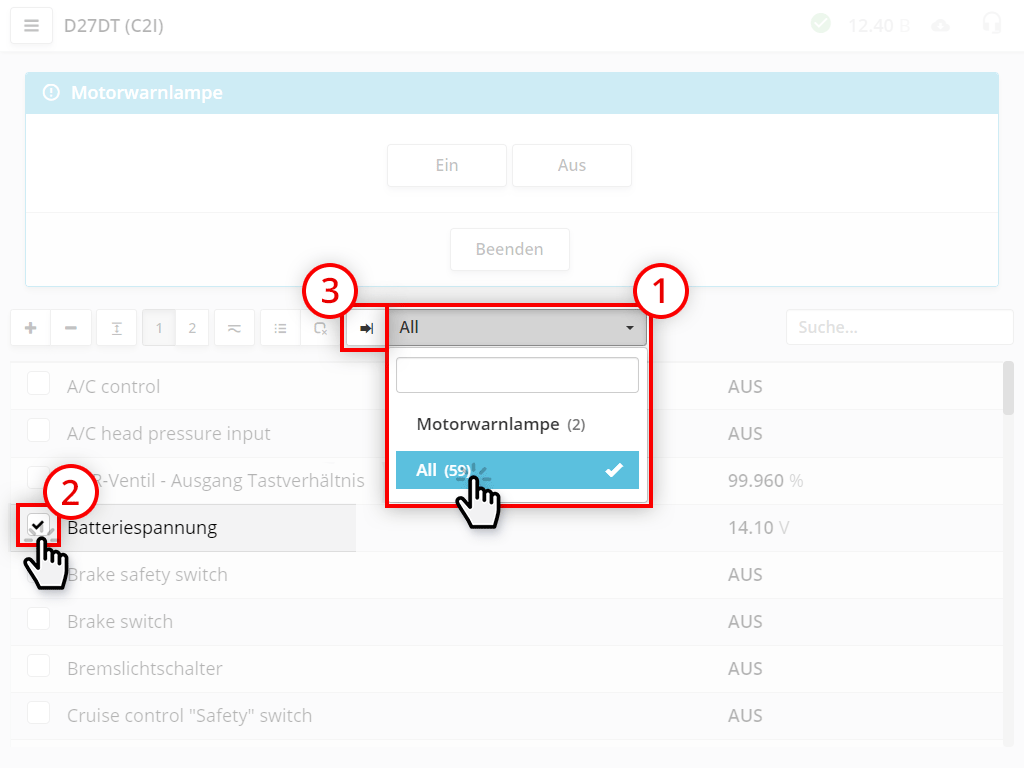
Falls bestimmte Parameter fehlen, können Sie diese selbst hinzufügen:
Es gibt Hersteller, die keine Tests parallel zu den Ist-Werten erlauben. Zum Beispiel die VAG-Gruppe, daher sind dort nur Tests mit den vom Hersteller vorgesehenen Ist-Werten möglich.
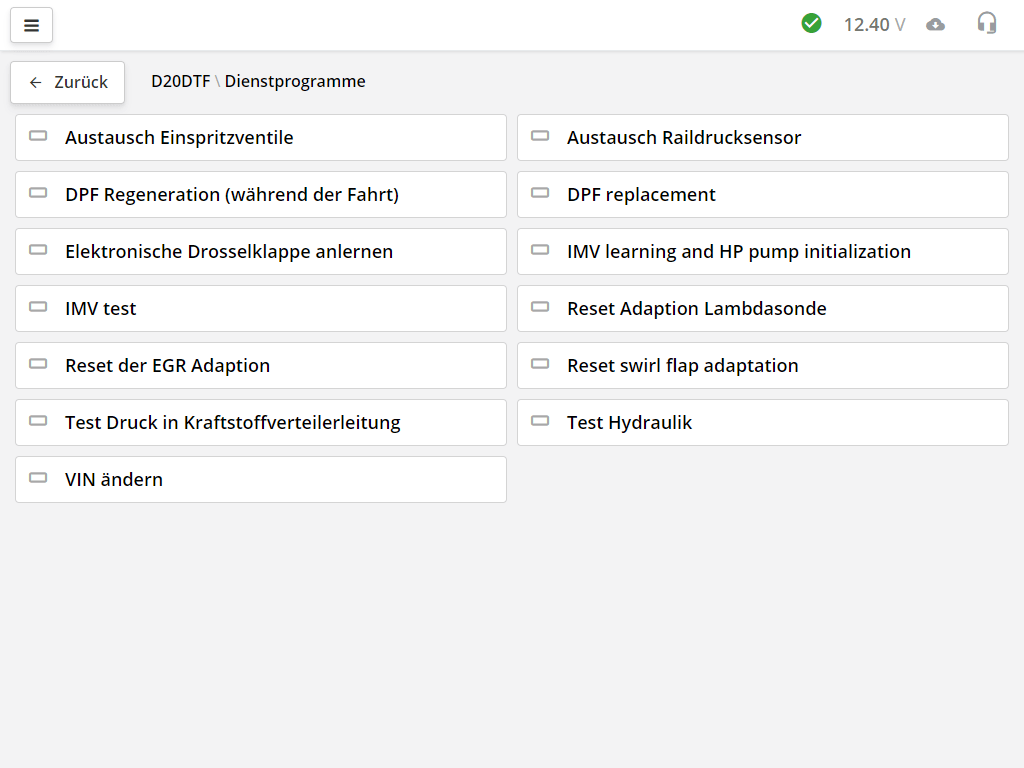
In diesem Bereich befinden sich spezialisierte Steuergerätefunktionen wie Adaptionen, Rücksetzungen etc.
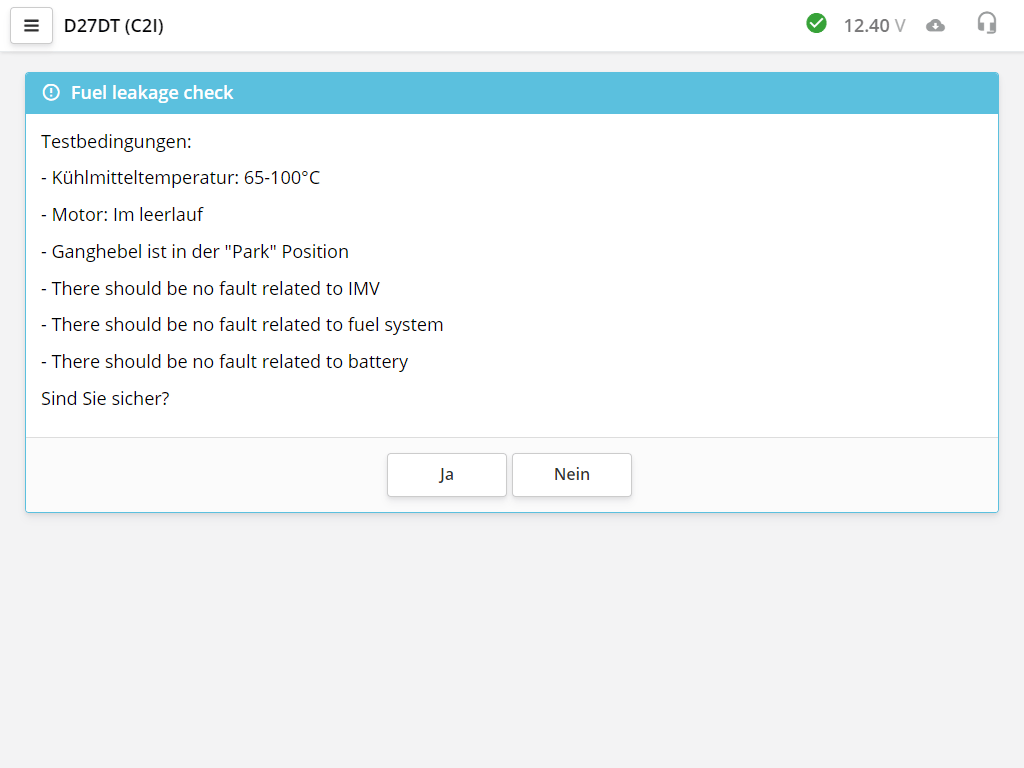
Dienstprogramme werden ebenfalls durch Klick auf die entsprechende Kachel gestartet. Lesen Sie die Beschreibung sorgfältig durch (falls vorhanden) und beachten Sie die Ausführungsbedingungen.
Egal welche Funktion Sie starten - das erste Fenster ist immer ein Informationsfenster. Ein Testdienstprogramm oder Codierung wird niemals im ersten Schritt direkt ausgeführt. Daher können Sie bedenkenlos ein Dienstprogramm starten und die Beschreibung lesen.
Bestimmte Komponenten des Fahrzeugsystems erfordern nach dem Einbau neuer Teile oder in regelmäßigen Abständen eine Adaptionsprozedur. Dies kann beispielsweise die Anpassung des Steuergeräts an die Endwerte des Drosselklappensensors oder der Kupplungspedalstellung sein.
Das Motorsteuerungssystem passt sich an Veränderungen der Sensorparameter an. Beim Einbau neuer Ersatzteile müssen zuvor gespeicherte Korrekturwerte zurückgesetzt werden. Hierfür ist ein Reset der Adaptionen erforderlich.
Wird bei Ölwechsel durchgeführt. Das Reset-Verfahren variiert je nach Hersteller. In einigen Fällen genügt ein einfacher Reset-Knopf, in anderen Fällen muss das nächste Warnintervall programmiert werden. Weitere Details finden Sie in der Fahrzeugreparaturdokumentation.
Um die Vielfalt der Steuergerätevariationen und Softwareversionen zu reduzieren, produzieren Hersteller universelle Steuergeräte, die an die jeweilige Fahrzeugausstattung angepasst werden.
Die Konfiguration wird oft auch als Codierung (coding) bezeichnet.
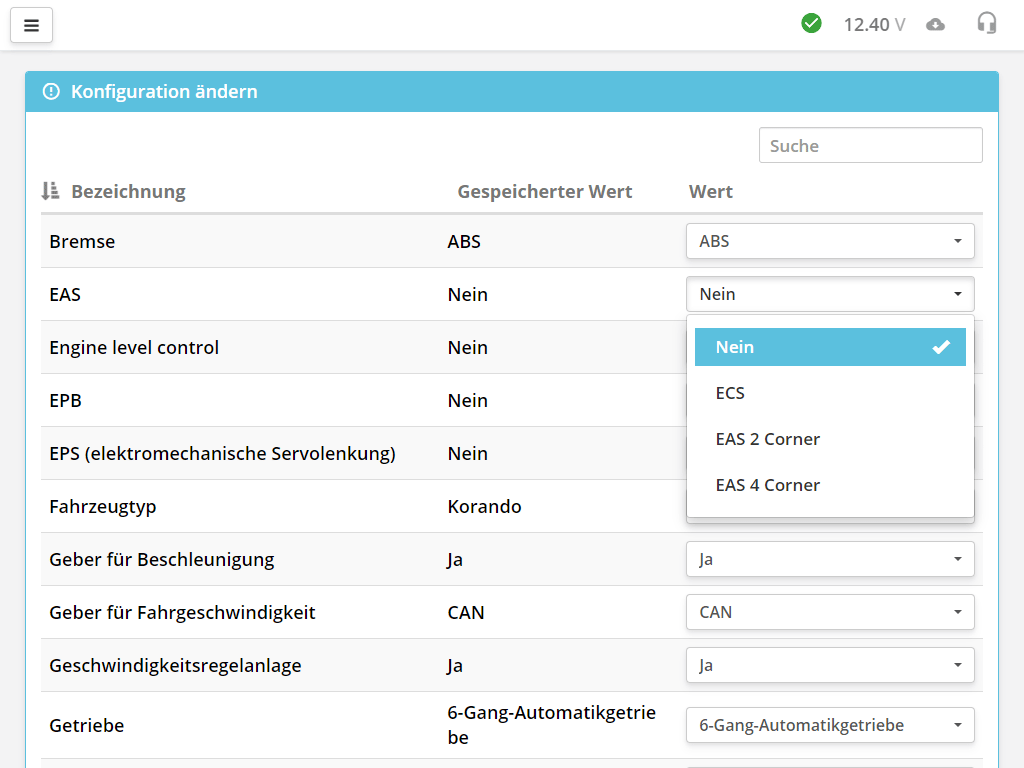
Die Anzahl der Codierungsparameter hängt vom jeweiligen Steuergerätemodell ab.
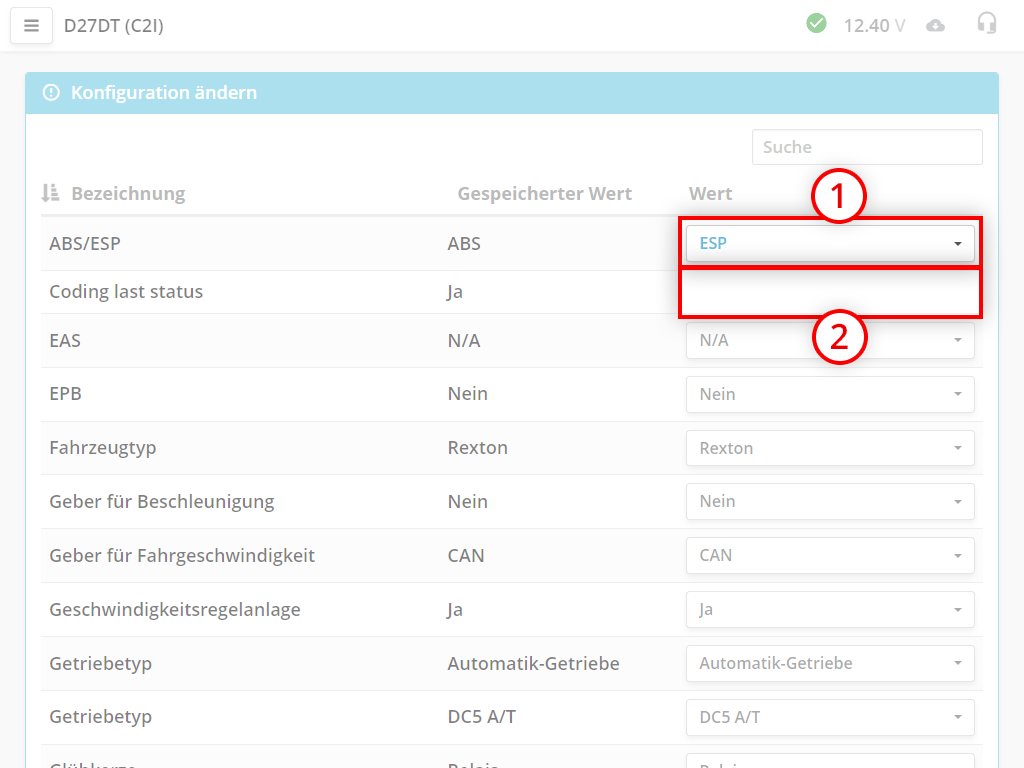
Hier sehen Sie den Parameternamen, seinen aktuellen Status und den neuen Status, der geändert werden kann.
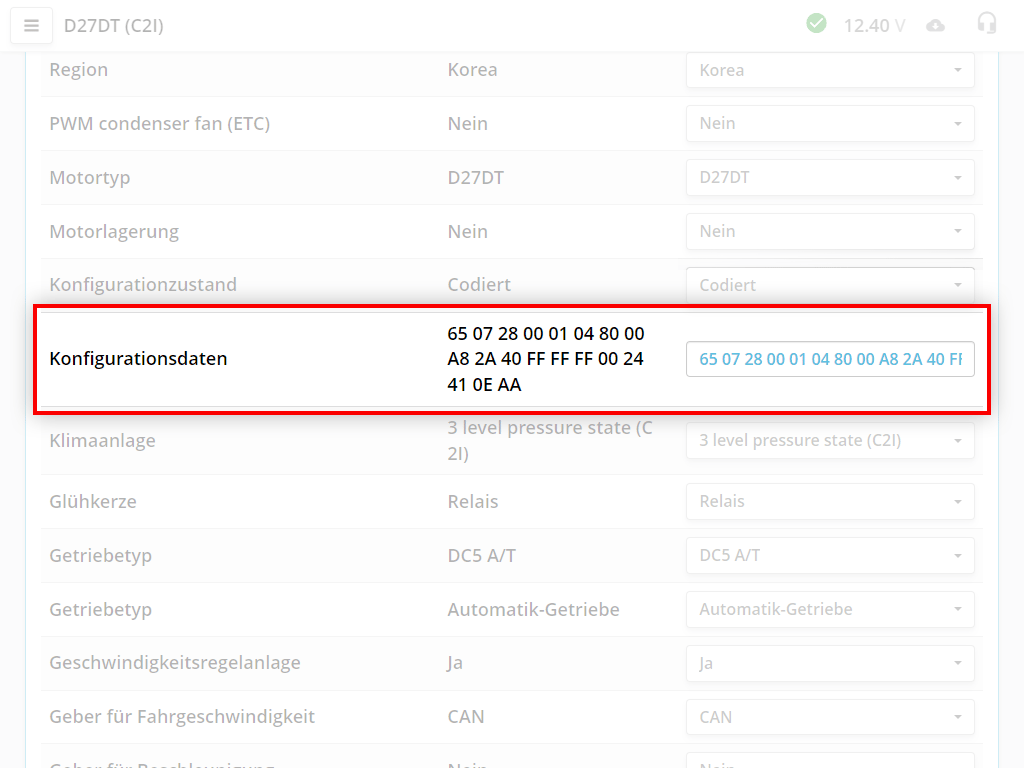
Unter den Parametern befindet sich "Konfigurationsdaten". Dies ist ein hexadezimaler Code der gesamten Konfiguration. Änderungen in den Dropdown-Menüs wirken sich direkt auf diesen Code aus.
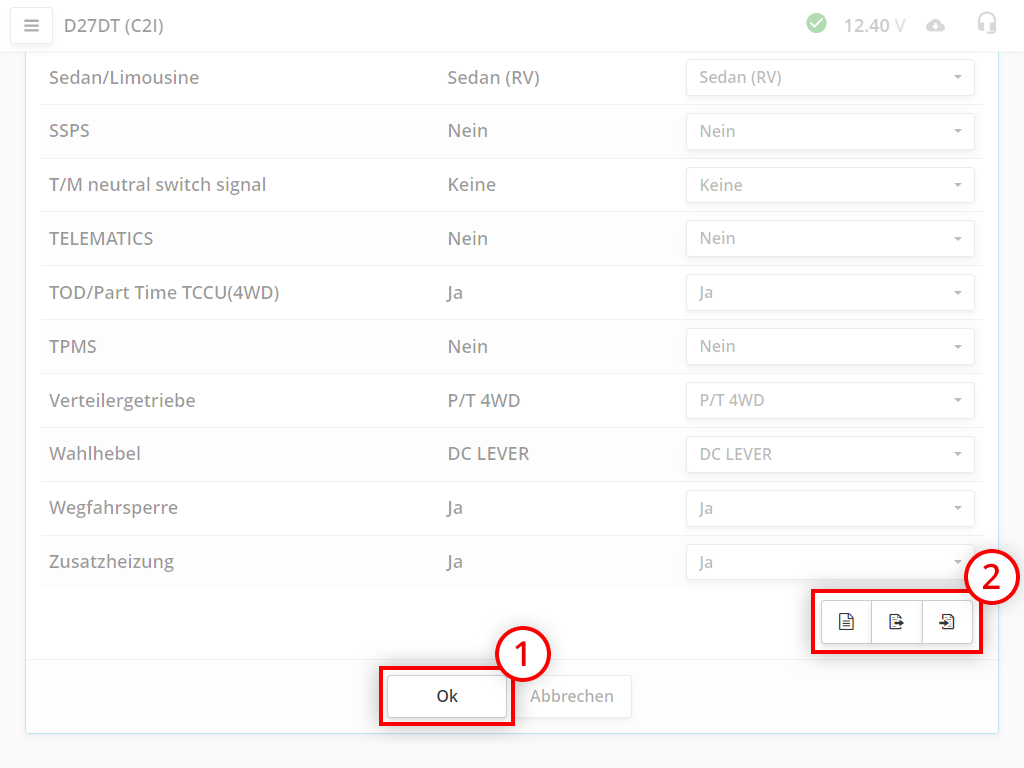
Ändern Sie die gewünschten Parameter und klicken Sie auf Ok. Der Scanner schreibt die Daten in das Steuergerät.
Zusätzliche Funktionen für die Konfigurationsverwaltung:
Jede Änderung wird automatisch gespeichert und mit der internen Bezeichnung des Steuergeräts verknüpft. Über die Schaltfläche (Änderungshistorie) können Sie vorgenommene Änderungen rückgängig machen.
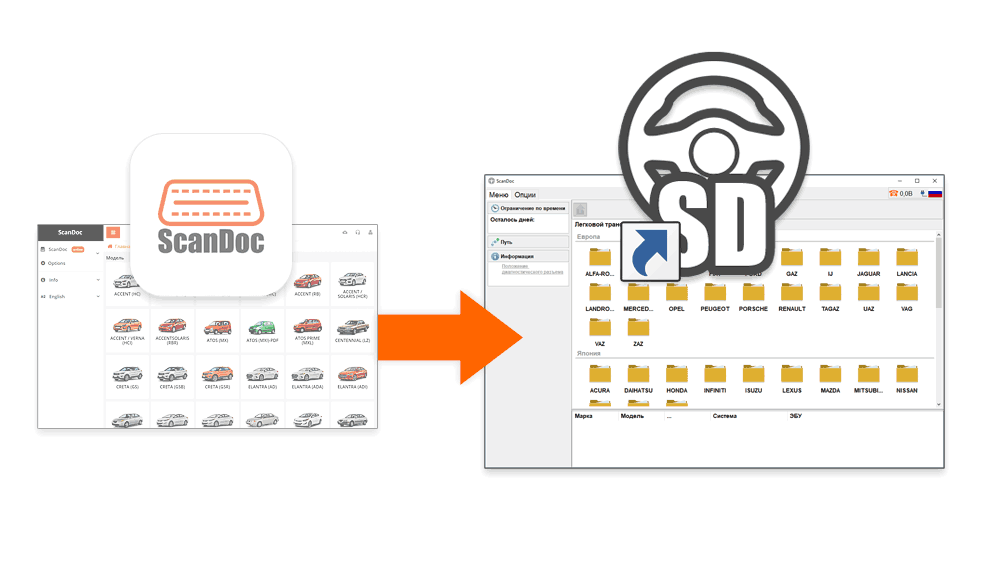
Sie können entweder mit der alten oder der neuen Programmversion arbeiten. Der Scanner muss jedoch mit der Firmware der Version ausgestattet sein, mit der Sie arbeiten möchten. Wenn Sie zur anderen Programmversion wechseln möchten, müssen Sie den Scanner in den Bootloader-Modus versetzen und ein Firmware-Update durchführen.
Sollte das Update aus irgendeinem Grund fehlschlagen, können Sie den Bootloader-Modus durch Ausschalten und erneutes Einschalten des Geräts beenden.
Jetzt muss die Firmware des Adapters aktualisiert werden.
Sollte das Update aus irgendeinem Grund fehlschlagen, können Sie den Bootloader-Modus durch Ausschalten und erneutes Einschalten des Geräts beenden
Nun muss die Firmware des Adapters aktualisiert werden.
Verbinden Sie den Scanner mit dem Computer und starten Sie das ScanDoc-Programm.
Der Scanner ist nun bereit für die Arbeit mit der alten Programmversion!

Der Scanner ist nun bereit für die Arbeit mit der alten Programmversion!